Reverse Plank Leg Lift
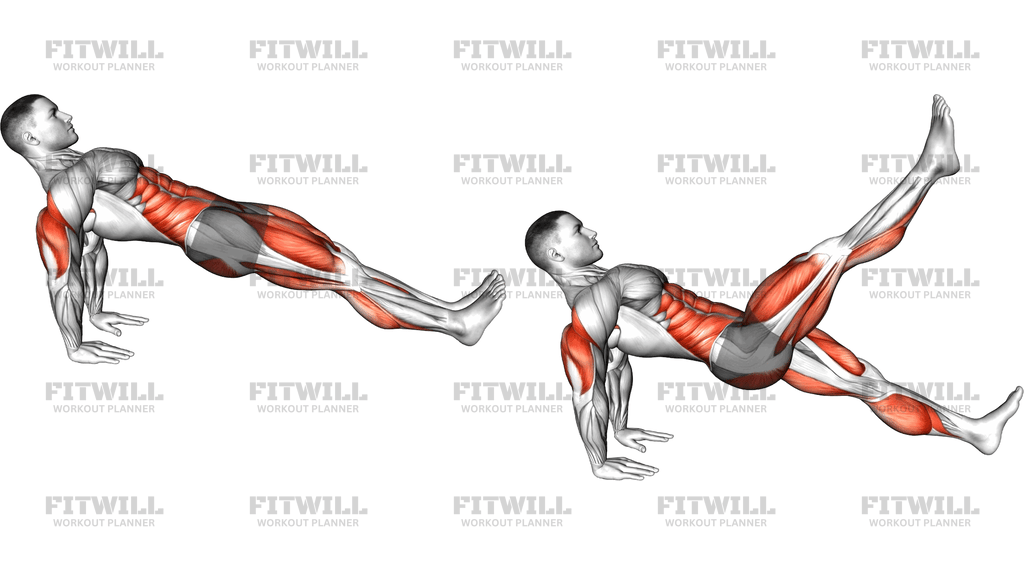
The Reverse Plank Leg Lift combines the classic reverse plank hold with an alternating leg raise, so you are not just holding a static position — you are challenging it one leg at a time. You start seated on the floor with your legs extended, place your hands behind your hips with fingers pointing forward or slightly out, then press through your palms and heels to lift your hips until your body forms a straight line from shoulders to feet. From there, one leg lifts toward the ceiling while the other foot and your hands support your weight.
This movement is valuable because the reverse plank position is one of the few bodyweight setups that loads the posterior chain — the glutes, hamstrings, and lower back — while the shoulders extend behind the body. Most floor work for the core happens in front-facing positions, so the reverse plank leg lift fills a real gap, especially for people who spend long hours sitting and need extension-based strength rather than more flexion.
The primary work comes from the glutes, which hold the hips up and drive the lifted leg upward, and from the hamstrings and lower back, which keep the pelvis level. The abs and deep core work isometrically to stop the ribcage from flaring and the lower back from sagging as the load shifts to one supporting leg. The shoulders and triceps hold the upper body steady, and the calves and ankle of the planted foot stabilize you throughout.
Setup details matter a lot here. If your hands are planted too far behind you or your shoulders shrug up toward your ears, the position becomes a shoulder strain instead of a hip exercise. Keep the palms flat, fingers spread, shoulders pulled down and back, and the chest open. The height of your hips is set by squeezing the glutes, not by pushing the belly toward the ceiling.
To execute well, lift the hips first and own the straight-line position before adding the leg lift. Raise one leg with control to roughly hip height or slightly above, pause briefly, lower it without letting the hips drop, then switch sides. The moment your hips sag or your supporting knee bends to compensate, the set is over — reset rather than grinding through bad reps.
This exercise fits well into warm-ups, core circuits, and glute-focused bodyweight sessions. It needs no equipment beyond a bit of floor space, so it travels easily. People with wrist sensitivity should test the position with a short hold first, and anyone working through shoulder issues should get clearance before loading the extended-arm position.
[ Workout Log & Planner ]
Put your next workout in Fitwill
Keep your plan and training log ready when you are.


Instructions
- Sit on the floor with your legs extended in front of you and place your palms flat on the floor just behind your hips, fingers pointing forward or slightly turned out.
- Press through your palms and heels to lift your hips off the floor until your body forms one straight line from your shoulders through your hips to your feet, with your head in line with your spine.
- Squeeze your glutes and brace your abdominal wall so your ribcage stays down and your pelvis stays level before any leg movement begins.
- Draw your shoulder blades down and back, keep your arms straight, and let your chest stay open rather than letting your shoulders roll forward.
- Shift your weight slightly onto one supporting foot, then lift your other leg upward with control to about hip height or a little higher, keeping the knee mostly straight.
- Pause for a beat at the top of the lift without letting your hips rotate or drop toward the floor.
- Lower the raised leg slowly until it meets the level of the supporting leg, keeping the hips lifted the entire time.
- Repeat the lift on the opposite side to complete one alternating rep, or complete all reps on one side before switching.
- Exhale as you lift the leg, inhale as you lower it, and keep breathing steadily through the hold instead of holding your breath.
- When the set ends, lower your hips to the floor with control, shake out your wrists, and reset your hand position before the next set.
Tips & Tricks
- If your hips drop as soon as one leg leaves the floor, the load has exceeded your glute strength — hold the plain reverse plank longer before adding lifts, or lift the leg only a few inches.
- Watch for the ribcage pushing toward the ceiling as you lift the leg; pull the lower ribs down with your abs so the work stays in the hips and core instead of hanging on the lower back.
- Splaying the lifted foot outward or letting the hips rotate is a common giveaway of weak hip control — point the toes forward and keep both hip bones level throughout the lift.
- Spread your fingers wide and press the base of the palm and the fingertips into the floor to distribute wrist load; if your wrists complain, shift your hands slightly wider or angle the fingers out a few degrees.
- Avoid shrugging your shoulders up around your ears — think of pushing the floor away to keep space between your shoulders and neck.
- A slightly bent knee on the lifting leg is acceptable if tight hamstrings stop a straight-leg raise, but the hips must never drop to buy extra height.
- Quality beats speed here; a two-second lift and a two-second lower with a motionless pelvis does more than fast, bouncy reps that let momentum do the lifting.
- Keep the supporting leg active as well — drive that heel into the floor to keep the whole chain engaged rather than letting the planted side go slack.
- If the full position is too demanding, start with your knees slightly bent and feet flat, which shortens the lever and makes holding the hips up easier while you build strength.
Frequently Asked Questions
Which muscles does the Reverse Plank Leg Lift target?
The glutes are the primary movers, holding the hips up and raising the working leg, with strong support from the hamstrings and lower back. The abs and deep core work isometrically to keep the pelvis and ribcage stable, while the shoulders and triceps hold the upper body in place.
Is the Reverse Plank Leg Lift suitable for beginners?
Yes, with modifications. Beginners should first master a plain reverse plank hold for 15-30 seconds, then add small, slow leg lifts. Keeping the knees slightly bent or lifting the leg only a few inches are both valid starting points.
How high should I lift my leg during the Reverse Plank Leg Lift?
Aim for roughly hip height or slightly above, but only as high as you can go without the hips rotating or dropping. Height achieved by tilting the pelvis is not useful range — control matters more than the angle.
Why do my wrists hurt during the Reverse Plank Leg Lift?
The extended-arm position loads the wrists at a sharp angle, so discomfort usually comes from hand placement or limited wrist mobility. Spread your fingers, press through the whole palm, angle the fingers slightly outward, and build up hold times gradually rather than jumping into long sets.
What is the most common mistake in the Reverse Plank Leg Lift?
Letting the hips sag or drop each time one leg lifts, which shifts the work from the glutes to the lower back. Another frequent error is arching the ribcage toward the ceiling instead of keeping the trunk braced in one straight line.
Can I substitute the Reverse Plank Leg Lift with another exercise?
If the position is unavailable to you, a glute bridge with alternating leg extensions trains a similar hip-extension pattern from a friendlier angle. A standard reverse plank hold without the lifts is the closest substitute when the dynamic portion is the limiting factor.
How many reps and sets of the Reverse Plank Leg Lift should I do?
Two to four sets of 8-12 alternating lifts per side works well for strength and control, or hold the plank position while performing slower lifts for 20-40 seconds per set. Stop the set once your hips can no longer stay level.
Should my fingers point toward or away from my body in the Reverse Plank Leg Lift?
Fingers pointing forward, in the same direction as your toes, is the standard setup because it keeps the shoulders in a stable, externally rotated position. A slight outward turn is fine if it relieves wrist strain, but avoid pointing the fingers backward toward your hips.
Is it safe to do the Reverse Plank Leg Lift with lower back discomfort?
The exercise emphasizes hip extension, but sagging hips or an overarched trunk can load the lower back unfavorably. If discomfort appears, reduce the leg lift height, shorten the sets, and focus on squeezing the glutes to keep the pelvis level; stop and reassess if the sensation persists.