Seated Biceps Curl On Chair
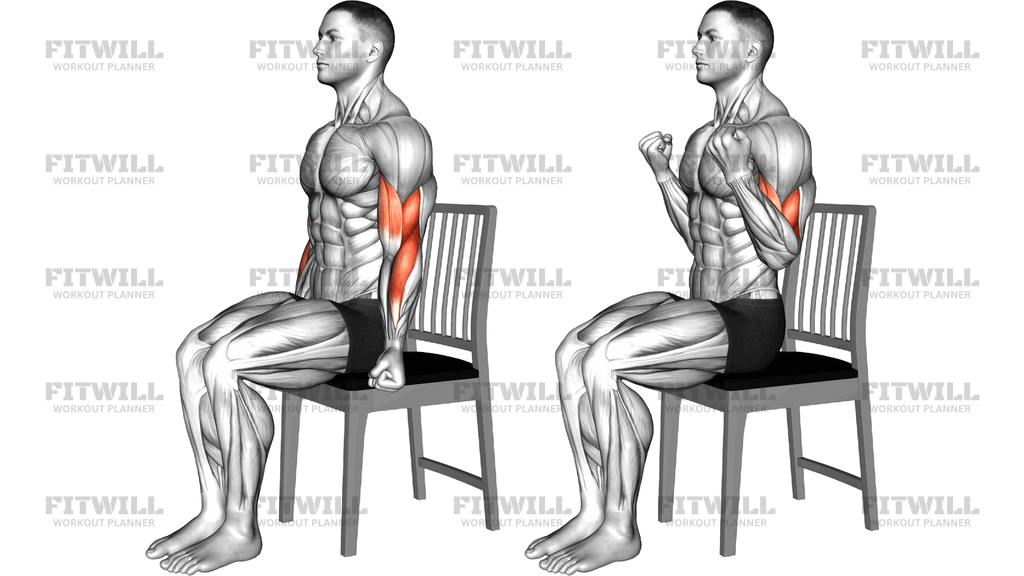
The Seated Biceps Curl On Chair is a bodyweight arm exercise performed sitting upright on an ordinary chair with no external load. You sit tall with your feet flat on the floor, arms hanging straight down at your sides, and simply curl your fists up toward your shoulders by bending at the elbows, then lower them back down under control. Because there is no dumbbell or bar involved, the resistance comes entirely from the effort you generate in the biceps themselves, making this a deliberately paced, contraction-focused movement rather than a heavy lifting exercise.
This movement works best when you treat it like an intensity technique. Squeeze your fists tightly, keep your elbows pinned to your ribs, and flex the biceps hard at the top of each rep as if you are trying to crush the movement. Done casually it feels like almost nothing, but done with full intent and a slow tempo, the biceps and the deeper brachialis underneath them work surprisingly hard. The forearms and grip also stay engaged the whole time because you are actively clenching your hands throughout the set.
The seated position on a chair is what makes this exercise useful. Sitting removes any tendency to swing the hips, lean back, or use the legs to cheat the weight up, so the elbows have no choice but to stay fixed at your sides. That makes it a good teaching tool for beginners who are learning what a strict curl feels like, and a handy option for anyone rehabbing around elbow irritation who wants to move through a pain-free range without load. It also works well as a warm-up before dumbbell or barbell curl work, or as a hotel-room and office-break option when no equipment is around.
Setup matters more than it looks. Sit forward on the chair so your back is upright and unsupported rather than slumped against the backrest, with feet planted roughly hip-width apart. Let your arms hang fully straight at the start so the biceps get a slight stretch at the bottom of each rep. If your elbows drift forward as you curl, you shift work toward the front of the shoulders and away from the arms, which defeats the purpose of the movement.
To execute it well, think of the elbow as a hinge bolted to your side. Curl the fists up until the elbows are fully bent and the biceps are squeezed as hard as possible, hold that peak contraction for a second or two, then take two to three slow counts to lower the fists back to the starting position. Because there is no external resistance pulling your arms down, the lowering phase is where most of the training effect lives, so do not rush it.
The most common use cases are home training, warm-ups, and high-rep finishing sets for the arms. It is also a low-risk way to teach elbow control and mind-muscle connection. If you want more challenge, slow the tempo further, pause longer at the top, or move on to loaded curl variations once you can perform strict, deliberate reps without the elbows wandering.
[ Workout Log & Planner ]
Put your next workout in Fitwill
Keep your plan and training log ready when you are.


Instructions
- Sit forward on a sturdy chair with your back upright and unsupported, feet flat on the floor about hip-width apart.
- Let both arms hang straight down at your sides, close to your body, and clench your fists firmly.
- Pull your shoulders back and down, brace your trunk lightly, and keep your head in line with your spine.
- Keeping your upper arms glued to your ribs, bend your elbows and curl your fists up toward your shoulders.
- Squeeze the biceps hard at the top, with elbows fully bent and held at your sides rather than drifting forward.
- Hold the peak contraction for one to two seconds before starting the descent.
- Lower your fists slowly back to the starting position, taking two to three counts and straightening the arms fully.
- Exhale as you curl up and inhale as you lower back down, keeping the breathing steady.
- Pause briefly with straight arms before starting the next rep so each one begins from the same position.
- Complete your target reps with the same tempo, stopping when you can no longer keep your elbows pinned to your sides.
Tips & Tricks
- The elbows drifting forward is the most common fault here; imagine your upper arms are taped to your ribs and only the forearms move.
- Do not let the shoulders shrug as you curl. If your shoulders creep up toward your ears, relax them down before the next rep.
- A loose grip makes this exercise feel empty. Clench your fists hard for the entire set to keep tension on the biceps and forearms.
- Because there is no weight to slow you down, the temptation is to pump out fast reps. Slow the lowering phase to two or three counts to make the set worthwhile.
- If you catch yourself leaning your torso back to 'help' the curl, move your hips forward on the chair so you have nothing to lean against.
- Fully straighten the arms at the bottom of each rep. Half-range reps start creeping in once the arms fatigue, and the stretched position is part of the value.
- Keep wrists straight and in line with the forearm. Bending the wrists inward at the top is a sign you are forcing range you do not need.
- Sit far enough forward that the chair seat does not block your elbows from hanging freely at your sides at the start of each rep.
Frequently Asked Questions
What muscles does the Seated Biceps Curl On Chair work?
The biceps on the front of the upper arm are the prime movers, with the brachialis and brachioradialis assisting. The forearms and grip stay active because you clench your fists throughout the set.
Can the Seated Biceps Curl On Chair build muscle without any weights?
It can contribute when performed with slow tempo, hard squeezing at the top, and high reps close to fatigue, but its main value is as a warm-up, teaching tool, or equipment-free option. For meaningful long-term strength gains, progress to loaded curl variations.
Why should I sit forward on the chair instead of leaning back?
Sitting forward keeps your torso upright and unsupported, which removes any chance of using trunk lean to assist the curl. It also lets your arms hang freely at your sides so the elbows can stay fixed.
Should my elbows move forward as I curl my fists up?
No. The elbows should stay pinned to your ribs for the whole rep. When they drift forward, the front shoulders take over and the biceps lose tension.
How many reps should I do of the Seated Biceps Curl On Chair?
Because the resistance is self-generated, higher rep ranges work best, typically 15 to 30 controlled reps per set. Focus on a two to three second lowering phase and a hard squeeze at the top rather than counting fast reps.
Is this exercise suitable for complete beginners?
Yes, it is one of the safest ways to learn what a strict curl feels like because there is no external load and the chair prevents cheating. It is a good primer before moving on to dumbbell or barbell curls.
What can I use instead of a chair for the Seated Biceps Curl On Chair?
Any stable seated position works, such as a bench, box, or the edge of a bed, as long as your feet reach the floor and your arms can hang beside your hips. Avoid soft couches that let you slouch.
Can I do the Seated Biceps Curl On Chair if my elbows are sore?
Because the movement is unweighted, many people can work within a comfortable range, but stop if you feel sharp pain at any point in the curl. Persistent elbow discomfort should be assessed before continuing arm training.
How do I make the Seated Biceps Curl On Chair harder?
Slow the tempo, extend the pause at the fully curled position to three or four seconds, and add more reps per set. Once that stops being challenging, switch to dumbbell curls for progressive overload.