Lying Bicep Curl
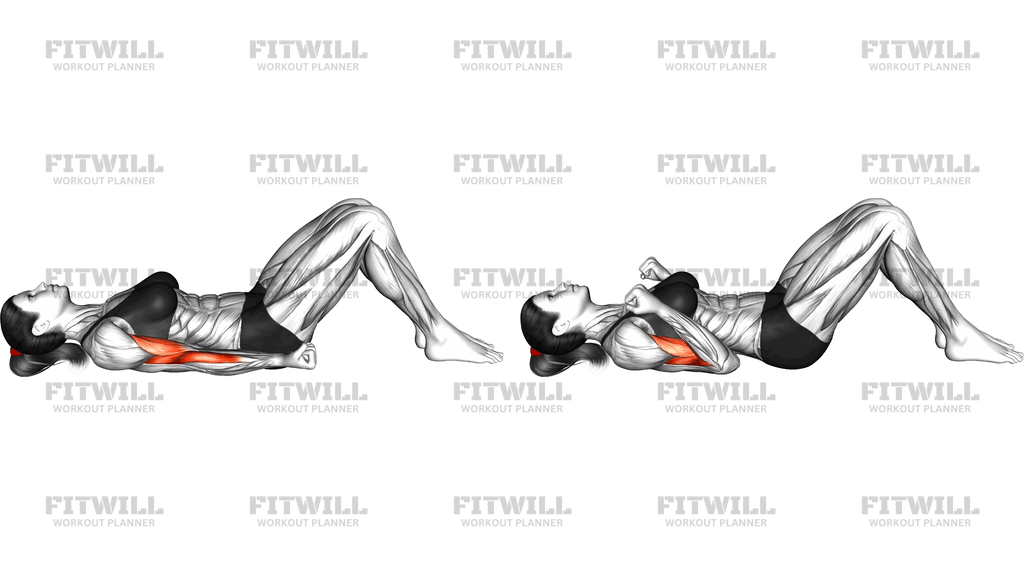
The Lying Bicep Curl is a bodyweight biceps exercise performed on your back with your knees bent and feet flat on the floor. Your arms rest at your sides with the elbows staying anchored against the ground, and you curl by bending the elbows to draw your fists up toward your shoulders, then lower them back down under control. Because there is no external load, the movement relies entirely on deliberate muscle tension, making it a simple but surprisingly effective way to isolate the biceps.
This exercise suits a wide range of people. Beginners can use it to learn what a proper curl actually feels like, since the floor removes momentum and forces the elbows to stay put. It also works well as a warm-up before weighted arm work, as a finishing pump at the end of an upper-body session, or as a low-joint-stress option for anyone training without equipment at home or while traveling.
The primary muscles worked are the biceps brachii on the front of the upper arm, with strong support from the brachialis underneath and the brachioradialis and forearm flexors assisting through the grip and wrist position. Because the upper back, shoulders, and head rest on the floor, nothing else has to stabilize a load, so attention stays on the elbow joint doing its one job: flexion.
Setup matters more than it looks. Lying down fixes your torso in place, which prevents the shoulder swinging and body English that quietly steal work from the biceps in standing curls. Keep the back of each upper arm in contact with the floor throughout the rep; if the elbow lifts, the range shortens and other muscles start compensating. The bent-knee position with feet flat helps your lower back stay comfortable and neutral.
To execute well, curl with intent rather than speed. Squeeze the biceps to fold the elbow fully, pause briefly at the top where the contraction peaks, then take a slow two to three seconds to return. Because the resistance is limited to your own limb, quality of contraction and time under tension matter far more than rep speed. Moving quickly turns this into a joint-flapping exercise that trains almost nothing.
A useful progression is adding self-resistance: press one hand lightly against the working fist or forearm to make the biceps fight against real tension. You can also slow the lowering phase or add isometric holds at different points in the range. Treat this movement as a precision tool for the arms rather than a mass-builder, and it fits neatly into almost any program.
Fitwill
Log Workouts, Track Progress & Build Strength.
Achieve more with Fitwill: explore over 9600 exercises with images and videos, access built-in and custom workouts, perfect for both gym and home sessions, and see real results.
Start your journey. Download today!




Instructions
- Lie on your back on an exercise mat or the floor with your knees bent and feet flat, roughly hip-width apart.
- Let both arms rest at your sides with palms facing up or inward, and position your upper arms so the backs of them rest comfortably against the floor.
- Relax your shoulders down away from your ears and let your head and upper back stay heavy on the ground.
- Brace your core lightly so your ribcage stays down and your lower back stays in a comfortable, neutral position.
- Exhale and bend your elbows, curling your fists up toward your shoulders while keeping the backs of your upper arms pressed into the floor.
- Squeeze the biceps hard at the top of the curl and hold the contraction for a beat.
- Inhale and lower your fists back down slowly, taking two to three seconds, until your arms are nearly straight at your sides.
- Pause briefly at the bottom to feel a light stretch in the biceps before starting the next rep.
- Complete your set, then release your arms, straighten your legs, and shake out the arms before your next exercise.
Tips & Tricks
- The most common fault is letting the elbows drift off the floor as you curl — this shortens the range and turns the movement into a front raise. Check the elbow contact on every rep.
- Do not rush the reps. With no external load, the biceps only get challenged if you curl slowly and squeeze deliberately at the top.
- Keep your wrists straight and relaxed. Bending the wrists toward you shifts tension into the forearms and away from the biceps.
- If your lower back feels strained, bend your knees more and press your feet firmly into the floor; the bent-knee setup exists to protect that position.
- For a harder version, press your opposite hand against the working fist and curl against that resistance — this is the simplest way to load the movement without equipment.
- Avoid shrugging your shoulders toward your ears as you fatigue. If the neck or traps start working, the set is effectively over for the biceps.
- Straighten the arms fully at the bottom of each rep. Half-repping the bottom position skips the stretch portion where much of the flexibility benefit lives.
- Because the exercise is light, it pairs well before heavy pulling or curling work as an activation drill — two sets of 12 to 15 slow reps is enough.
Frequently Asked Questions
What muscles does the Lying Bicep Curl work?
The biceps brachii on the front of the upper arm is the main mover, with the brachialis and brachioradialis assisting. The forearms help stabilize the wrists throughout the curl.
Why do the elbows stay on the floor during the Lying Bicep Curl?
Keeping the backs of the upper arms pinned to the floor locks the shoulder in place so the elbow is the only joint moving. This prevents swinging and ensures the biceps, not momentum, do the work.
Is the Lying Bicep Curl good for beginners?
Yes. It teaches the feeling of a strict elbow flexion with zero load and no balance demands, which carries over directly to dumbbell and barbell curls later.
Can I build muscle with the Lying Bicep Curl since there is no weight?
It provides a light stimulus that works well for activation, warm-ups, and training with limited equipment. For significant hypertrophy, add self-resistance or progress to loaded curl variations.
How do I make the Lying Bicep Curl harder?
Press your free hand against the working fist or forearm to create resistance, slow the lowering phase to four or five seconds, or pause for several seconds at mid-range. All three increase tension without any equipment.
Should my palms face up or stay neutral during the exercise?
Either works. Supinated palms, meaning palms facing up, bias the biceps most directly, while a neutral grip brings the brachioradialis and forearms slightly more into play.
Why are my forearms burning more than my biceps?
You are likely gripping hard or cocking your wrists as you curl. Keep the hands open and relaxed with straight wrists, and refocus on squeezing at the elbow rather than clenching the fist.
Can the Lying Bicep Curl replace standing dumbbell curls?
Not entirely, since the resistance is much lower, but it is a legitimate substitute when you have no equipment, are traveling, or want a low-stress arm exercise on recovery days.
How many reps and sets should I do of the Lying Bicep Curl?
Aim for two to three sets of 12 to 20 slow, controlled reps. Since the load is light, longer sets with deliberate squeezing produce better results than low-rep, fast sets.
Is it safe to do the Lying Bicep Curl every day?
Generally yes, because the load is minimal and the elbow travels through a natural range. If you notice persistent elbow or shoulder discomfort, reduce frequency and check that your elbows stay on the floor during each rep.