Single Arm Push Up
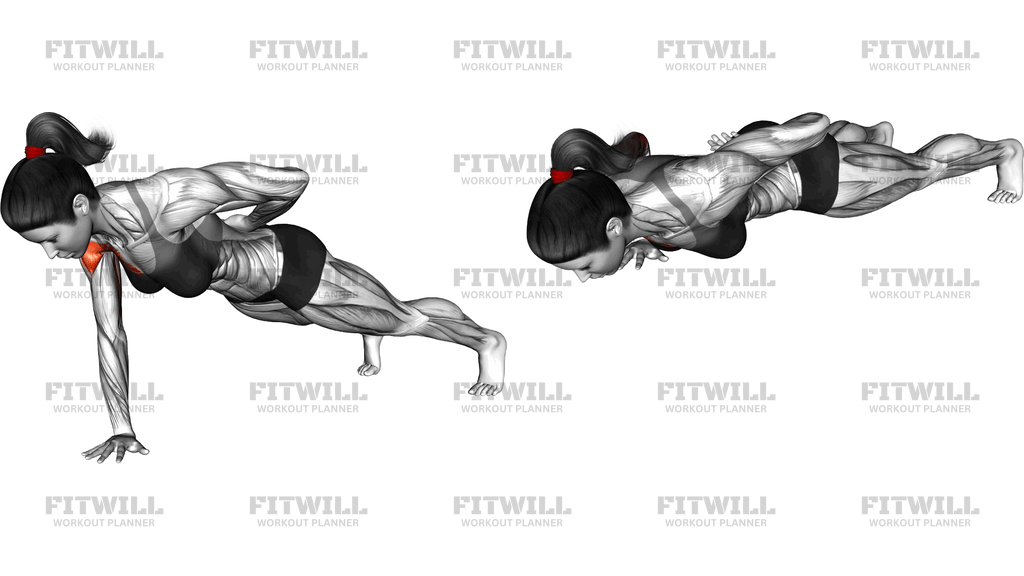
The Single Arm Push Up is one of the most demanding bodyweight pressing movements you can do. Instead of sharing the load between two hands, your entire upper body is supported by a single arm while your legs split wide to keep you balanced. It looks simple from the outside, but it combines serious pressing strength with trunk stability, anti-rotation control, and full-body tension.
This movement primarily builds the chest of the working side, with strong contributions from the triceps and front of the shoulder. What makes it special is the rotational demand: because only one hand is on the floor, your obliques and deep core have to fight hard to stop your hips and shoulders from twisting toward the ground. You also load the stabilizing muscles around the working shoulder and wrist in a way that two-arm push ups never quite match.
Setup matters more here than in almost any other push up variation. Your feet should be spread considerably wider than hip width, with the working hand placed roughly under the center of your chest rather than out to the side. The free hand rests behind your back or on the opposite thigh. If your hand sits too wide or your feet are too close, you will either lose balance or stress the shoulder joint unnecessarily.
To execute well, think of pulling yourself down with the working arm while keeping your whole body rigid, then drive the floor away as you press back up. Your hips will want to rotate and your torso will want to twist — resist both. A slight turn of the torso is acceptable at advanced levels, but beginners should aim for a body line that stays as square to the floor as a regular push up.
The Single Arm Push Up is a common goal for calisthenics trainees and a useful strength benchmark for anyone who has outgrown standard push ups. It fits well at the start of a pressing session when you are fresh, typically trained for low repetitions across multiple sets. Progressions like elevated or assisted single arm variations let you build toward the floor version safely.
Because the wrist, elbow, and shoulder of the working arm take significant load, warm up thoroughly and stop if you feel joint pain rather than muscle effort. Earning this movement through progressions is far better than forcing reps with a sagging or twisting body.
[ Workout Log & Planner ]
Put your next workout in Fitwill
Keep your plan and training log ready when you are.


Instructions
- Set your feet much wider than hip width, roughly one and a half to two times shoulder width, so you have a stable triangular base with your working hand.
- Place one palm flat on the floor directly under the center of your chest, fingers spread and pointing forward, with your elbow soft and ready to press.
- Tuck your free hand behind your back or rest it on the opposite thigh, and settle into a straight plank line from head through heels.
- Brace your abs and glutes hard, as if someone is about to push you sideways, and pull your shoulders down away from your ears.
- Bend the working elbow and lower your chest toward the floor, letting the elbow track back at roughly 45 degrees to your torso rather than flaring wide.
- Descend until your chest is a few inches from the floor, or as low as you can go while keeping your hips level and your body square.
- Press the floor away through your palm, keeping your fingers spread for balance, and extend the arm until it is nearly straight at the top.
- Exhale as you press up and inhale as you lower, keeping the breath steady instead of holding it through the rep.
- Lower with control on every rep — do not let gravity drop you — and reset your foot position and brace before starting the next repetition.
- Complete your reps on one side, then switch hands and match the number of reps on the other side.
Tips & Tricks
- If your hips twist toward the floor on every rep, that is the most common giveaway that the load is too heavy — regress to an elevated surface and build the anti-rotation strength there first.
- Placing the working hand directly under your chest, not out to the side, keeps the shoulder in a safe pressing line; a wide hand position is the usual cause of front shoulder discomfort in this movement.
- Spreading your fingers and actively gripping the floor gives you side-to-side balance feedback — a flat, relaxed palm is why many people wobble at the top of the rep.
- Keep your head neutral by looking at a spot on the floor slightly ahead of your hand; craning the neck up often accompanies a sagging lower back.
- A slight rotation of the torso at the bottom is normal at advanced levels, but if your whole body is visibly twisting, shorten the range of motion instead of chasing depth.
- Full-body tension is what separates a clean Single Arm Push Up from a messy one — squeeze your glutes and quads before you even start the descent.
- Do not let the working elbow collapse inward toward your ribs at the bottom; think of the arm forming a slight arrow shape rather than a tight T.
- If you can do 20 solid regular push ups but fail immediately on one arm, the issue is usually balance and bracing, not raw pressing strength — practice the top hold and slow negatives first.
Frequently Asked Questions
What muscles does the Single Arm Push Up work?
The chest of the working arm is the primary muscle, supported heavily by the triceps and front delts. Your obliques, abs, and glutes work isometrically to prevent your torso from rotating during the rep.
Is the Single Arm Push Up suitable for beginners?
Not usually in its floor form — most beginners lack the pressing strength and anti-rotation control. Start with an elevated version, such as hands on a bench or wall, and progress the height down as you get stronger.
Why do my hips rotate when I do the Single Arm Push Up?
Rotation happens when your core cannot resist the twisting force of pressing with one arm. Widen your foot stance, grip the floor harder, and practice slow negatives with a focus on keeping both hips level.
How wide should my feet be for the Single Arm Push Up?
A wide split stance, roughly one and a half to two times shoulder width, gives you the lateral stability you need. As you advance, you can narrow the feet slightly to increase the difficulty.
Where should my free hand go during the Single Arm Push Up?
Most people place it behind their back or on the opposite thigh. The key is to keep it out of contact with the floor so the working arm does the pressing.
What is the best progression toward a full Single Arm Push Up?
Elevated single arm push ups, archer push ups, and slow single arm negatives all build the specific strength and balance. Move to a lower surface only when you can keep your body square at the current height.
Is it normal for my wrist to hurt during Single Arm Push Ups?
Some discomfort can come from the concentrated load on one wrist. Spread your fingers, shift a little weight onto the heel of the palm, warm up the wrists first, and stop if sharp pain persists.
Can I replace the Single Arm Push Up with weighted push ups?
Weighted push ups build pressing strength but do not train the anti-rotation and balance demands of pressing with one arm. Ideally use both, since each covers a weakness the other misses.
How many reps of the Single Arm Push Up should I aim for?
Because the load is high, low rep sets of one to five per side across several sets are typical. Focus on clean, square body positions rather than grinding out extra reps with twisting form.