Power Sled Pull
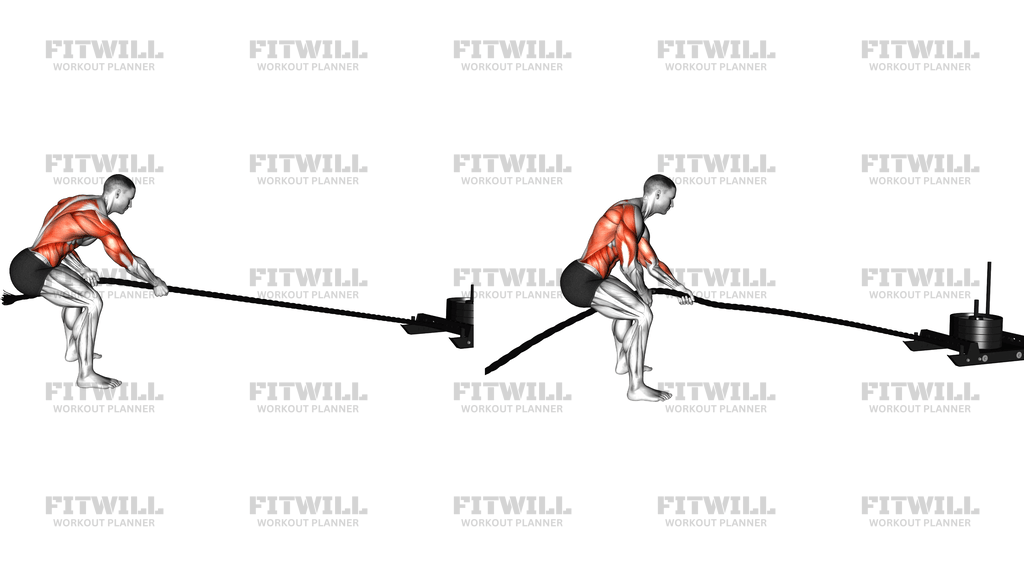
The Power Sled Pull is a weighted drag exercise where you anchor a rope to a loaded sled, take an athletic stance facing the sled, and pull it toward you hand over hand until it reaches your feet. Unlike a sled push, which is driven mostly by the legs, the pull loads your upper body through the entire chain from grip to lat to trunk, making it one of the most complete pulling drills you can do on turf, grass, or gym flooring.
This movement earns its place in almost any training program. Strength athletes use it to build pulling power without the eccentric stress of rows or deadlifts, since the sled slides forward and there is no lowering phase to recover from. Field and court sport athletes use it because the hand-over-hand rhythm mimics grabbing and controlling an opponent. General lifters like it because it drives the heart rate up quickly while still being joint-friendly.
The main work comes from the lats and upper back as you reach, grab, and haul the rope in, with strong support from the biceps and forearms, which have to hold on as the sled digs in and resists. Your grip is often the limiting factor. Meanwhile, the athletic stance demands steady tension from the glutes, quads, and calves, and your core braces continuously to keep your torso from being folded forward by the load.
Setup matters more than most people expect. The rope should run straight from the sled to your hands with no slack or sharp angles, the weight on the sled should let you pull in smooth strokes rather than dead-stop jerks, and your stance should be low enough that your legs and hips contribute instead of your lower back doing the hauling. A sloppy setup usually shows up as a rounded back or a rope that goes slack between pulls.
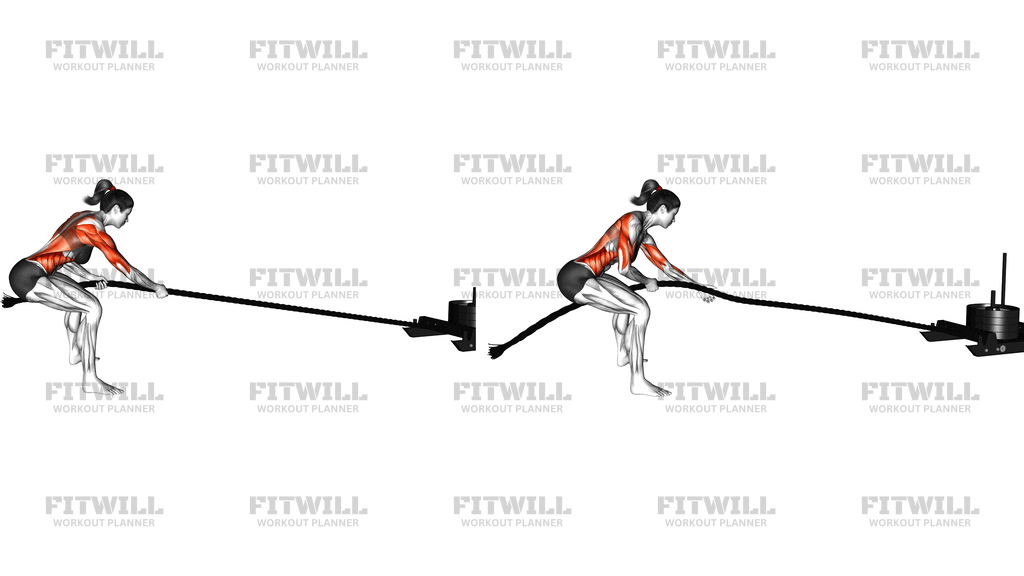
To execute it well, sit into a quarter squat with a flat back, pull the rope to your hip on one side while reaching forward with the other hand, and keep the rope moving without letting the sled stall. Walk backward as the sled approaches so you always have fresh rope to pull. When the sled reaches you, reset your stance and pull it back or set it down to end the set.
You will see the Power Sled Pull in conditioning finishers, football and rugby training blocks, functional fitness circuits, and rehabilitation-style programs where coaches want heavy pulling work without spinal compression. Start lighter than feels necessary, keep the strokes rhythmic, and let the legs and hips share the work with the arms.
[ Workout Log & Planner ]
Put your next workout in Fitwill
Keep your plan and training log ready when you are.


Instructions
- Attach one end of the rope securely to the eyelet or post of a weighted power sled and stretch the rope out on the floor toward your training area.
- Load the sled with plates appropriate for the distance; choose a weight you can pull in continuous strokes without the sled stalling on every grab.
- Face the sled and take an athletic stance: feet about hip-width to shoulder-width apart, knees bent, hips pushed back, chest up, and back flat.
- Grab the rope with both hands, one forward and one back near your hip, and brace your core as if about to absorb a push to the ribs.
- Pull the rear hand back to your hip and drive your elbow past your torso while the forward hand reaches out and grabs the rope farther ahead.
- Alternate hands in a steady hand-over-hand rhythm, drawing the sled toward you while keeping your torso angle and low stance unchanged.
- Exhale forcefully on each pull and inhale quickly as you reset your hands for the next stroke.
- When the sled closes in, walk backward with small, controlled steps until you have fresh rope in front of you, keeping tension in the rope the whole time.
- Pull the sled all the way to your feet to finish the rep, or until you reach your target distance or rope length.
- Release the rope, stand up, rest, and reset the sled to the starting line before the next set.
Tips & Tricks
- The most common fault is rounding the lower back as the sled resists. Sit your hips farther back and think about pulling with your elbows, not your hands.
- If the sled stalls after every stroke, the load is too heavy or your strokes are too short. Either take weight off or reach farther down the rope to lengthen each pull.
- Keep the rope between pulls taut but not straining. Letting it go slack resets the sled's friction and forces a jerky restart that stresses the shoulders.
- Do not let your shoulders creep up toward your ears as your grip fatigues; sink your shoulders down and let the lats do the hauling.
- Your legs should work like a brace, not bystanders. If you find yourself standing nearly upright and yanking with the arms, drop back into the quarter squat.
- Chalk or lifting grips are worth using here. A slipping grip shortens every set and teaches you to squeeze inefficiently.
- Alternate which hand starts closest to your hip on each set so both sides of your back develop evenly.
- Pull on a surface with consistent friction. A sled that slides easily for half the distance and then catches on a seam will wreck your rhythm and timing.
- For conditioning, prioritize continuous movement with moderate weight; for strength, use a heavier sled and accept slower, more deliberate strokes.
Frequently Asked Questions
What muscles does the Power Sled Pull work?
The lats and upper back do the primary pulling, with the biceps and forearms driving and holding the rope. The glutes, quads, and core stabilize your athletic stance throughout the set.
Is the Power Sled Pull good for beginners?
Yes, it is actually one of the more beginner-friendly pulling exercises because there is no eccentric loading and the weight can be scaled precisely. Start with a light sled and focus on keeping your back flat and your strokes smooth.
How heavy should the sled be for a Power Sled Pull?
Pick a load you can pull in continuous hand-over-hand strokes without the sled stalling between grabs. If you are dead-stopping and yanking every stroke, the sled is too heavy for most training goals.
Why does my grip give out before my back does during the Power Sled Pull?
The rope challenges your forearms constantly as the sled resists, so grip is usually the first link to fail. Chalk up, squeeze the rope rather than pinching it, and shorten sets until your forearms adapt.
How is the Power Sled Pull different from a rope battle wave or a cable row?
Unlike battling rope waves, the sled pull moves an actual load across the floor toward you, and unlike a cable row, your body must hold an athletic stance against continuous resistance while resetting the rope. It blends rowing strength with conditioning and grip work in one drill.
How far should I pull the sled in each set?
Common options are 10 to 20 meters per set for strength, or 20 to 40 meters for conditioning. Walk backward as the sled approaches so the rope length stays consistent through the set.
Should my back stay low during the Power Sled Pull?
Yes, keep a forward-leaning torso from the hips with a flat back, similar to the bottom of a quarter squat. Standing upright and pulling with your arms alone shifts stress away from the lats and toward your lower back and shoulders.
What can I substitute if I don't have a power sled?
A rope attached to a heavy tire, a weighted plate on a smooth floor, or a loaded prowler dragged in reverse can all replicate the effect. Any heavy object that slides and can be anchored to a rope will work.
Is the Power Sled Pull hard on the lower back?
Not if your stance is low and your back stays flat, because the hips and legs share the load and there is no spinal compression from supporting the weight. The risk comes from rounding forward or yanking with a jerky start, so keep strokes smooth.
Can I train the Power Sled Pull frequently?
Yes, the sled produces very little muscle damage and soreness because there is no lowering phase, so it can appear several times per week. Manage total grip volume, since your forearms recover more slowly than your back.