Bear Push Up
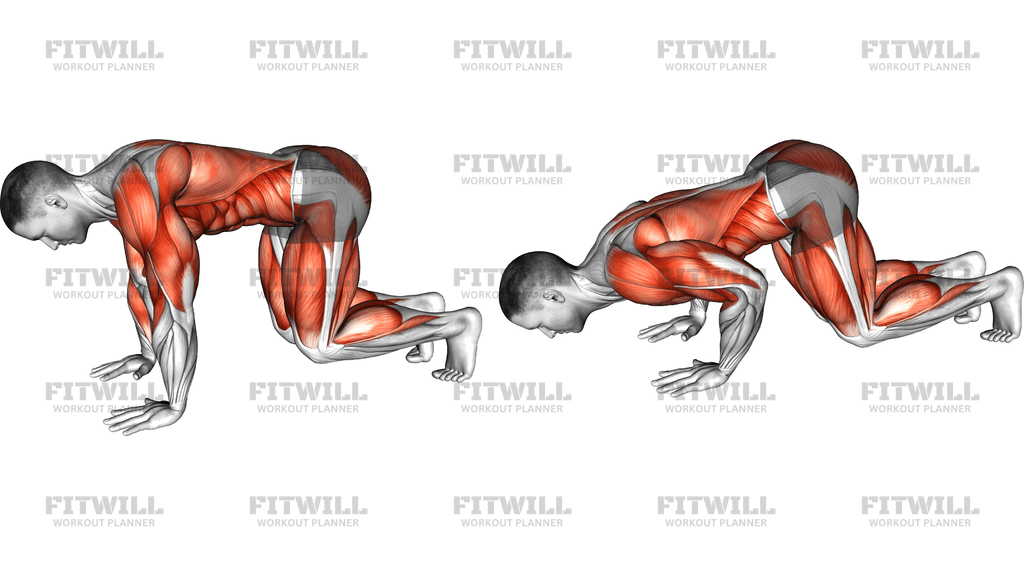
The Bear Push Up is a body weight pressing exercise performed from a bear crawl position — hands and toes on the floor with knees bent and hovering just below hip height. Instead of the long, straight-body line of a standard push-up, your torso stays angled downward with hips held high, and you bend the elbows to lower your chest toward the floor between your hands, then press back up to the starting bear position. It sits somewhere between a push-up and a pike press, which makes it a useful stepping stone for people building toward harder pressing variations.
The shortened body position is what makes this exercise distinctive. Because your hips sit above knee height and your knees stay flexed, a portion of your body weight shifts toward the hands and shoulders, increasing the demand on the chest, triceps, and front delts compared with a kneeling push-up, without requiring the full-body tension of a strict push-up. At the same time, keeping the knees hovering forces the deep core and hip flexors to work continuously to hold the bear position, so the trunk never gets a break.
Setup matters here more than most people expect. If your knees drift too far behind you or your hips sag, the movement turns into a sloppy push-up with a rounded lower back. If your hands sit too far forward, the shoulders take the brunt of the load at an awkward angle. Placing the hands directly under the shoulders, keeping the spine neutral, and holding the knees under the hips creates a stable base that lets the elbows travel at a comfortable angle beside the ribs.
To execute it well, think of lowering your chest — not your forehead — toward the floor, letting the elbows track roughly 45 degrees from your sides. Pause briefly at the bottom, then press the floor away until the arms are straight again, keeping the hips at the same height the entire time. The most common fault is the hips bobbing up and down as you press; imagine a glass of water balanced on your lower back from start to finish.
This variation works well as a warm-up press, as a main movement for beginners and intermediates, or as a higher-rep finisher for more advanced lifters. It also carries over directly to the bear crawl family of exercises, so if you train bear crawls, bear holds, or crawl-based conditioning, this drill reinforces the exact position those movements demand. Because no equipment is needed beyond a floor surface, it fits easily into home workouts, circuit training, and travel sessions.
[ Workout Log & Planner ]
Put your next workout in Fitwill
Keep your plan and training log ready when you are.


Instructions
- Kneel on the floor and place your hands flat on the ground directly under your shoulders, fingers spread and pointing forward.
- Tuck your toes under and lift your knees off the floor, then shift your weight forward so your knees bend and sit under your hips, forming the bear position with your back flat and hips raised.
- Brace your abs and squeeze your thighs slightly so your knees stay hovering and your spine stays neutral from head to hips.
- Look down at the floor a short distance ahead of your hands to keep your neck in line with your spine.
- Bend your elbows and lower your chest toward the floor between your hands, letting the elbows track back at roughly 45 degrees to your torso.
- Descend until your chest is close to the floor and your upper arms are near parallel to the ground, keeping your hips at a constant height.
- Press firmly through your palms and push the floor away until your arms are fully straight, exhaling as you drive up.
- Reset your bear position at the top — knees still hovering, back flat — before starting the next repetition.
- Breathe in as you lower and out as you press, and keep the tempo controlled rather than bouncing out of the bottom.
Tips & Tricks
- The most frequent mistake is turning the exercise into a regular push-up by walking the feet back and straightening the legs — keep the knees bent under the hips so the hips stay high and the load stays on the shoulders and chest.
- If your lower back rounds or aches, your core is letting go; shorten the set, and practice holding the bear position on its own until you can keep the ribs down and pelvis level for 30 seconds.
- Elbows flaring straight out to the sides puts stress on the shoulder joints — think about pulling your elbows slightly toward your ribs as you lower.
- Do not drop your head to reach the floor first; if your nose touches down before your chest, you are limiting the range and leading with the neck.
- If the full version is too hard, keep your knees lightly touching the floor while holding the elevated-hip position — you still get the angled pressing path with less load.
- Widen your hand position slightly if your wrists complain; a narrower grip from the bear position can be hard on the wrists and restricts the chest's range.
- Stop each rep at the top and re-establish the bear position instead of rushing — the hovering knees are a core exercise in themselves, and letting them drop steals half the benefit.
- On a slippery floor, use a mat under your feet so your toes do not slide backward as you press.
- Aim for quality reps over quantity; once your hips start bobbing or sagging, the pressing position has broken down and the set should end.
Frequently Asked Questions
What muscles does the Bear Push Up work?
The chest and triceps do most of the pressing work, with the front delts assisting. Because the knees hover throughout, the deep core, hip flexors, and shoulder stabilizers also work hard just to hold the position.
How is the Bear Push Up different from a regular push-up?
In a regular push-up your body forms one straight line from head to heels, while in the Bear Push Up the hips stay raised with knees bent under them. This shifts more load toward the shoulders and upper pressing muscles and adds a constant core demand to keep the knees hovering.
Is the Bear Push Up good for beginners?
Yes — it is a good middle step between kneeling push-ups and full push-ups. Beginners can start with the knees lightly resting on the floor while keeping the hips high, then progress to hovering knees.
Should my knees touch the floor during the Bear Push Up?
In the full version, no — the knees stay bent under the hips and hover above the ground for the whole set. Letting them touch turns the drill into a kneeling push-up and removes much of the core work.
Why do my hips drop or bob during the movement?
That usually means the core is fatiguing or the elbows are flaring so widely that the torso shifts. Slow the tempo down, brace harder, and think about keeping your hips at exactly the same height on the way down and up.
Can I use the Bear Push Up to build toward a full push-up?
Yes. It overloads the pressing muscles at a steeper angle while training the braced trunk position a strict push-up needs. Once you can perform solid sets here, progress to full push-ups from a straight-body plank.
What can I substitute if the Bear Push Up is too difficult?
Use a kneeling push-up with the hips kept high, or hold a static bear position interspersed with short lowering-only reps. Both options train the same position with less pressing load.
How do I protect my wrists during the Bear Push Up?
Spread your fingers, press the base of the palm and fingertips into the floor, and avoid gripping with the heel of the hand rolled back. A slightly wider hand placement or a mat under the palms can also reduce wrist strain.
How many reps and sets of the Bear Push Up should I do?
Start with 2-3 sets of 6-10 controlled reps, ending each set when your hips can no longer stay level. As strength improves, add reps or slow the lowering phase before moving to harder pressing variations.
Is it safe for my lower back?
When performed with the knees under the hips and the ribs down, the spine stays in a supported neutral position. If you feel your lower back sagging or arching, stop the set and build up your bear hold endurance before continuing.