Figure 4 Sinal Rotation
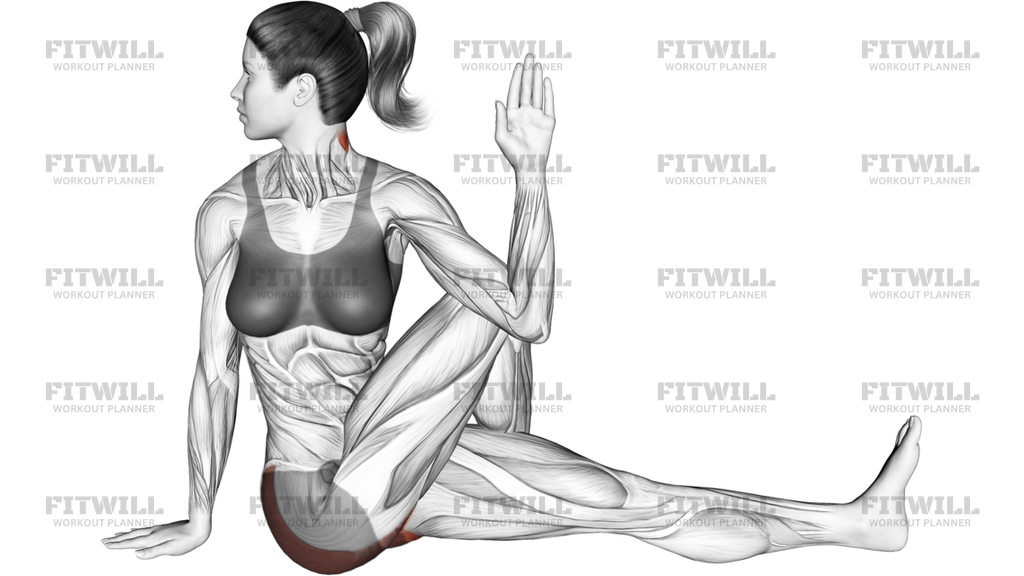
The Figure 4 Spinal Rotation is a seated rotational stretch that combines a figure-4 leg position with a deep twist of the trunk. You sit on the floor with one knee bent and that foot planted outside the opposite leg, then use your arm against the knee to lever your torso into rotation while the opposite hand supports you behind your hip. The result is a simultaneous stretch through the outer hip of the bent leg and the obliques and mid-back on the rotating side.
This position is especially useful for people whose hips and lower back feel locked up from long sitting. The figure-4 setup puts the bent hip into flexion, adduction, and external rotation, which targets the glutes and the deep rotators of the hip, while the twist lengthens the obliques and the smaller muscles that run along the spine. Because you control the pressure with your own arm, the intensity is easy to dial up or down.
The setup matters more than it looks. Sitting tall with the supporting hand planted close to your body keeps your spine long, which lets the rotation come from your trunk and hip rather than from slumping forward. If you round your back or yank the knee with your arm, you lose the targeted stretch and load the lower back in a way that rarely feels good.
To perform it well, exhale as you rotate, keep your chest lifted, and let the twist deepen gradually over several breaths rather than forcing the knee down. The stretch should sit in the outer hip and along the side and back of the trunk, not in the knee joint itself.
This is a common mobility piece in warm-ups before lower-body training, in cool-downs after squats or running, and in general desk-worker routines. It needs no equipment beyond a bit of floor space, and a thin mat or carpet makes it more comfortable. Anyone with a recent hip or spine injury should check with a professional before adding loaded-looking rotational work like this.
[ Workout Log & Planner ]
Put your next workout in Fitwill
Keep your plan and training log ready when you are.


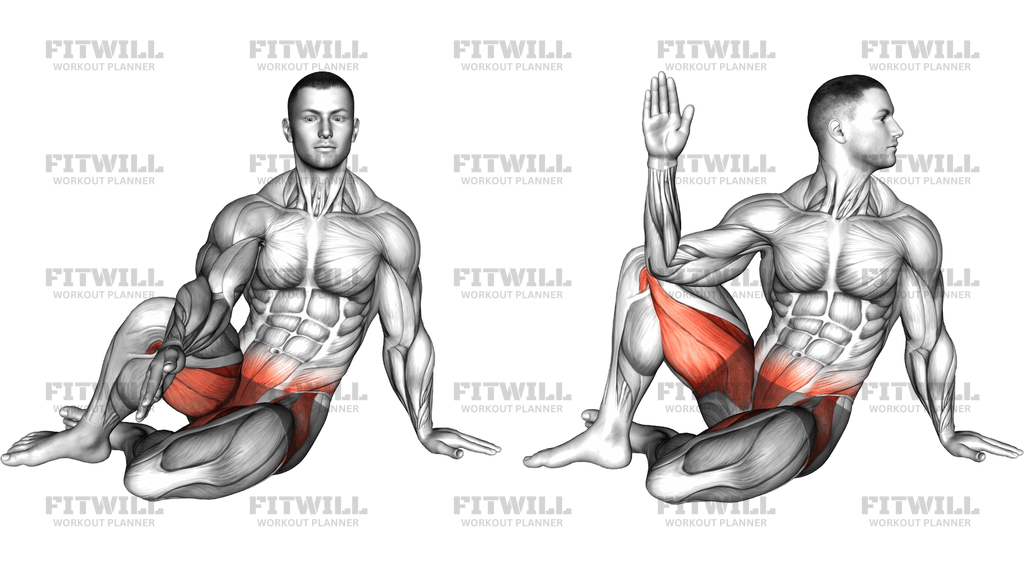
Instructions
- Sit on the floor or a mat with both legs extended in front of you and your spine tall.
- Bend one knee and cross that foot over your straight leg, placing it flat on the floor just outside the opposite thigh so the bent leg forms a figure-4 shape.
- Plant the hand on the same side as your straight leg on the floor behind your hip, fingers pointing away from you, to act as your support.
- Place the opposite arm on the outside of your raised knee, elbow bent, ready to press against the leg.
- Brace lightly through your trunk, then exhale as you press the knee across your body and rotate your chest in the opposite direction, looking over your back shoulder.
- Keep the supporting arm straight and your spine long so the rotation comes from the trunk and hip, not from rounding forward.
- Hold the end position for 20-40 seconds, breathing steadily and easing slightly deeper with each exhale.
- Release the pressure slowly, rotate back to center, uncross the leg, and reset your posture before switching sides.
- Complete the same hold on the other side, aiming for one to three rounds per side.
Tips & Tricks
- The most common mistake is pulling the knee with the arm instead of pressing it. Your arm should create gentle pressure against the leg while your trunk does the twisting, or you will just wrench the hip forward.
- If your chest collapses toward your knee, re-plant your supporting hand closer to your body. A hand planted too far behind you forces you to lean back and round to reach the twist.
- Keep the crossed foot flat on the floor. Letting it dangle or slide changes the angle at the hip and can shift the stretch into the knee.
- If the twist feels jammed in the lower back, reduce how far you rotate and focus on turning from the ribs instead. The range will improve as the outer hip releases.
- Keep the straight leg genuinely straight and the kneecap pointing up. A drifting straight leg usually means the hips are rotating instead of the spine.
- Never bounce into the rotation. This stretch responds better to a long, quiet hold with slow exhales than to pulsing at the end range.
- Any sharp sensation inside the knee of the bent leg means the hip is being forced. Back off the pressure and, if it persists, hold the knee with both hands instead of using the elbow.
- Do this stretch after training or after a warm shower rather than cold, when the glutes and hip rotators lengthen more willingly.
- If sitting tall is hard because of tight hamstrings pulling you backward, prop your hips on a folded towel or low cushion so the pelvis can stay neutral.
Frequently Asked Questions
What muscles does the Figure 4 Spinal Rotation stretch?
It primarily targets the glutes and the deep external rotators of the bent hip, with the obliques and muscles alongside the spine lengthening on the rotating side. The lower back gets a gentle rotational stretch as well.
Is the Figure 4 Spinal Rotation suitable for beginners?
Yes. Because you control the pressure with your own arm, you can start with a light press and a modest rotation and progress gradually. Beginners should prioritize sitting tall over twisting far.
Should I hold the Figure 4 Spinal Rotation as a static stretch or move in and out of it?
It works both ways. Before training, move in and out of the rotation slowly for 5-8 breaths; after training or before bed, hold the end position for 20-40 seconds per side.
Why does my knee hurt when I press it in the Figure 4 Spinal Rotation?
Knee discomfort usually means the hip is being forced into rotation faster than it allows, so the stress transfers to the knee joint. Ease off the arm pressure, keep the foot flat, and let the hip open over time rather than pushing through pain.
How far should I rotate in the Figure 4 Spinal Rotation?
Rotate only until you feel a clear stretch in the outer hip and side of the trunk. Chasing the shoulder toward the knee with a rounded back defeats the purpose and puts unnecessary stress on the spine.
Can I do the Figure 4 Spinal Rotation if I have lower back issues?
A gentle rotational stretch is often well tolerated, but anyone with a current or recent back problem should get clearance from a qualified professional first. Keeping the spine tall and the rotation small is the safest approach.
What can I substitute for the Figure 4 Spinal Rotation?
A supine figure-4 stretch, where you lie on your back and pull the crossed knee toward your chest, targets the same hip muscles without the spinal twist. A seated twist with both knees bent is another close alternative.
How often should I perform the Figure 4 Spinal Rotation?
Daily is reasonable for most people, especially if you sit for long hours. One to three rounds of 20-40 seconds per side after workouts or in the evening is a solid routine.
Do I need any equipment for the Figure 4 Spinal Rotation?
No, it is a body-weight stretch that only requires floor space. An exercise mat or a carpeted area simply makes sitting more comfortable, and a small cushion under the hips can help if your hamstrings pull your posture backward.