March On Spot Bicep Curl
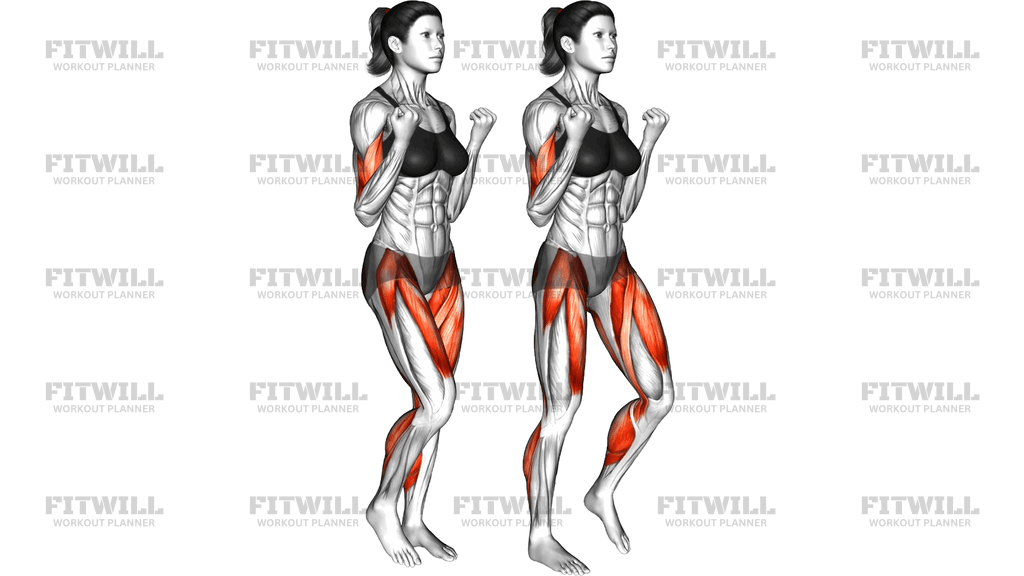
March On Spot Bicep Curl combines two familiar movements into one efficient exercise: you hold your arms in a curled position with fists drawn up toward your shoulders while marching in place, lifting each knee to roughly hip height. Instead of curling a weight up and down, your biceps work isometrically, staying contracted the entire time your legs drive the marching rhythm. This makes it a body-weight strength and endurance drill that challenges your arms, hips, and trunk at the same time.
The main workload sits in the biceps, which hold a sustained contraction against the tension you create by squeezing your fists toward your shoulders. Meanwhile, each knee lift is powered by the hip flexors with support from the quadriceps, and the supporting leg's calf and ankle stabilize every landing. Your core stays busy throughout, keeping your ribs stacked over your pelvis so the marching does not turn into leaning and swaying.
Because no equipment is needed, this movement fits easily into home workouts, warm-ups, travel routines, or active recovery days. It is especially useful for beginners who want to build arm strength before loading a barbell or picking up dumbbells, and for anyone who wants a low-impact way to keep the upper and lower body working together. The isometric biceps hold also suits people managing elbow irritation who want muscle engagement without repeated bending and straightening under load.
Setup matters more than it might seem. Stand tall with your feet about hip-width apart, elbows pinned to your sides, and fists raised so your forearms stay angled upward throughout. If your elbows drift forward or your shoulders creep up toward your ears, the biceps lose tension and the neck takes over work it was never meant to do. Keep your gaze forward and your torso upright so each knee lift happens directly beneath you.
To execute the movement well, brace your core, then begin lifting one knee to about hip height while the opposite foot stays grounded. Lower that foot under control and switch legs, finding a steady marching rhythm you can maintain without your arms dropping. The fists stay clenched and the elbows stay fixed at your ribs from the first step to the last — the legs move, the arms hold.
A practical safety note: keep the march low-impact by placing each foot down softly rather than stomping, and stop the set if you feel pinching at the front of either hip or strain in the lower back. The exercise should feel like sustained effort in the arms and thighs, not joint stress.
[ Workout Log & Planner ]
Put your next workout in Fitwill
Keep your plan and training log ready when you are.


Instructions
- Stand upright with your feet hip-width apart, weight balanced evenly across both feet, and your arms relaxed at your sides.
- Bend both elbows and draw your fists up to about shoulder height, pinning your upper arms firmly against your ribs so the elbows cannot drift forward.
- Brace your abdominal muscles, pull your shoulders down away from your ears, and keep your chest lifted and gaze straight ahead.
- Shift your weight slightly onto one foot and lift the opposite knee up toward hip height, keeping your torso upright rather than leaning back.
- Lower that foot to the floor with control, then immediately lift the other knee, settling into a smooth, steady marching rhythm.
- Keep your fists clenched and elbows locked at your sides the entire time — the biceps hold the curled position without moving while your legs march.
- Breathe continuously throughout, inhaling for a couple of steps and exhaling for a couple of steps rather than holding your breath.
- Continue marching for your target time or step count, checking occasionally that your elbows are still down and your shoulders relaxed.
- To finish, plant both feet together, lower your arms slowly to your sides, and shake out the forearms and shoulders before the next set.
Tips & Tricks
- If your elbows start creeping forward as fatigue builds, your biceps tension is fading — reset them against your ribs before continuing rather than letting the arms sag into a half-relaxed position.
- Shrugged shoulders are the most common giveaway that the hold is too hard; drop the fists an inch or two lower and keep the march going instead of losing position.
- Keep the knee lift at or slightly below hip height. Forcing the knee higher usually tips the pelvis forward and shifts work into the lower back.
- Land each foot softly from heel to mid-foot. Heavy stomping turns this into a joint-pounding drill instead of a controlled strength hold.
- Squeeze the fists firmly during the hold — actively gripping increases tension through the forearms and biceps without adding any equipment.
- If standing balance feels shaky, slow the march down and pause briefly on one leg each rep rather than speeding up, which hides the instability.
- Hold the curl at slightly different forearm angles across sets — higher and lower — to vary where the biceps feel the sustained tension.
- Count steps in time with your breathing rather than the clock; a breath every two to four steps keeps the rhythm even and prevents breath-holding.
- If your lower back tightens up, reduce the knee height and re-brace your abs before continuing — the march should come from the hips, not from arching the spine.
Frequently Asked Questions
What muscles does the March On Spot Bicep Curl work?
The biceps work isometrically, holding a contracted position for the whole set, while the hip flexors and quadriceps power each knee lift. The calves, ankles, and core stabilize and keep you upright as you march.
Is the March On Spot Bicep Curl good for beginners?
Yes. With no equipment and a self-set pace, beginners can start with short sets of 15–20 seconds and low knee lifts. It is a low-risk way to build arm strength and coordination before adding weights.
Why don't my arms move during the March On Spot Bicep Curl?
The biceps in this exercise work isometrically — the muscles generate tension while the elbow angle stays fixed. This sustained hold builds muscular endurance differently from a standard curl where the forearm swings up and down.
How high should I lift my knees while marching?
Aim for roughly hip height, or slightly lower if that compromises your posture. The knee lift should come from the hip with your torso staying tall; if you feel yourself leaning back, reduce the height.
What is the most common mistake in the March On Spot Bicep Curl?
Letting the elbows drift away from the ribs and the shoulders ride up toward the ears, which releases biceps tension and strains the neck. Pin the upper arms to your sides and keep the shoulders pulled down throughout.
Can I add dumbbells to this exercise?
You can, but start with no added weight until you can hold the curl position without your elbows dropping for a full set. Even light dumbbells turn the isometric hold into a demanding endurance challenge quickly.
How long should I hold the march for each set?
Start with 20–30 seconds and progress toward 45–60 seconds as your arm and hip flexor endurance improves. The set should end when your elbows start to drop, not when you are completely exhausted.
Can the March On Spot Bicep Curl replace regular bicep curls?
Not entirely. The isometric hold builds endurance and control at one joint angle, while loaded curls train strength through a full range of motion. It works well as a supplement, warm-up, or substitute when equipment is not available.
Is this exercise safe if I have elbow discomfort?
The static hold avoids repeated bending under load, which many people find more comfortable than repeated curls, but you should lower your fists to a pain-free angle and stop if discomfort persists. Check with a qualified professional if symptoms continue.
Can I do the March On Spot Bicep Curl as a warm-up?
Yes, it raises the heart rate gently while activating the arms, hips, and core, making it a useful full-body warm-up before strength training. Keep the pace moderate and the knee lifts controlled so you arrive at your main workout fresh.