Handstand Push Up From Kneeling Position (3 Times)
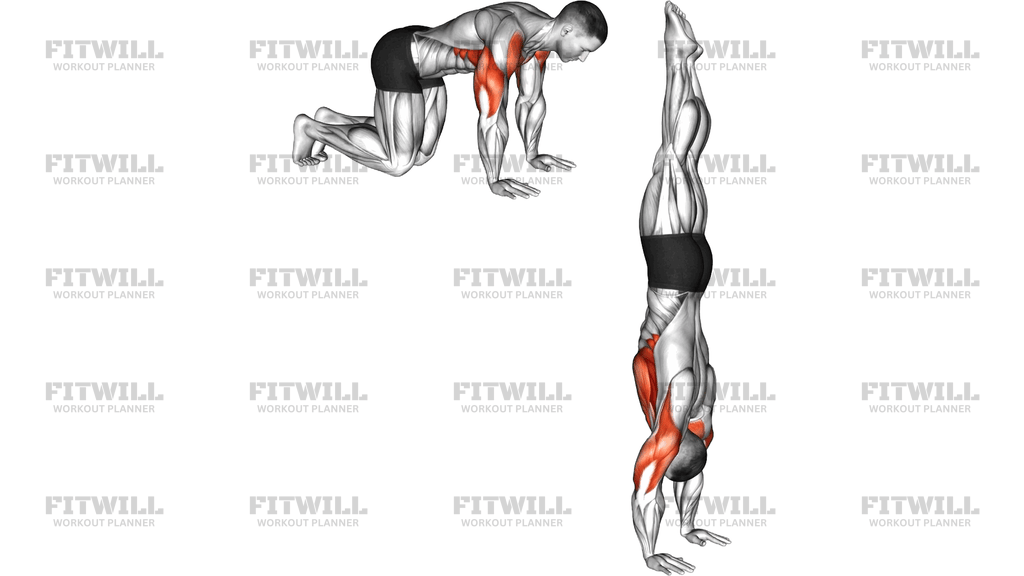
The Handstand Push Up From Kneeling Position is a bodyweight press that starts from a kneeling position on the floor, kicks up into a vertical handstand, and then performs a handstand push up, repeated for three reps before you come back down. It combines two demanding skills into one set: the kick-up and balance of a freestanding handstand, and the overhead pressing strength to lower your body toward the floor and press back out. Because you start from the knees rather than a standing split stance, the kick-up is shorter and more controlled, which makes this version easier to repeat without tiring your legs or scrambling for balance.
This movement suits trainees who already own a comfortable freestanding handstand hold of at least 15-30 seconds and want to build toward full handstand push ups. It is a staple in calisthenics and gymnastics strength work, and it is also a useful teaching drill: the kneeling start removes the standing entry from the equation, so you can spend your effort on the press itself instead of fighting to get upside down.
The primary work comes from the shoulders, especially the front and side delts, with the triceps extending the elbows as you press out of the bottom. The upper back, serratus, and traps stabilize the shoulder blades while the hands stay planted, and the deep core and hip control keep your ribs and legs stacked over your shoulders. Even the wrists and forearms get trained, since your fingers constantly make small pressing corrections to hold balance.
Setup matters more here than in almost any other pressing exercise. Place your hands about shoulder-width apart with fingers spread, and make sure the floor is clear behind and in front of you, because that is the space your legs travel through on the kick-up. Starting from the knees with your weight already shifted onto your hands means your entry into the handstand should be quiet and controlled, not a wild throw that lands you overarched and out of position.
To execute it well, kick up with one leg leading and bring the second leg to meet it, then find a straight vertical line from wrists to hips to toes before you attempt the press. Lower by bending your elbows and letting your head travel slightly forward between your hands, then press back to a locked-out handstand. Three quality reps is the prescribed dose, and that number exists for a reason: balance and pressing precision deteriorate quickly once you fatigue upside down.
Treat this as a skill-strength movement rather than a conditioning exercise. Rest fully between sets, keep the surface you train on free of clutter, and if your balance fails, be prepared to bail by stepping one foot down or cartwheeling out rather than collapsing onto your head or neck.
[ Workout Log & Planner ]
Put your next workout in Fitwill
Keep your plan and training log ready when you are.


Instructions
- Kneel on a clear floor with plenty of open space around you, then place your palms flat on the ground about shoulder-width apart with fingers spread wide.
- Shift your weight forward onto your hands until your shoulders stack directly over your wrists and your knees hover or rest lightly behind you, head lowered between your arms.
- Brace your midsection and squeeze your legs together so your body moves as one piece when you kick.
- Kick one leg up toward the ceiling, let the second leg follow, and rise into a straight vertical handstand with toes pointed and glutes engaged.
- Press firmly through your fingertips and palms to fine-tune your balance before attempting the press, holding the handstand until you feel steady.
- Inhale, then bend your elbows to lower your body, letting your head travel down and slightly forward between your hands until your elbows reach roughly 90 degrees or your controlled depth limit.
- Exhale and press the floor away, extending your elbows back to a locked-out handstand with ears between your arms.
- Complete three total handstand push ups, keeping each rep balanced and controlled rather than rushing through the set.
- After the third rep, lower your legs one at a time with control back down to the kneeling position you started from.
- Rest fully, shake out your wrists, and reset your hand placement before the next set.
Tips & Tricks
- The most common mistake is kicking too hard on the entry and arriving in the handstand overarched with ribs forward. If this happens, use a smaller, sharper kick from the knees and let fingertip pressure stop your legs at vertical.
- Keep your elbows tracking roughly over your wrists instead of flaring out to the sides. Flared elbows in the bottom of the press shift load onto the shoulder capsule and make the press much harder.
- Do not let your head crash toward the floor. The descent should take two to three seconds, and if you cannot lower under control, cut the depth in half rather than dropping fast and grinding out of the bottom.
- Warm up your wrists specifically before this exercise, since they carry your full bodyweight through the entire set. A few sets of wrist rocks and palm-to-back-of-hand stretches make a noticeable difference.
- If you consistently lose balance backward on the press, you are probably letting your shoulders drift behind your wrists at the bottom. Think of pushing the floor away and keeping your head between your arms, not behind them.
- Build confidence by holding the handstand for a full breath or two before each press. A press attempted while still wobbling usually ends the set early.
- Full range to a head-to-floor touch is the goal, but partial reps with perfect balance build more usable strength than deep reps where you lose your line every time.
- Train near a wall at first and use it only as a bail option, not as a crutch you kick into every rep, or the kneeling-start skill will not transfer to freestanding work.
- Do not breathe-hold through the set. Exhale on the press, inhale on the way down, even if the breaths are short.
- Three reps per set keeps the quality high. If rep three gets sloppy or your balance breaks down, stop there instead of adding a fourth.
Frequently Asked Questions
What muscles does the Handstand Push Up From Kneeling Position work?
The shoulders, particularly the front delts, do most of the pressing, supported heavily by the triceps. Your upper back, traps, and core work isometrically to hold the inverted line and balance.
Why start from a kneeling position instead of standing?
The kneeling start gives you a shorter, more controlled kick-up so you arrive in the handstand with less effort and less overshoot. That lets you focus your energy on the pressing portion rather than the entry.
Can beginners do this exercise?
Not usually as written. You should first be able to hold a freestanding handstand for at least 15-30 seconds; before that, build pressing strength with pike push-ups and wall-supported handstand push ups.
Do I need a wall for the Handstand Push Up From Kneeling Position?
No wall is required since the kick-up starts from kneeling, but training near a wall as a bail option is a smart safety choice while your balance is still inconsistent.
How deep should I lower on each handstand push up?
Lower only as far as you can control with elbows bending over your wrists, ideally until your elbows reach about 90 degrees. Depth without balance or control is worth less than a shallower, cleaner rep.
What should I do if I lose my balance mid-set?
Step or hop one foot down toward the floor to break the fall, or cartwheel out of the handstand rather than collapsing. Never let your weight drop onto your head or neck.
My wrists ache during this movement. What can I change?
Spend more time on wrist mobility and conditioning before training, spread your fingers and grip the floor actively, and consider limiting total sets per session since your wrists carry your full bodyweight throughout.
What can I substitute if I cannot kick up to a freestanding handstand yet?
Wall handstand push ups and feet-elevated pike push-ups train the same pressing pattern with less balance demand. Use them until your freestanding hold is solid.
Why only three reps?
Freestanding handstand pressing is as much skill as strength, and precision fades quickly once you are fatigued and inverted. Three reps per set keeps every attempt balanced and technically sound.
How is this different from a regular handstand push up?
A regular handstand push up usually starts already balanced in the handstand, often against a wall. This version adds the kneeling kick-up entry each set, so it trains the entry, the balance, and the press in one continuous sequence.