Wall Walks To Handstand Push Up
Wall Walks To Handstand Push Up is a compound bodyweight movement that combines two of the most demanding vertical pressing skills into one sequence. You begin on all fours with your back toward a wall, walk your feet up the wall until your body stacks into a handstand position, then perform a full push up with your head descending toward the floor before walking back down under control. Because the wall supports your balance, you can focus entirely on pressing strength, body alignment, and overhead mobility instead of fighting to stay stacked.
This movement is a staple in gymnastics-style strength training and calisthenics, and it is especially useful for intermediate lifters who have outgrown regular push ups but are not yet ready for freestanding handstand push ups. The wall walk portion builds shoulder stability, scapular control, and core strength through a large range of motion, while the push up at the top loads the shoulders and triceps with a high percentage of your bodyweight in a true overhead position.
The setup matters more than most people expect. The distance your hands are placed from the wall determines whether the push up portion is even possible. Too close and your head hits the wall before you reach a full range; too far and you lose the vertical stack that makes the press efficient. Hands should be roughly shoulder-width apart or slightly wider, fingers spread, with the middle fingertips a hand-span or so away from the base of the wall.
To execute it well, think of the wall walk as a controlled hip hinge up the wall rather than a scramble. Walk your hands back toward the wall as your feet climb, keeping your ribs down and your glutes engaged so your lower back does not arch excessively. At the top, your body should form one straight line from wrists to hips to ankles, with your head positioned between your arms. The push up itself should lower your head toward a point just in front of your hands, elbows tracking at roughly a 45-degree angle from your torso, then press back to full lockout before descending.
Common use cases include building toward a strict freestanding handstand push up, adding overhead pressing volume without barbells or dumbbells, developing shoulder and scapular resilience for sports like CrossFit, gymnastics, wrestling, and climbing, and training the core anti-extension role in a way floor planks cannot replicate. Because the descent is loaded eccentrically, it also builds a lot of strength per rep even when the press itself is difficult.
Practically speaking, this is a high-skill movement that rewards patience. Warm up your wrists thoroughly, keep your sets short, and stop as soon as your body line breaks down. If you cannot yet press at the top of the wall, hold the handstand position for time or perform a smaller-range partial press instead, and let the strength build progressively. A padded surface or mat under the head area is a sensible precaution for the first several sessions.
[ Workout Log & Planner ]
Put your next workout in Fitwill
Keep your plan and training log ready when you are.


Instructions
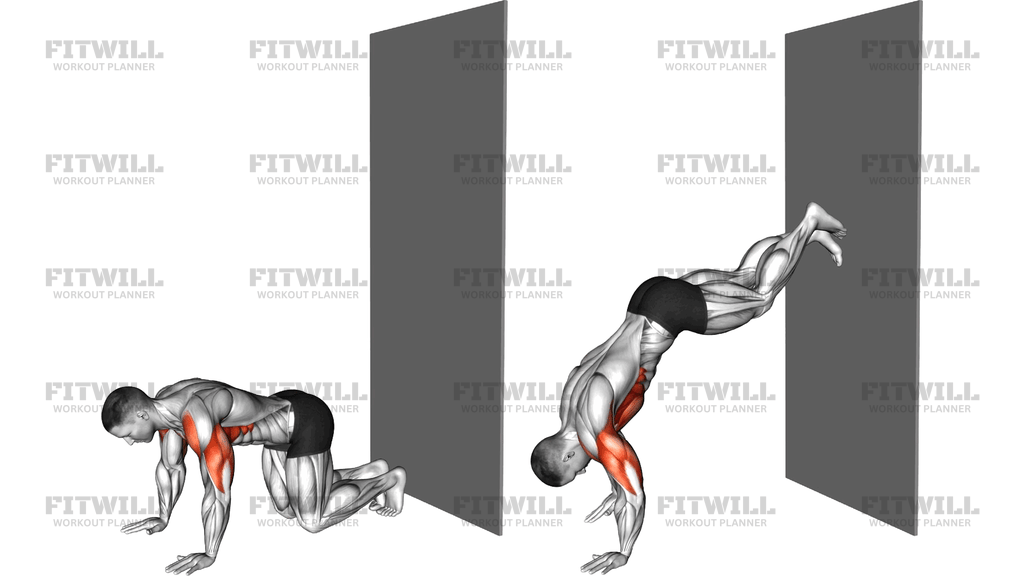
- Place an exercise mat or padded surface along the base of a sturdy, clear wall, then sit with your back to the wall and place your palms flat on the floor about shoulder-width apart, roughly a hand-span in front of your knees' starting reach.
- Push up onto all fours so your hands sit directly under your shoulders and your back faces the wall; your toes should be able to reach the wall when you lift your hips.
- Brace your core, squeeze your glutes, and walk your feet up the wall behind you one at a time, letting your hips rise as your feet climb.
- As your feet ascend, walk your hands back toward the wall in small steps, keeping your arms straight and your ribs pulled down so your lower back stays neutral.
- Continue until your hips are stacked over your shoulders and your body forms a straight vertical line from wrists to ankles, with only your feet lightly touching the wall.
- Bend your elbows and lower your head toward the floor just in front of your hands, keeping your elbows at about 45 degrees from your torso and your heels resting against the wall.
- Pause briefly when your head is just above the mat, then press through your palms and push the floor away until your elbows lock out fully overhead.
- Exhale as you press up and inhale as you lower; keep breathing steadily rather than holding your breath through the descent.
- After your final press, walk your hands away from the wall in small steps as you walk your feet down under control until one foot reaches the floor.
- Stand up, shake out your wrists and shoulders, and reset your hand position before starting the next rep.
Tips & Tricks
- Measure your hand distance from the wall before you climb. A hand-span to a hand-span-and-a-half from the base usually leaves room for the head to descend without slamming into the wall.
- If your lower back arches into a deep banana shape at the top, consciously tuck your ribs and squeeze your glutes; an arched handstand turns the push up into a leaning press and strains the lumbar area.
- Controlled feet-first descents are part of the exercise. Sliding or hopping down wastes the eccentric work and increases the chance of losing footing on a smooth wall.
- If your elbows flare straight out to the sides during the press, your hands are probably too wide. Narrow the grip slightly and think about pushing the floor away with your elbows pointing forward-ish.
- Warm your wrists with circles, stretches, and a few short wall holds first. The walk-up phase loads the wrists at steep angles long before the pressing begins.
- Partial presses count. If you can only lower a few inches at the top, do those reps consistently and the range will grow; forcing the head to the floor too early usually produces a collapsed body line.
- Keep the feet contact light. Pressing hard into the wall with your heels turns the handstand push up into an incline press and robs your shoulders of the adaptation you are training for.
- Stop the set when your hips drift away from the wall or your head position wanders. Fatigue in this movement shows up as a breakdown in alignment before it shows up in pressing strength.
- Face-away wall walks as shown are gentler on the shoulders than chest-to-wall variations for most people; if you want extra technique work, practice slow hand-walking without the push up on separate days.
Frequently Asked Questions
What muscles does Wall Walks To Handstand Push Up work?
The shoulders and triceps do the bulk of the pressing, with the traps, upper back, and serratus anterior stabilizing the shoulder blades. The core and hip flexors hold your body line during the walk up and down the wall.
Can beginners do Wall Walks To Handstand Push Up?
Beginners should start with wall walks only, without the push up at the top, and build comfort being inverted. Once you can hold a solid wall handstand for 30 to 45 seconds, add partial presses before attempting full-range reps.
How far should my hands be from the wall during Wall Walks To Handstand Push Up?
Roughly a hand-span to a hand-span-and-a-half from the base of the wall works for most people. Too close and your head hits the wall during the descent; too far and your body leans away from vertical, making the press much harder.
Why does my lower back arch at the top of Wall Walks To Handstand Push Up?
An arched handstand usually means the core is not braced or the shoulders lack the mobility to stack vertically over the hips. Tuck your ribs, squeeze your glutes, and work on overhead shoulder flexibility to fix the line.
What can I substitute if I cannot press at the top of Wall Walks To Handstand Push Up?
Hold the wall handstand for time, do negative-only reps where you lower slowly and walk down, or practice pike push ups with feet elevated on a box. All three build the same pressing pattern with less demand.
How is Wall Walks To Handstand Push Up different from a freestanding handstand push up?
The wall removes the balance requirement, so you can concentrate on pressing strength and alignment. It is the standard progression step before training the freestanding version, which adds ankle, hip, and fingertip balance control.
Is it safe for my wrists and shoulders?
It is generally safe for healthy wrists and shoulders when warmed up and progressed gradually, but the movement loads both areas heavily. If you have a history of wrist pain or shoulder impingement, build volume slowly and stop if you feel sharp or pinching sensations.
How many reps and sets of Wall Walks To Handstand Push Up should I do?
Two to four sets of three to six quality reps works well for strength, with full rest between sets. Because skill breaks down with fatigue, several clean sets beat one long set where the body line collapses.
Should my feet stay touching the wall during the push up portion?
Yes, keep light contact with your heels or toes against the wall for balance, but do not push into it. Pressing hard against the wall shifts the load away from your shoulders and changes the exercise into something easier.