Wall Walks To Handstand Shoulder Tap
Wall Walks To Handstand Shoulder Tap is an advanced bodyweight gymnastics-style movement that combines the wall walk — climbing your feet up a wall until you reach a handstand position — with controlled single-arm shoulder taps at the top. It is one of the most effective ways to build straight-arm pushing strength, overhead stability, and the balance and confidence needed for freestanding handstands, all while the wall provides a safety net.
The movement demands a lot from the shoulders, particularly the front delts and the muscles that stabilize the scapula, along with the triceps during each tap. Your core works the entire time to hold a straight line from hands to hips, and the wrist extensors and forearms take constant load as they support and steer your weight. Because each tap forces one arm to hold nearly all of your bodyweight alone, it exposes and corrects side-to-side imbalances that regular handstand holds hide.
Setup matters more than most people expect. Place your hands roughly 20 to 30 centimeters from the wall, slightly wider than shoulder width, and walk your feet up only as high as you can keep a hollow, ribs-down body position. If your hands are too far from the wall, you will end up in an arched, banana-shaped handstand that trains poor habits and loads your lower back instead of your shoulders.
Execution should be slow and deliberate. Walk the hands back toward the wall as the feet climb, stop when your chest faces the wall with hands about 10 to 15 centimeters away, then shift your weight over one hand and tap the opposite shoulder. Keep the taps small and controlled — the goal is to prove the supporting arm owns the position, not to move fast.
This exercise is a staple for handstand training, CrossFit-style conditioning, and calisthenics progressions. It also works well as a strength finisher for push-day sessions. If you cannot yet hold a chest-to-wall handstand for 30 to 40 seconds, work on that first, or limit your wall walks to a lower height and practice taps from a shorter, easier angle.
Safety-wise, this is a demanding position for the wrists, elbows, and shoulders. Warm up the wrists thoroughly, keep the elbows from flaring, and come down the wall with the same control you used going up. If you feel pinching in the shoulder or pain in the wrist crease, stop and regress to a shorter walk or an incline variation instead of pushing through discomfort.
[ Workout Log & Planner ]
Put your next workout in Fitwill
Keep your plan and training log ready when you are.


Instructions
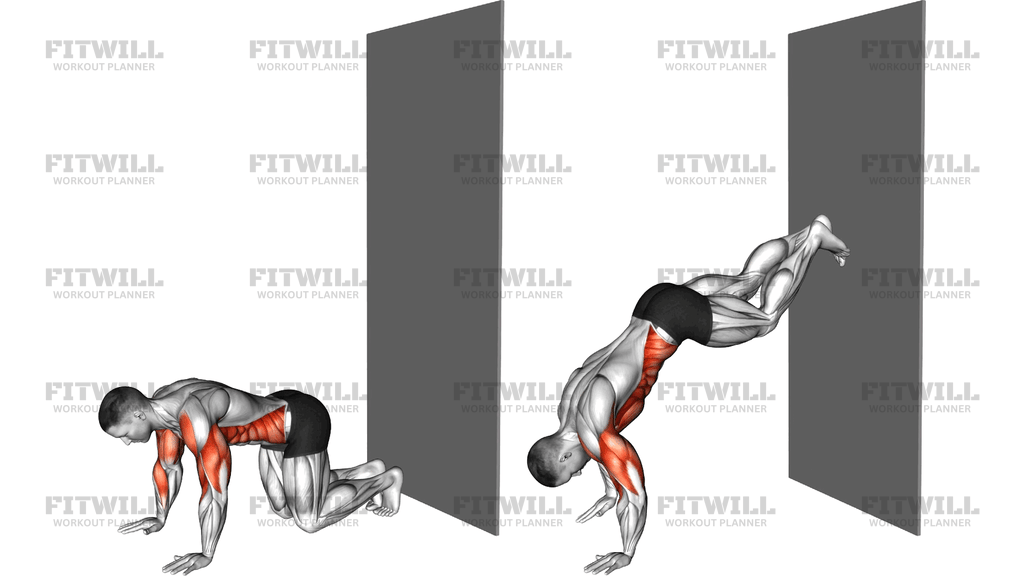
- Kneel facing a clear wall and place your palms flat on the floor about 20 to 30 centimeters in front of it, slightly wider than shoulder width, with fingers spread and middle fingers pointing forward.
- From a hands-and-knees position, place one foot against the wall base, then step the other foot up beside it so you are in a short Pike position with both soles on the wall.
- Brace your core and pull your ribs down so your body forms one straight line from hands to hips before you climb any higher.
- Walk your feet up the wall a few steps at a time while simultaneously walking your hands back toward the wall, keeping the hips stacked over the shoulders as you ascend.
- Climb until you reach a chest-to-wall handstand position: arms fully locked, shoulders pressed up toward your ears, body hollow, and hands roughly 10 to 15 centimeters from the wall.
- Shift your weight deliberately over one hand until it is centered under your shoulder, then lift the other hand and tap the same-side shoulder, keeping the tap brief and controlled.
- Place the tapping hand back down with your fingers spreading to grip the floor again, then shift across and tap the opposite shoulder.
- Breathe in short, steady breaths through your nose while holding the handstand; avoid holding your breath, which causes tension spikes and wobble.
- After finishing your taps, walk your hands forward and step your feet back down the wall one step at a time until your feet reach the floor.
- Reset in the kneeling position, shake out your wrists, and begin the next repetition from a fresh, braced setup.
Tips & Tricks
- If your lower back arches hard as you climb, you have walked your hands too far past your comfort zone — come back down a step and re-establish the hollow position before continuing.
- Wobbling at the top usually comes from tapping too fast. Slow the hand lift down to a two-second lift and a two-second lower so the supporting arm never loses tension.
- Keep your elbows fully locked during the taps. Soft elbows turn the shoulder tap into a mini push-up and shift load away from the shoulder stabilizers you are trying to train.
- Grip the floor actively with your fingertips as you shift sideways. Fingertip pressure is what steers your balance when one hand comes off the ground.
- If your wrists burn on the wall, spend time on wrist stretches and drills before the set, or use a folded mat under the heels of your hands to reduce extension angle.
- A common mistake is facing away from the wall for the taps. Face the wall instead — it forces you into a straighter line and gives you the wall as a spotter if you lose balance.
- Do not climb higher than you can control. A shoulder tap done at chest height with a clean body line builds more capacity than a shaky tap in a full arched handstand.
- Keep your head in a neutral position between your arms. Craning the neck to look at the floor tips your balance and breaks the line from hands to hips.
- Scale by stopping the climb at a 45-degree angle and doing taps there. As that becomes comfortable, walk a step or two higher each week.
Frequently Asked Questions
What muscles does Wall Walks To Handstand Shoulder Tap work?
The shoulders do most of the work, especially the front delts and the scapular stabilizers like the upper traps and serratus anterior. The triceps, core, and forearm muscles support the position throughout the climb and every tap.
Is this exercise suitable for beginners?
Not in its full form. Beginners should start with wall walks that stop at a 45-degree angle and build up to chest-to-wall holds before adding shoulder taps.
Why should I face the wall instead of doing the handstand facing away?
The chest-to-wall position locks you into a straighter body line, prevents the arched lower back that develops with back-to-wall handstands, and lets the wall catch you if your feet slip.
How far should my hands be from the wall at the top?
About 10 to 15 centimeters. Too far away and your shoulders drift behind your wrists, creating an arch; too close and you risk scraping your toes and losing balance backward.
My hips sag and my back arches during the climb. How do I fix it?
Squeeze your glutes, tuck your ribs down, and actively press the floor away to elevate your shoulders. If the sag persists, climb to a lower height where you can hold the hollow line.
How does this exercise help with a freestanding handstand?
Shoulder taps train you to shift weight over one hand and to balance with fingertip and palm pressure, which are exactly the skills you need to correct and hold a freestanding handstand.
How many shoulder taps should I do per climb?
Two to four taps per climb is typical. Prioritize the quality of the handstand position at the top over the number of taps, and stop the set when your line breaks down.
What can I substitute if I cannot yet climb the wall?
Try Pike shoulder taps with feet on the floor, incline shoulder taps with feet on a bench, or a chest-to-wall handstand hold without taps. All three build the same pushing and stabilizing strength at a lower demand.
Is it normal for my wrists to hurt during Wall Walks To Handstand Shoulder Tap?
Some wrist fatigue is expected because they support your full bodyweight in deep extension, but sharp pain is not. Warm up the wrists, ease the extension angle with a slight wedge or mat, and reduce your time under tension if discomfort continues.