Wall Assisted Handstand To Tuck Planche Negative
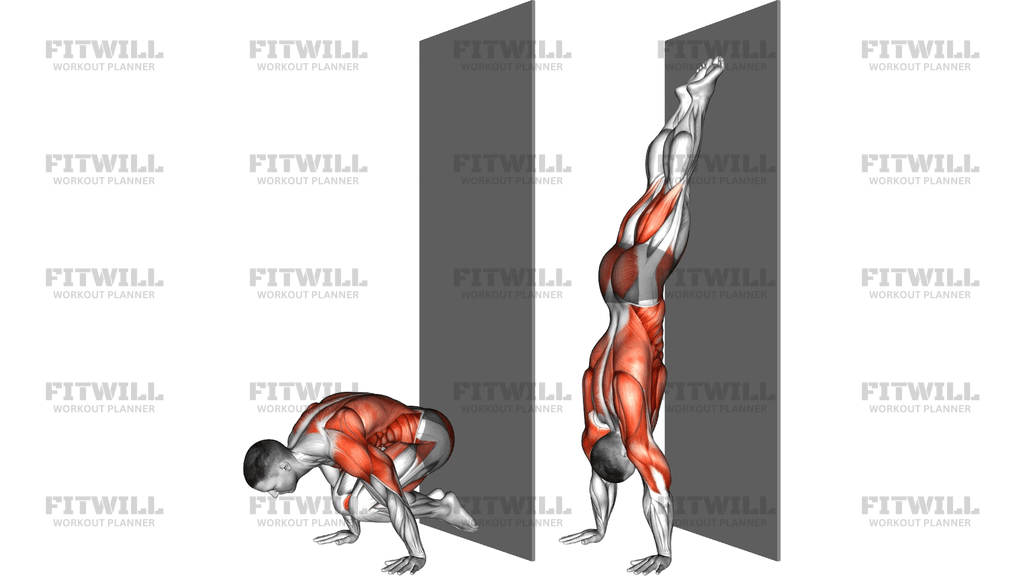
The Wall Assisted Handstand To Tuck Planche Negative is an advanced bodyweight skill drill that links two of calisthenics' most demanding overhead and straight-arm positions. You start in a handstand with your back against a wall, then lower under full control, bending at the hips and knees as your shoulders travel forward over your hands, until you finish in a tucked position close to the floor. The image shows the two ends of that path: the stacked, vertical handstand line and the compact tuck with knees drawn in and shoulders ahead of the wrists.
This movement exists because the hardest part of both the handstand and the tuck planche is the transition zone in between. By using the wall for balance support, you remove the falling risk and can devote all your attention to shoulder positioning, elbow lockout, and eccentric strength. The descent is where the adaptation happens — your anterior delts, triceps, lats, and upper back work hard to lower you slowly instead of letting gravity dump you to the floor.
This drill suits intermediate to advanced trainees who can already hold a wall handstand for 45-60 seconds and have some experience with straight-arm work like wall planks or frog stands. It is a staple for anyone chasing the tuck planche, a straight-arm handstand entry, or simply much stronger overhead pushing and scapular control. Because the negative is self-limiting, it lets you train positions you cannot yet hold isometrically.
Setup matters more than usual here. Hands should be placed roughly 15-25 centimeters from the wall with fingers spread, because as you lower you will lean further over the wrists and need that base to stay stable. Keep the elbows locked from the first millimeter — any bend turns a planche negative into a pseudo planche push-up and dramatically changes the load on the shoulder joint. Protract the shoulder blades, push the floor away, and keep that push alive through the entire descent.
The quality of the rep is judged entirely by speed and contact. A good negative takes four to eight seconds, the hips bend smoothly to bring the knees toward the chest, and the tuck finishes with control rather than a collapse. If you drop fast, the drill loses its purpose, so cut the set the moment your descent turns into free fall. Two to four sets of two to four reps with full rest is plenty for most people, since the eccentric demand on the shoulders and wrists is high.
Warm up the wrists and shoulders thoroughly before attempting this, and use a floor surface that gives you a confident grip. Stop the session if you feel sharp wrist or shoulder discomfort rather than muscular effort, and remember that progress with negatives is measured in weeks and months, not sessions.
[ Workout Log & Planner ]
Put your next workout in Fitwill
Keep your plan and training log ready when you are.


Instructions
- Place your hands about shoulder-width apart on the floor, 15-25 centimeters from the wall, fingers spread wide for grip.
- Kick or walk your feet up the wall into a handstand, working toward a straight line with your heels resting lightly against the wall and your head between your arms.
- Push the floor away so the shoulder blades are protracted, lock the elbows completely, and brace the midsection before starting the descent.
- Begin lowering by shifting your shoulders forward over and past the wrists while keeping the arms perfectly straight.
- As your weight moves ahead of your hands, bend at the hips and draw both knees in toward your chest into a tuck, keeping your back rounded and heels close to your glutes.
- Continue the controlled descent until your knees and lower legs approach the floor in the tucked position, shoulders staying in front of the wrists.
- Take four to eight seconds for the full descent — if you are falling faster than that, end the set rather than crashing into the tuck.
- Exhale steadily through the descent; avoid holding your breath or grunt-straining at the bottom.
- To reset, step one foot down to the floor, stand up, shake out the wrists, and take a full minute or more of rest before the next rep.
- Keep the elbows locked and fingers gripping for the entire rep — if an elbow bends, that rep is over.
Tips & Tricks
- The most common mistake is letting the elbows bend during the descent, which turns the drill into a push-up variation and shifts load onto a bent-arm pattern. If you cannot keep the arms straight, shorten the negative — lower only a few degrees and return up.
- If your shoulders drift behind the wrists on the way down, you will feel it as a sudden loss of control. Think of leaning forward deliberately, like tipping a ladder, rather than sinking straight down.
- Speed kills this exercise. A two-second collapse into the tuck gives your shoulders almost no stimulus; if you cannot slow it down, elevate nothing and instead practice wall plange leans to build the shoulder-over-wrist position.
- Keep the shoulder blades pushed apart the whole way. Allowing the chest to sink between the shoulders is a common failure point right before the drop into the tuck.
- Grip matters more as you lean forward. Press hard through the fingertips during the descent to keep your base from sliding out from under you.
- Warm the wrists with stretches and push-up positions first — this drill loads them at extreme angles and cold wrists are the most frequent complaint.
- Do not turn the toes into your only control point. The wall is for balance reassurance, not for dragging your body down; keep the heel contact light so the arms and shoulders do the work.
- Film yourself from the side. Most people believe they are lowering slowly when they are actually collapsing in the middle third of the movement, right where the hips tuck.
Frequently Asked Questions
What muscles does the Wall Assisted Handstand To Tuck Planche Negative work?
The primary load lands on the shoulders, especially the anterior delts, along with the triceps working to keep the elbows locked. The lats, upper back, core, and forearm muscles stabilize the descent, and the hip flexors drive the tuck.
Can beginners do the Wall Assisted Handstand To Tuck Planche Negative?
It is not a beginner drill. You should be comfortable holding a wall handstand for most of a minute and have experience with straight-arm holds like the frog stand before attempting it, because the shoulder leverages are demanding even without added weight.
How far from the wall should my hands be?
Roughly 15-25 centimeters works for most people. Too close and your knees cannot tuck without scraping the wall; too far and your handstand line becomes arched and harder to control during the lean.
Why do my elbows bend during the negative?
Bent elbows usually mean the load has exceeded your straight-arm strength, so the body instinctively recruits the pushing muscles. Regress to shorter partial negatives or wall plange leans until you can keep the arms locked through a longer range.
How long should each negative take?
Aim for four to eight seconds from handstand to tuck. If you cannot control at least four seconds, the position is too advanced and you will get more from easier progressions.
What can I substitute if the full negative is too hard?
Wall plange leans, where you hold the shoulders-forward lean from a plank with feet on the wall, build the same shoulder-over-wrist strength. Frog stands and wall handstand shoulder taps are also good precursors.
How should I protect my wrists in this exercise?
Warm them up thoroughly, spread the fingers and grip the floor, and keep the pressure distributed through the whole palm and fingertips rather than the heel of the hand. Stop the session if you feel sharp or pinpoint pain rather than muscular effort.
How often should I train the Wall Assisted Handstand To Tuck Planche Negative?
One to three sessions per week with at least a day between them works well, since the eccentric stress on the shoulders and wrists needs recovery time. Keep volume low — two to four hard reps per set is usually enough.
Why use a wall instead of a freestanding handstand for this drill?
The wall removes the balance component so you can push the eccentric intensity and practice the exact shoulder lean that the tuck planche demands. Once the negative feels strong, you can transfer the pattern toward freestanding work.