Standing Angel Wall Supported
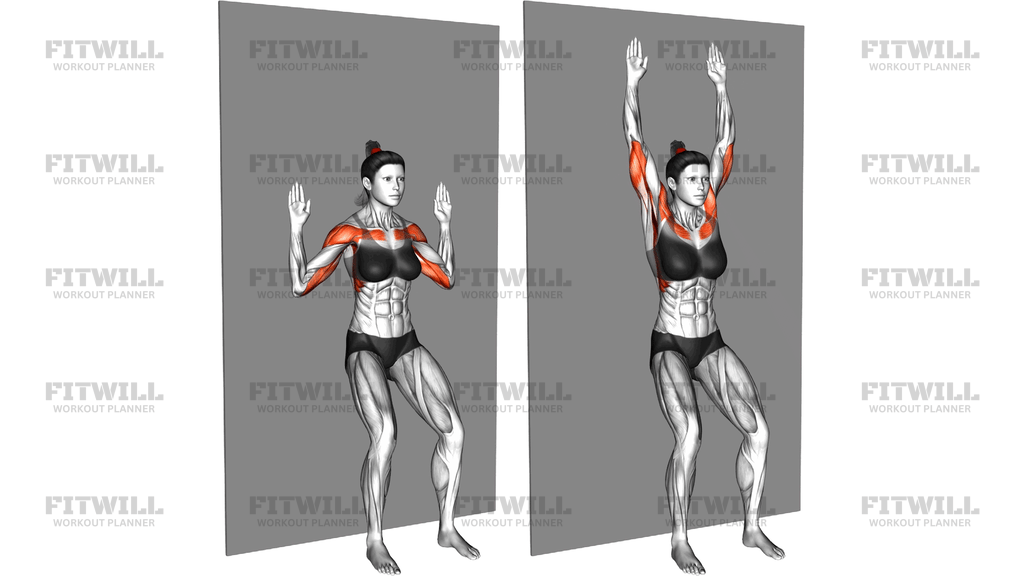
Standing Angel Wall Supported is a body weight mobility and activation exercise performed with your back flat against a wall. You start with elbows bent and the backs of your hands, forearms, and elbows pressed against the wall at shoulder height, then slowly slide your arms up overhead as far as you can maintain wall contact, before reversing the path back down. The movement resembles a snow angel made vertically, which is where the name comes from.
This exercise is best known as a posture and shoulder health drill. It works the lower and middle trapezius, rhomboids, rotator cuff muscles, and the deltoids, while the wall itself acts as instant feedback: any time your ribs flare or your lower back arches, your arms will peel away from the surface. That makes it useful for people who spend long hours sitting at a desk, lifters with limited overhead range of motion, and anyone rehabbing general shoulder stiffness after being cleared to train.
The wall-supported setup is what separates this from a free-standing arm circle or raise. Because your spine, shoulder blades, and arms all stay in contact with a flat plane, your body has no room to cheat with excess arching or shrugging. You are forced to move through the shoulder's true available range, which makes even a small slide up the wall feel demanding if your overhead mobility is restricted.
To execute it well, keep a soft knee bend, brace your core lightly, and press the low back, upper back, and head gently toward the wall before you start. Slide the arms up smoothly, exhaling as you reach, and stop at the first point where your hands or forearms want to leave the wall. Control the descent just as slowly. Two to three sets of eight to ten slow reps is a typical dose, either as a warm-up before pressing or pulling work or as a standalone daily posture habit.
Expect it to feel awkward at first if your thoracic spine or shoulders are tight; many people can only travel halfway up on early attempts. That is normal and improves with consistent practice. Move within the range you can keep honest wall contact, and treat progress as your hands getting higher each week rather than forcing range you cannot control.
Fitwill
Log Workouts, Track Progress & Build Strength.
Achieve more with Fitwill: explore over 9600 exercises with images and videos, access built-in and custom workouts, perfect for both gym and home sessions, and see real results.
Start your journey. Download today!




Instructions
- Stand with your back against a flat wall, feet a few inches out from the baseboard and about hip-width apart, with a small bend in the knees.
- Flatten your low back, upper back, and the back of your head gently against the wall, and brace your core as if preparing for a light push to the stomach.
- Raise both arms into a goalpost position with elbows bent at roughly 90 degrees, and press the backs of your hands, forearms, and elbows into the wall.
- Inhale at the bottom, then exhale as you slowly slide your arms up along the wall, straightening the elbows toward an overhead position.
- Keep your wrists, forearms, and elbows in contact with the wall for as long as possible during the slide.
- Stop at the highest point where your hands and arms still touch the wall without your low back arching or your shoulders shrugging up.
- Pause briefly at the top, then reverse the path, sliding the arms back down to the goalpost position with the same slow control.
- Keep breathing steadily throughout each rep rather than holding your breath at the top.
- Complete 8 to 10 controlled reps, resetting your back and core position against the wall whenever you feel it drift away.
Tips & Tricks
- If your hands cannot stay on the wall as you reach overhead, shorten the range instead of arching your lower back to fake the top position.
- Watch for shrugging: if your shoulders ride up toward your ears, consciously pull the shoulder blades down before each slide.
- A common mistake is flaring the ribs and letting the low back pop off the wall as the arms go up; imagine zipping your ribs down toward your hips throughout the rep.
- Keep the wrists straight and palms facing forward rather than letting the hands curl inward as fatigue sets in.
- If the backs of your hands cannot reach the wall due to tight shoulders or chest, start with forearms and elbows only, and work toward full hand contact over time.
- Do this barefoot or in flat shoes with the feet a few inches from the wall so you can hinge the pelvis slightly and flatten the low back.
- Move slower than feels necessary; the wall slide is a control drill, and rushing it turns it into a loose arm swing with little benefit.
- If standing is uncomfortable or you cannot keep your head on the wall, a seated version on a bench with a firm backrest is a reasonable downgrade.
- Expect one side to move better than the other; pause at the sticking point on the restricted side rather than letting the free arm do the work.
Frequently Asked Questions
What muscles does the Standing Angel Wall Supported work?
It primarily targets the deltoids and rotator cuff muscles that move the arms overhead, along with the lower and middle trapezius and rhomboids that control the shoulder blades against the wall. The core works isometrically to keep your ribs and low back flat against the surface.
Is the Standing Angel Wall Supported good for beginners?
Yes, it is one of the safest starting points for shoulder mobility work because the wall guides the path and provides instant feedback on form. Beginners should simply work within a shorter range and progress upward as wall contact improves.
Why do my hands keep coming off the wall during the Standing Angel Wall Supported?
This usually means limited overhead range from tight lats, chest, or thoracic spine, or the low back is arching to compensate. Reduce how high you slide, re-flatten your back, and build range gradually rather than forcing the arms to the top.
Should my entire back stay flat against the wall?
Aim for contact at the head, upper back, and low back, but a small natural gap behind the lumbar spine is fine. What matters is that the gap does not grow as your arms rise, which would mean you are arching instead of moving through the shoulders.
How is the Standing Angel Wall Supported different from a regular wall slide?
The two terms are often used for the same drill, but the angel name emphasizes the continuous up-and-down slide of the full arm along the wall. Some wall slide variations keep the elbows bent the entire time, while the angel pattern straightens the elbows overhead.
How many reps and sets should I do?
Two to three sets of 8 to 10 slow, controlled reps works well, either before upper body training or as a daily posture drill. Focus on quality of wall contact rather than pushing to fatigue.
Can I do the Standing Angel Wall Supported every day?
Yes, it is low-load and recovery-friendly, so many people use it daily as a desk-break or warm-up habit. If you feel persistent pinching or sharp discomfort in the shoulder rather than muscular effort, reduce the range and consult a professional.
What can I substitute if I have no clear wall space?
A seated version against a firm bench backrest or a door frame works, though the feedback is less complete. Free-standing snow angels lying on the floor are another option, since the floor provides the same contact cues in a different plane.
Should I feel this in my neck or shoulders?
You should feel muscular effort around the shoulders and between the shoulder blades. If your neck gripes, check that you are not shrugging or jutting your chin up to keep the head on the wall, and slightly lower your working range.