Lying Floor Slide
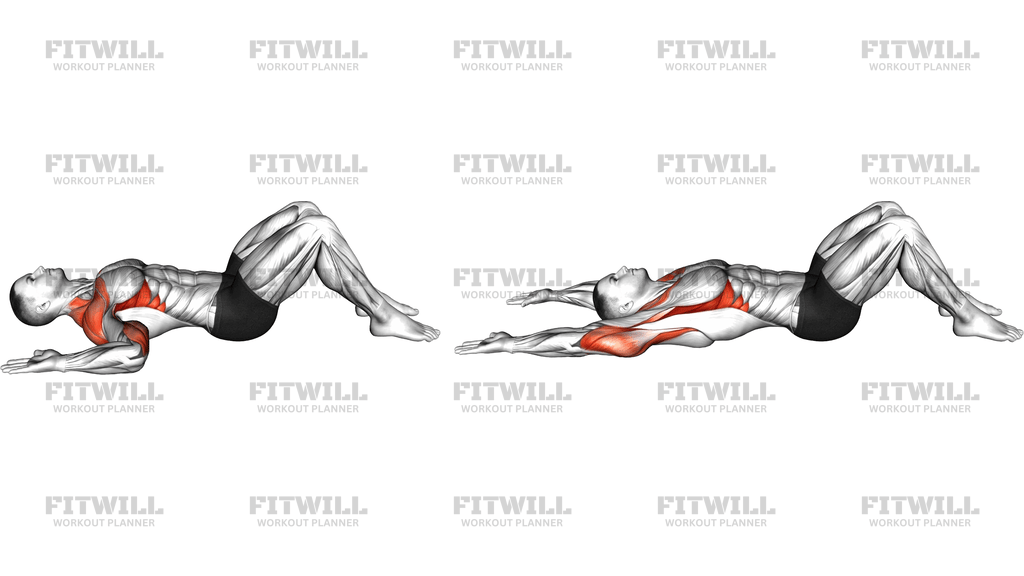
The Lying Floor Slide is a supine shoulder mobility drill performed with nothing but your body and the floor beneath you. You lie on your back with your knees bent and feet flat, reach your arms straight up toward the ceiling, and then slowly lower and slide your arms along the floor out to the sides and overhead, keeping contact with the ground the whole way. It looks simple, but the constant floor contact creates gentle friction and feedback that makes it one of the best tools for teaching the shoulders how to move through a full overhead range without compensation.
Because you are lying on your back, gravity assists the arms into the stretched position while the floor guides the path. That makes this movement especially useful for people whose shoulders drift forward or shrug when they press or reach overhead. Office workers, lifters with tight chests and lats, and anyone rebuilding overhead mobility after a long period of inactivity tend to benefit quickly. It is also a low-load option for warming up the shoulders before pressing days or cooling down after heavy upper-body training.
The movement primarily works through the shoulder joints while the muscles of the chest, lats, and front of the shoulders lengthen under light active tension. The muscles between the shoulder blades and along the rib cage work to keep the arms flat against the floor, which trains scapular control rather than raw strength. The bent-knee position presses the lower back toward the ground, so the core stays quietly engaged to stop the ribs from flaring as the arms travel overhead.
Setup matters more here than in most drills. If your head, ribs, or hips shift as the arms move, you lose the floor contact that makes the exercise effective, and the shoulders start compensating instead of opening up. Keep the feet planted, the back of the rib cage heavy, and the elbows soft but essentially straight so the slide travels through the shoulder rather than the elbow.
To execute it well, move slowly and let the range be dictated by where you can keep the arms touching the floor, not by how far you can force them overhead. The hands should trace a smooth arc from beside the hips, out to the sides, and up past shoulder level toward the ears, then retrace the same path back down. Two or three controlled passes at the end of your available range is usually enough.
You can use the Lying Floor Slide as a daily mobility snack, a pre-training shoulder primer, or a gentle restorative drill between heavier sessions. If the floor feels hard on the shoulder blades or tailbone, a thin mat or carpet helps, but avoid anything too cushioned that lets the body sink and changes the slide path.
Fitwill
Log Workouts, Track Progress & Build Strength.
Achieve more with Fitwill: explore over 9600 exercises with images and videos, access built-in and custom workouts, perfect for both gym and home sessions, and see real results.
Start your journey. Download today!




Instructions
- Lie on your back on the floor or a thin mat with your knees bent and feet flat on the ground, hip-width apart.
- Rest the back of your head and shoulders on the floor, and let your lower back settle gently toward the ground without forcing it flat.
- Raise both arms straight up toward the ceiling with elbows nearly locked and palms facing each other or up.
- Brace lightly by drawing the lower ribs down so they do not flare as the arms begin to move.
- Slowly lower your arms out to the sides and slide the backs of your hands and arms along the floor in a wide arc toward the overhead position.
- Continue sliding until your hands approach the floor beside your ears, stopping at the first point where either arm loses contact with the ground.
- Pause briefly overhead, feeling the stretch through the chest, front of the shoulders, and lats while keeping the ribs down.
- Reverse the path with the same control, sliding the arms back down along the floor to the starting position beside your hips.
- Breathe steadily throughout, inhaling as the arms travel overhead and exhaling as they return.
- Complete 2-3 sets of 8-10 slow slides, resetting your knee and foot position between sets if anything has shifted.
Tips & Tricks
- If your hands hover well above the floor at shoulder level, your chest and lats are likely the limiting factor — slide only as high as the arms can stay in contact rather than lifting them off to gain range.
- Ribs flaring toward the ceiling is the most common fault in this position; press the lower back gently toward the floor and shorten the overhead range until the rib cage stays quiet.
- Shoulders shrugging toward the ears defeats the purpose — consciously pull the shoulder blades down your back before starting each slide.
- Bend the elbows only if the shoulder joint feels pinched; a slightly softened elbow usually fixes discomfort without turning the slide into a curl.
- Move slower than feels necessary. Rushing turns the drill into a pendulum swing and removes the friction that gives the shoulders feedback.
- If one side slides further overhead than the other, do a few extra single-arm slides on the restricted side instead of pushing the mobile side deeper.
- Squeeze the shoulder blades together lightly as the arms reach the top of the slide to encourage the upper back to participate rather than hanging passively in the stretch.
- A hard floor works best; a thick, soft mat lets the shoulder blades sink and makes clean floor contact difficult.
- Stop the slide and shorten the range if you feel sharp or pinching sensations in the front of the shoulder — mild stretch is fine, joint pain is not a signal to push through.
Frequently Asked Questions
What muscles does the Lying Floor Slide work?
It primarily moves and mobilizes the shoulders, with the chest, lats, and front delts lengthening through the slide. The upper back and scapular stabilizers work to keep the arms flat against the floor, and the core quietly holds the rib cage down.
Is the Lying Floor Slide good for beginners?
Yes, it is one of the safest shoulder mobility drills because the floor supports the arms and sets the movement path. Beginners should simply start with a shorter overhead range and expand it as floor contact improves.
Why do my arms lift off the floor when I slide overhead?
That usually indicates tightness through the chest and lats, or the rib cage flaring up to fake extra range. Reduce the distance the arms travel, keep the lower ribs drawn down, and work gradually toward a higher slide while maintaining contact.
Should my knees be bent or legs straight during the Lying Floor Slide?
Bent knees with feet flat, as shown in the standard setup, press the lower back toward the floor and stop the hips from tilting as the arms go overhead. Straight legs make it harder to keep the rib cage and pelvis in a stable position.
How is the Lying Floor Slide different from a wall slide?
The wall slide is done standing and fights gravity as you press the arms up a wall, while the Lying Floor Slide uses the supine position so the floor guides the path and gravity assists the overhead reach. The floor slide is generally gentler and better for pure mobility work.
Can I do the Lying Floor Slide every day?
Yes, it is low load and well suited to daily practice, especially if you sit for long hours or press overhead frequently. One or two slow sets a day is enough for most people to see the range improve over a few weeks.
When should I do this exercise — before or after training?
It works well as a shoulder primer before pressing or pulling sessions and equally well as a cooldown afterward. On rest days, use it as a standalone mobility drill.
Is it normal to feel a stretch in the chest and lats?
Yes, a broad stretching sensation across the chest, front of the shoulders, and along the sides of the rib cage is the intended feeling. Sharp pain, pinching, or numbness into the arms means you should shorten the range and ease off.
What can I substitute if lying on the floor is uncomfortable?
A thin exercise mat or carpet usually solves discomfort on the shoulder blades or tailbone. If floor lying still is not an option, a standing wall slide trains a similar shoulder path with a different assistance profile.