Eight Angle Yoga Pose
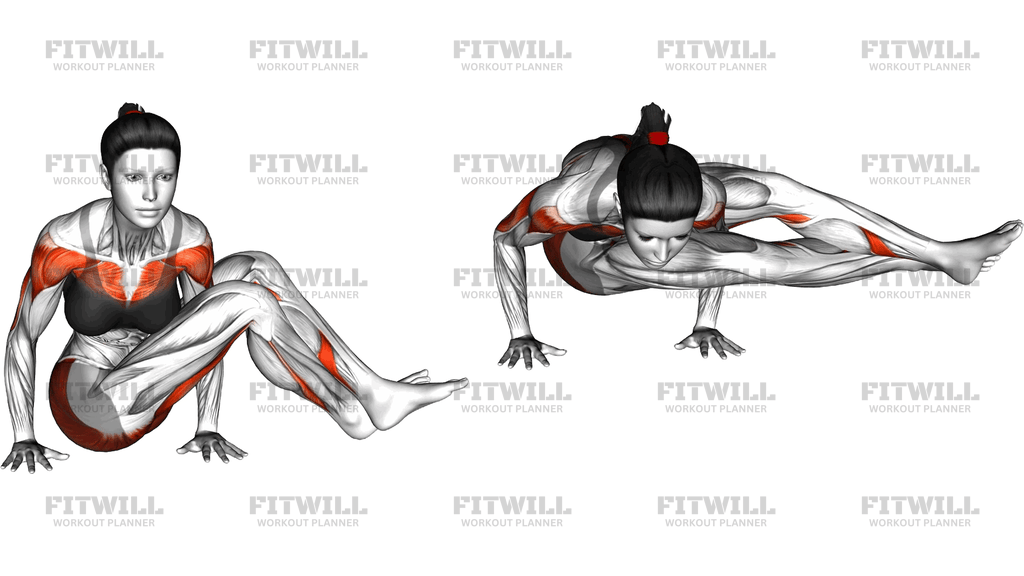
The Eight Angle Yoga Pose, known in traditional yoga as Astavakrasana, is an advanced arm balance that combines a deep twist with a straight-leg lift off the floor. Unlike most arm balances where the knees stay bent and tucked, this pose asks you to extend both legs out to one side while your entire body weight rests on your hands. The result is a shape that looks almost architectural: shoulders level, legs long, and the torso suspended between the arms at an angle.
This movement is especially valuable for experienced yogis, calisthenics practitioners, and anyone building toward advanced arm balances like Peacock Pose or one-legged variations of Crow. It trains pressing strength through the shoulders and triceps, scapular stability through the chest and serratus anterior, and a strong rotational squeeze from the obliques as the legs clamp around the supporting arm. Because one leg hooks over the shoulder and the other crosses beneath, the inner thighs and hamstrings also work hard to hold the legs together in the air.
Setup is where this pose is won or lost. Sitting on the mat, you thread one arm under a bent knee and plant that hand well outside the hip. The grip width and hand placement matter more than raw strength: hands too narrow make the lift unstable, while hands set too far forward leave you pitching onto your face. Taking a moment to spread the fingers, press the outer hands firm, and draw the shoulder blades down before lifting sets the foundation for everything that follows.
To execute the pose well, think of it as two phases. First, establish the bind: lift the hooked leg over the shoulder, cross the ankles, and squeeze the legs against the arm as if trying to snap it. This compression turns two loose limbs into one rigid unit, which is what actually allows the lift. Second, lean forward over the hands, let the hips swing out to the side, and straighten both legs together as the seat leaves the floor. The exhale is your friend here; emptying the lungs makes the body lighter and the lift cleaner.
Common use cases include advanced vinyasa sequences, arm-balance workshops, and gymnastic-strength training sessions where rotational control is a priority. Because it demands both hip opening and upper-body strength, it also serves as an honest assessment pose: if you can sit comfortably in a deep seated twist and hold a solid Chaturanga, you are likely ready to work on it.
A few safety points are worth respecting. Keep the elbows tracking close to the body rather than flaring wide, and never drop into the pose with locked or collapsed shoulders. Wrists take a serious load here, so warm them up thoroughly and come down if you feel pinching. Practice on a mat with a clear space in front of you, and expect to fall out of the pose many times before it holds — that is part of the process, not a sign of failure.
[ Workout Log & Planner ]
Put your next workout in Fitwill
Keep your plan and training log ready when you are.


Instructions
- Sit on your mat with both legs extended, then bend your right knee and hug the thigh toward your chest.
- Thread your right arm under the right knee and plant the right hand on the mat well outside your right hip, fingers spread wide.
- Place your left hand on the mat beside your left hip, about shoulder-width from the right hand, and press both palms firmly into the floor.
- Lift the bent right leg over the right shoulder so the back of the thigh rests high on the triceps, then cross your left ankle over the right ankle.
- Squeeze the legs tightly together against the right arm and lean your torso forward, shifting your weight into the palms as the shoulders stack over the wrists.
- On an exhale, press the floor away, straighten the elbows slightly, and let both legs swing out to the left side as the hips lift off the mat.
- Extend both legs fully toward the left, reaching through the heels, and hold the pose for one to five breaths with the chest lifted and gaze forward.
- To come down, bend the knees, lower the hips back toward the mat with control, and uncross the ankles before releasing the leg from behind the shoulder.
- Breathe steadily throughout — inhale as you set the bind, exhale as you lift — and avoid holding your breath at the top of the pose.
- Reset and repeat the full sequence on the other side, threading the left arm under the left knee and extending the legs to the right.
Tips & Tricks
- The most common mistake is skipping the leg squeeze. If the inner thighs are not actively clamping the arm, the legs slip and the lift collapses — squeeze first, lift second.
- If your hand slides forward during the lift, you will pitch forward onto the nose. Plant the supporting hand slightly wider and press through the fingertips to stay balanced.
- Short hamstrings or hips make the initial thread difficult. Straighten the top leg and fold forward briefly before lifting to create the hip mobility you need.
- Elbows that flare out to the sides dump shoulder stability. Think Chaturanga arms: elbows brushing the ribs, forearms vertical.
- If the lift feels impossible, start with the hips barely hovering an inch off the mat. Small, repeated hops teach the weight shift better than one big struggling lift.
- A stubborn crossed-ankle grip causes the legs to separate mid-hold. Cross the ankles at the top of the foot, not the shin, so the hook locks in place.
- Cold wrists are the main injury risk in this pose. Circle the wrists, rock on all fours, and do a few Crow Pose attempts before loading the Eight Angle Yoga Pose.
- Keep the neck long and look slightly forward rather than straight down; dropping the head rounds the upper back and makes the lift heavier.
- Work the pose near a wall or on a soft surface at first. Falling sideways is the most common exit, and knowing the landing is safe lets you commit to the lean.
Frequently Asked Questions
Which muscles does the Eight Angle Yoga Pose work the most?
The shoulders and triceps carry most of the load, supported by the chest as you press the floor away. The obliques and deep core drive the twist, while the inner thighs and hamstrings hold the legs clamped around the arm.
Is the Eight Angle Yoga Pose suitable for beginners?
It is an advanced pose, but beginners can work the pieces separately. Practice threading the arm under the leg, lifting the leg onto the shoulder, and holding a bent-knee hover before attempting the full straight-leg lift.
How long should I hold the Eight Angle Yoga Pose?
One to five calm breaths is a solid target. Because the wrists and shoulders take concentrated load, several short, quality holds beat one long grinding effort.
Why do my legs keep slipping off my arm during the lift?
The ankle cross and the inner-thigh squeeze are what lock the legs in place. Cross the ankles firmly at the top of the feet and clamp the thighs against the arm before your weight shifts forward.
What can I do if I cannot hook my leg over my shoulder?
Spend time on hip openers and seated forward folds, and use a smaller starting shape: bend the knee more and place the thigh on the upper arm instead of the shoulder. A yoga strap looped around the thigh can also help you learn the bind.
Which poses prepare me for the Eight Angle Yoga Pose?
Crow Pose builds the basic arm-balance weight shift, Chaturanga develops the pressing and elbow position, and deep seated twists plus Revolved Hand-to-Big-Toe Pose open the hips and hamstrings this pose demands.
Is it normal for my wrists to ache in this pose?
Some wrist fatigue is expected since they bear your full body weight, but sharp pain is not. Warm the wrists up, spread the fingers and grip the mat, shift weight slightly toward the heels of the hands, and stop if pain persists.
How do I fall out of the Eight Angle Yoga Pose safely?
Most falls go sideways toward the extended legs, so keep that area clear and practice on a mat. If you feel yourself tipping, bend the knees and lower the hips back toward the floor rather than catching yourself on a locked arm.
Should my arms be straight or bent in the final position?
The arms stay mostly straight with the elbow of the supporting arm close to the ribs, similar to a high plank. Fully collapsing onto a bent arm removes the shoulder stability the pose is meant to build.