Standing Angel Wall Supported
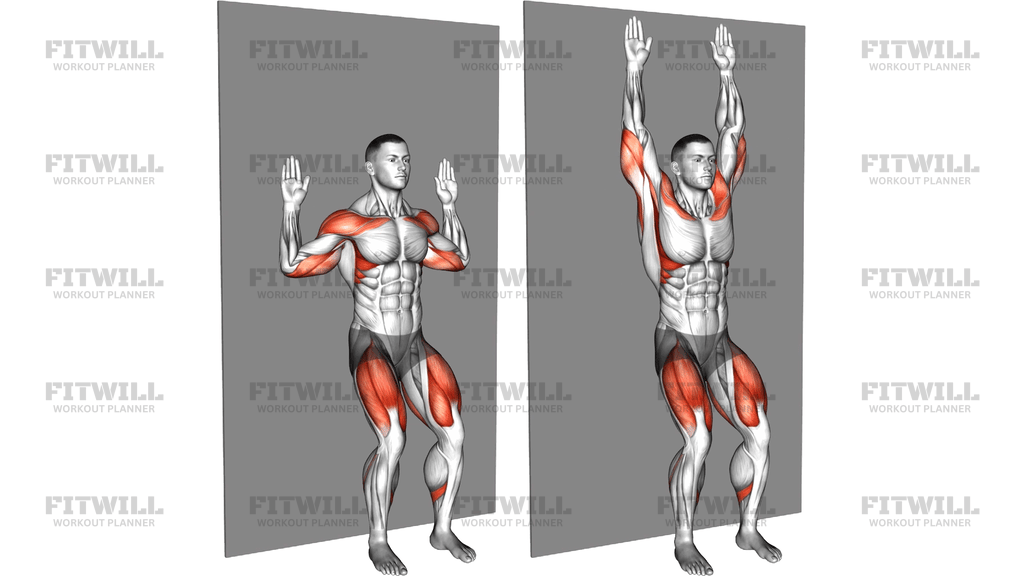
The Standing Angel Wall Supported is a bodyweight mobility and control drill performed with your back flat against a wall. You start with your elbows bent at roughly 90 degrees, upper arms out to the sides, and the backs of your hands, forearms, and elbows touching the wall. From there, you slowly slide your arms up the wall until they are nearly straight overhead, then reverse the path back down to the start. The movement looks simple, but keeping every contact point on the wall while your ribs stay down makes it surprisingly demanding.
This drill is a staple in shoulder warm-ups and postural programs because it trains overhead range of motion with immediate feedback. The wall acts as a guide: the moment your shoulders round forward or your lower back arches, your arms peel away from the surface and you know instantly that form has slipped. That makes it especially useful for people who spend long hours sitting, since it encourages the shoulder blades to move upward and rotate properly instead of the chest compensating for overhead motion.
Muscularly, the Standing Angel Wall Supported works the deltoids through a full overhead arc while the lower and middle traps, rhomboids, and serratus anterior control the shoulder blades. The rotator cuff muscles stabilize the shoulder joint throughout the slide, and the trunk works isometrically to keep your spine flat against the wall. It is low load by design, so it suits warm-ups, recovery days, and anyone rebuilding comfortable overhead movement rather than chasing heavy strength.
Setup matters more here than in most bodyweight drills. Stand with your head, upper back, and hips touching the wall, feet a few inches out so your knees stay soft, and press your lower back gently toward the wall without forcing it flat. If you start with your ribs flared or shoulders shrugged, the whole slide happens through your lower back instead of your shoulders, which defeats the purpose.
To execute it well, keep the contact points continuous: hands, wrists, and elbows should stay glued to the wall for the entire slide. Move slowly enough that you could pause at any height, and stop the range the moment something has to lift off or your back arches. Most people find the lowest few inches on the way down the hardest part, which is exactly where the drill earns its keep.
Common use cases include pre-training shoulder preparation, desk-worker posture routines, physical therapy progressions for overhead tolerance, and as a self-test to check whether your overhead range is limited by stiffness or by control. Because it needs no equipment and only a few feet of clear wall, it fits easily into any warm-up or daily movement break.
Fitwill
Log Workouts, Track Progress & Build Strength.
Achieve more with Fitwill: explore over 9600 exercises with images and videos, access built-in and custom workouts, perfect for both gym and home sessions, and see real results.
Start your journey. Download today!




Instructions
- Stand with your back against a clear wall, positioning your head, upper back, and hips in contact with the surface and your feet about 4-6 inches in front of it.
- Raise your arms to shoulder height and bend your elbows to 90 degrees so the backs of your hands, forearms, and elbows rest against the wall, forming a goalpost shape.
- Gently draw your lower ribs down toward the wall so there is only a small natural gap at your lower back, and soften your knees slightly.
- Take a breath in, then exhale as you begin sliding your hands and elbows up the wall in a slow, smooth arc toward overhead.
- Continue the slide until your arms are nearly straight above your head, keeping your wrists and forearms in contact with the wall as long as possible.
- At the top, reach slightly taller through your fingertips without shrugging your shoulders toward your ears or letting your back arch off the wall.
- Reverse the path with control, sliding your hands back down the wall until your elbows return to the 90-degree goalpost position.
- Breathe steadily throughout, exhaling on the way up and inhaling on the way down, and never hold your breath.
- Complete your target repetitions, resetting your rib and shoulder position at the bottom of each rep before starting the next slide.
Tips & Tricks
- If your hands or forearms keep peeling off the wall, narrow your starting position slightly or shorten the range; forcing contact usually means the chest or lats are tight.
- Watch for the ribs flaring up as the arms rise. If your lower back arches away from the wall, stop the slide at that height and work within that range until it improves.
- Keep the elbows from collapsing inward during the descent. They should track outward and stay wide, matching the path they took on the way up.
- Avoid shrugging your shoulders to your ears at the top. Think of the shoulder blades gliding up and around the ribcage rather than the neck doing the lifting.
- Move slower than feels necessary. A slide of two to three seconds up and the same down gives the shoulder blades far more useful feedback than rushing the reps.
- If your wrists cannot comfortably rest flat against the wall due to tight forearms or shoulders, keep light contact with the backs of the hands rather than forcing the wrists down.
- Place a small towel behind your head and upper back only if the wall feels uncomfortable; do not pad the lower back, where arching is the mistake you are trying to catch.
- Bend the knees a little more if you feel your hips push forward and your lower back press hard into the wall during the slide.
- Treat mild awareness of the shoulder blades working as the goal; any pinching in the front of the shoulder or pain at the neck means reduce the range or stop.
Frequently Asked Questions
What muscles does the Standing Angel Wall Supported work?
The deltoids drive the arms through the overhead arc while the lower and middle trapezius, rhomboids, and serratus anterior control the shoulder blades. The rotator cuff stabilizes the joint and the trunk holds your spine against the wall.
Is the Standing Angel Wall Supported good for beginners?
Yes, it is one of the most beginner-friendly shoulder drills because it is load-free and the wall gives constant feedback on form. Beginners often have a shorter range at first, which simply marks the range to work within.
Why do my arms keep coming off the wall during the slide?
This usually points to tightness in the chest or lats, or the shoulder blades rounding forward to compensate. Shorten the range so contact stays continuous, and gradually work higher over weeks as mobility improves.
How many reps and sets of the Standing Angel Wall Supported should I do?
A typical dose is 2-3 sets of 8-10 slow slides, either as a warm-up before pressing or pulling work or as a daily posture break. Quality of contact matters far more than rep count.
Should my lower back be completely flat against the wall?
No, forcing the lower back flat can be uncomfortable and unnecessary. Keep a small natural gap by gently drawing the ribs down, and just make sure the gap does not grow as your arms rise.
What is the most common mistake in this exercise?
Arching the lower back and flaring the ribs to fake extra overhead range. If your back leaves the wall as you slide up, stop at that height and build the range gradually.
What can I use instead of a wall if I do not have clear wall space?
A sturdy door or a smooth vertical post works the same way. The key requirement is a flat surface tall enough for your arms to reach nearly overhead while your back stays in contact.
Can I do the Standing Angel Wall Supported every day?
Yes, its low-load nature makes it suitable for daily practice, and many people use it as a movement break during long sitting periods. If a shoulder feels irritated rather than merely working, take a rest day.
How is this different from a wall slide or floor slide?
The standing version with the full back against the wall adds the demand of keeping the ribs and spine controlled, whereas floor versions remove that trunk challenge. The wall also gives clearer feedback when the shoulders round forward.