Standing Push And Toe Tap
The Standing Push And Toe Tap is a body weight coordination drill that combines an overhead press pattern with a single-leg balance challenge. You stand tall with your elbows bent at shoulder height and palms facing forward, then press your hands up toward the ceiling while one leg reaches back to tap its toes lightly on the floor behind you. Each rep forces your shoulders, core, and standing leg to work together, which makes it far more demanding than the sum of its parts.
This movement is especially useful for people who want to build shoulder strength and stability without equipment, or who need a low-impact way to train balance at the same time. It fits well into warm-ups, home workouts, active recovery days, and programs for older adults, since the toe tap provides a safety point of contact while the standing leg still does most of the stabilizing work.
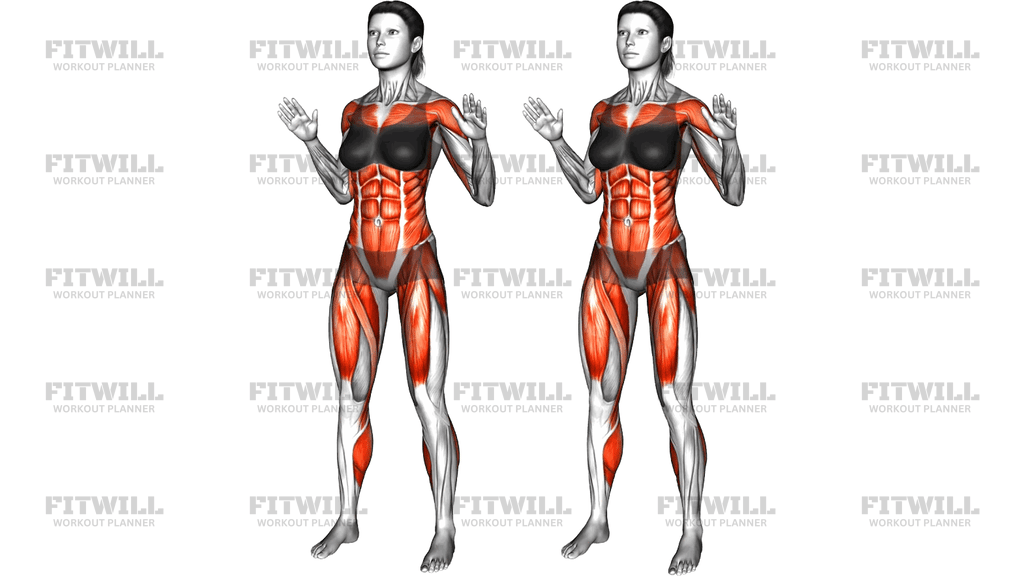
The main muscles working are the shoulders, particularly the front and side delts, which drive the press. Your abs and deep core stay braced the entire time to keep your ribs stacked over your pelvis while your arms move overhead. The standing leg's quads and calves steady your body, and the glutes on the tapping-leg side control how far the leg reaches back. Because the arm press and the toe tap happen together, your coordination and timing get trained right alongside the muscles.
Setup matters more than it looks. If your elbows drift below shoulder height or your palms turn inward, the press loses its clean overhead path and your neck and upper traps start doing work they should not. Similarly, if you plant the tapping foot and load it heavily, you turn a balance drill into a lunge and cheat your standing leg out of the work. A light, deliberate toe contact is the goal.
To execute it well, keep your torso tall and your gaze forward, press your hands up until your elbows are nearly straight without shrugging, and let the toe kiss the floor behind you rather than stab at it. Move at a pace you can control on both the press and the return. If you find yourself leaning back as your arms go overhead, that is your cue to brace harder and shorten the range slightly.
A practical safety point: give yourself enough room behind you so the reaching foot never collides with furniture, and keep a wall or sturdy chair nearby if you are new to single-leg work. Stop and reset your stance whenever you feel yourself wobbling rather than fighting through a sloppy rep.
[ Workout Log & Planner ]
Put your next workout in Fitwill
Keep your plan and training log ready when you are.


Instructions
- Stand with your feet hip-width apart, weight evenly distributed, and arms raised so your elbows are bent to about 90 degrees at shoulder height with palms facing forward, away from your body.
- Draw your shoulder blades down slightly so your shoulders are not shrugged toward your ears, and brace your abdominal muscles as if preparing for a light push.
- Shift your weight fully onto your left foot and lift your right heel so only the toes are ready to reach.
- Exhale and press both hands upward toward the ceiling until your arms are nearly straight, keeping your wrists stacked over your elbows.
- As your arms extend, reach your right leg back behind you and tap your toes lightly against the floor, keeping that knee soft and your hips square to the front.
- Hold the top position for a brief moment with your torso tall and ribs down, resisting the urge to arch your lower back.
- Inhale and lower your arms back to the starting bent-elbow position while lifting your right toes off the floor.
- Bring your right foot back under your hips, reset your balance, then repeat the press and tap on the other leg.
- Continue alternating legs for the desired number of reps, moving slowly enough that the toe contact stays light and controlled.
- If you lose your balance at any point, stop, plant both feet, re-brace, and restart from a stable stance rather than rushing the next rep.
Tips & Tricks
- If your lower back arches as your hands go overhead, it usually means your abs have let go; exhale sharply at the top of the press and think about pulling your ribs toward your hips.
- A heavy, loaded toe tap is the most common mistake in this movement. Aim for contact you could make with a piece of paper, so the standing leg actually has to stabilize.
- Keep your elbows at or slightly above shoulder height before pressing. Letting them drop to your sides turns the drill into a lateral raise pattern and reduces the overhead demand.
- Watch for shrugging. If your shoulders creep toward your ears at the top of the press, cut the range a few degrees and press only as high as you can with your neck relaxed.
- Do not let your hips rotate toward the tapping leg. Facing a mirror or a fixed point on the wall helps you keep both hips square to the front throughout the reach.
- Slow down the lowering phase of the arms. Most people control the press but let gravity drop their hands, which wastes half of the shoulder work.
- If balance is the limiting factor, stand closer to a wall and let your fingertips hover near it for support rather than shortening the arm press.
- Keep a soft knee on your standing leg. Locking it straight makes you steadier for a second but removes the calf and quad work that makes this drill valuable.
- Breathe in a rhythm: exhale on the press and tap, inhale as you return. Holding your breath is a sign the pace is too fast for your current control.
Frequently Asked Questions
What muscles does the Standing Push And Toe Tap work?
The shoulders, especially the front and side delts, drive the press. Your abs stabilize your torso, while the quads and calves of the standing leg handle balance, and the glutes control the leg reaching back.
How light should the toe tap be?
Light enough that it would not leave a mark in sand. The tap is a balance reference point, not a support, so keep almost all of your weight on the standing leg.
Is the Standing Push And Toe Tap good for beginners?
Yes, it is a low-impact way to learn overhead pressing and single-leg control at the same time. Beginners can stand near a wall or reduce the range of the press until coordination improves.
Should I alternate legs every rep or do all reps on one side?
Alternating each rep keeps the rhythm and challenges your balance transitions, but doing all reps on one side before switching is fine if you want to focus on a weaker or less stable leg.
Why do my shoulders shrug when I press overhead?
Your upper traps are compensating because the press range exceeds your current shoulder control. Shorten the press slightly and keep your shoulder blades drawn down until the movement feels smooth.
Can I do the Standing Push And Toe Tap with light dumbbells?
Yes, once your form is solid with body weight, very light weights can add shoulder demand. Just remember the extra load also makes the balance portion harder, so progress gradually.
How far back should the tapping leg reach?
Only as far as you can reach while keeping your hips square and your torso upright. A short, controlled reach behind you is better than a long one that pulls you into a lean.
What can I use as a substitute if I struggle with balance?
Stand with your back near a wall, or perform the press while keeping the non-working foot only an inch off the floor beside you. Progress to the full toe tap as your stability improves.
How many reps should I do?
Eight to twelve alternating reps per side works well for strength and control. Stop the set when your balance or press form starts to break down rather than when your muscles fully fatigue.
Is it safe to do this exercise every day?
Because it uses only your body weight and stays low impact, frequent practice is generally fine. If your shoulders feel sore rather than tired, take a rest day and check your pressing range.