Seated Shoulder Waves
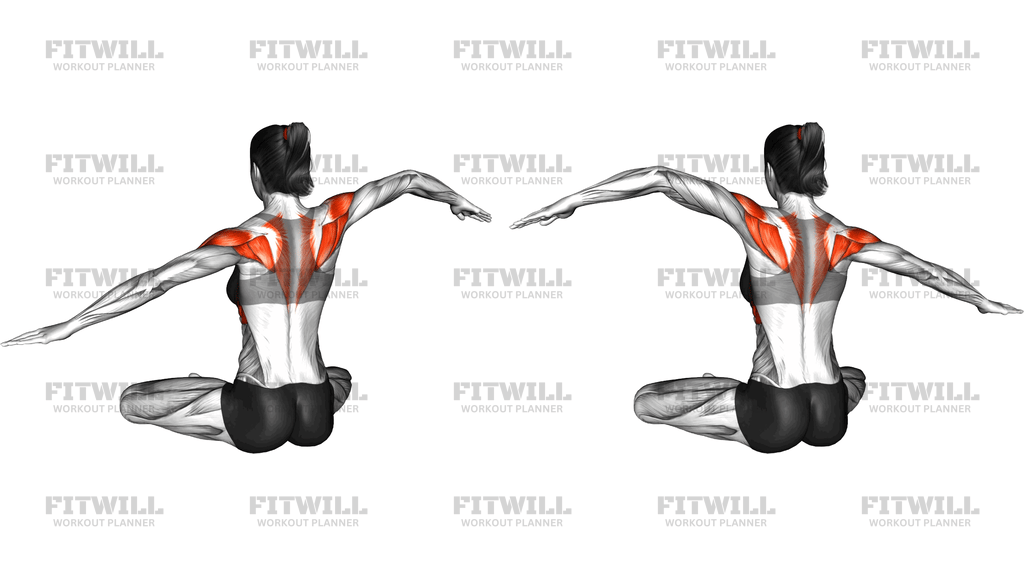
Seated Shoulder Waves are a low-load shoulder and upper-back activation drill performed from a cross-legged seated position on the floor. With the arms extended straight out to the sides at shoulder height, you create a continuous traveling wave through each arm by lifting and lowering the hand, elbow, and shoulder in sequence, alternating smoothly from side to side. Because there is no external load, the exercise isolates the quality of movement itself — smooth scapular control, steady shoulder-height holding, and coordination between both arms.
This movement is especially useful as a warm-up before pressing, pulling, or overhead work, and as a reintroduction exercise for people returning from a layoff or rebuilding shoulder endurance. The side delts work isometrically to keep the arms lifted, while the mid and upper traps and rhomboids control the shoulder blades as the wave passes through. The rotator cuff muscles get gentle timing work as they steady the humeral head through each ripple, which is exactly the kind of low-fatigue practice resilient shoulders respond well to.
The seated setup matters more than it looks. Sitting cross-legged removes the legs from the equation and makes it hard to cheat by rocking, leaning, or hiking the whole torso toward the working side. The spine stays tall and relatively still, so any motion you see should come from the arms and shoulder blades, not from trunk sway. If sitting on the floor is uncomfortable, the same drill works on a firm chair, but the floor position gives most people a stable, honest base.
To execute it well, keep the arms long with a soft elbow, palms facing down or slightly forward, and think of the wave as a smooth ripple running from fingertips back to the shoulder and across the upper back to the other side. The tempo should feel unhurried — this is a control drill, not a race. Breathe steadily throughout and resist the urge to shrug; the shoulders should stay relaxed and away from the ears even at the top of each wave.
Common use cases include shoulder warm-up circuits, desk-break mobility routines, dance and swim prep, and rehabilitation-style training where light, rhythmic shoulder work is preferred over loaded raises. Keep sets short — 20 to 40 seconds of continuous waving is usually enough to feel the side shoulders and between the shoulder blades working. If either arm drops noticeably below shoulder height, that is your cue to rest rather than grind through poor positions.
Fitwill
Log Workouts, Track Progress & Build Strength.
Achieve more with Fitwill: explore over 9600 exercises with images and videos, access built-in and custom workouts, perfect for both gym and home sessions, and see real results.
Start your journey. Download today!




Instructions
- Sit on the floor in a comfortable cross-legged position with your sitting bones grounded and your spine tall.
- Extend both arms straight out to the sides at shoulder height, in line with the shoulders, palms facing down and fingers long.
- Gently draw the shoulders back and down so the shoulder blades rest flat on the upper back, then brace the core lightly to keep the torso still.
- Begin the wave on the right arm: lift the hand a few inches while the elbow and shoulder stay put, then pass that lift down through the elbow and into the shoulder blade.
- Immediately repeat the ripple on the left arm so the two sides alternate in one continuous, flowing rhythm.
- Keep the arms at or very close to shoulder height for the entire set — the wave travels through the arm, it does not raise or drop the whole limb.
- Breathe in a steady, even rhythm through the nose, exhaling softly as each wave rolls through the shoulders.
- Continue alternating for 20 to 40 seconds, or until the side shoulders and upper back start to feel warm and lightly fatigued.
- To finish, lower both arms together under control, rest the hands on the knees, and reset your posture before the next set.
Tips & Tricks
- The most common mistake is letting the arms drift below shoulder height as the set goes on. If they start sinking, either reset at shoulder height or end the set — half-height waves train nothing useful.
- Watch for shrugging: if the upper traps creep toward the ears, the shoulders are doing the stabilizing instead of the mid-back. Picture pressing the shoulder blades gently into your back pockets.
- Do not let the trunk lean toward each arm as it lifts. Sit tall and imagine a glass of water balanced on your head; the ripple happens in the arms only.
- Keep the elbows soft, not locked. Fully straightening and hard-locking the elbows for a long set can irritate the joint and shifts work away from the shoulders.
- Make the wave smooth rather than jerky. If the motion looks like two separate arm flaps, slow down and focus on the hand-lift traveling through the elbow before it reaches the shoulder.
- Palms slightly facing forward or down both work, but avoid rotating the forearms aggressively mid-set — pick one hand position and hold it.
- If sitting cross-legged on the floor bothers your knees or hips, sit up on a folded blanket or yoga block so the hips sit above the knees; this keeps the spine tall without forcing the legs down.
- For a harder version, slow the tempo and hold each arm at the top of its wave for a one-count before the ripple passes through — the side delts will feel it quickly.
- Pair this with band pull-aparts or wall slides in a warm-up; doing Seated Shoulder Waves first wakes up the timing that those loaded drills then reinforce.
Frequently Asked Questions
What muscles do Seated Shoulder Waves work?
The side and rear shoulders work to hold the arms at shoulder height, while the mid and upper traps and rhomboids control the shoulder blades as the wave passes through. The rotator cuff contributes as a stabilizer rather than a prime mover.
Is Seated Shoulder Waves suitable for complete beginners?
Yes. Because it uses no external load, the main challenge is coordination and endurance, not strength. Beginners should start with 15 to 20 second sets and focus on keeping the arms at shoulder height.
Why is the exercise done seated cross-legged instead of standing?
The cross-legged seat locks the hips and trunk in place, so it becomes obvious if you start rocking, leaning, or hiking the torso to help the arms. It isolates the shoulder and shoulder-blade control that the drill is meant to train.
My arms drop during Seated Shoulder Waves — what should I change?
Arm drop is a sign the side shoulders have fatigued, not a form flaw to push through. Shorten the set, rest fully between rounds, and build duration gradually; clean 20-second sets beat sloppy 60-second ones.
Can I do Seated Shoulder Waves before bench pressing or overhead work?
Absolutely — it is one of the best uses for the drill. Two or three short sets of continuous waving raise the working temperature of the delts and scapular muscles without draining strength for the main lift.
What can I substitute if sitting on the floor is uncomfortable?
Perform the exact same arm waves seated on a firm chair or bench with the feet flat on the floor. Keep the same tall spine and shoulder-height arms so the drill keeps its purpose.
How fast should the wave travel through each arm?
Slow enough that you can feel it pass from the hand through the elbow into the shoulder blade — roughly one full wave per arm every two to three seconds. If the movement looks like flapping, you are going too fast.
Is Seated Shoulder Waves safe for cranky shoulders?
For most people it is a gentle, joint-friendly drill, but if you have a current or recent shoulder injury, clear it with a qualified professional first. Keep the range small and stay well below any point of pinching or pain.
How long should each set of Seated Shoulder Waves last?
Twenty to forty seconds of continuous waving per set works well for warm-up and endurance purposes. Two to four sets is plenty, since the goal is quality movement, not exhaustion.