Seated Shoulder Waves
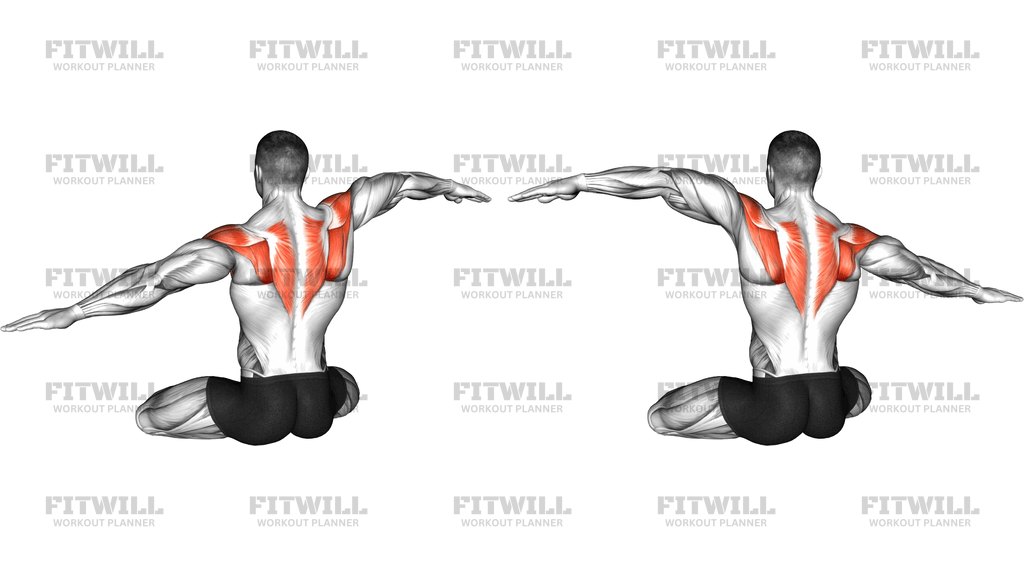
Seated Shoulder Waves is a body-weight mobility drill performed from a seated position on the floor, usually with the legs folded underneath you and the arms extended straight out to the sides at shoulder height. From there, you send a smooth, traveling wave through each arm, moving from the shoulder through the elbow, wrist, and fingertips, and then letting the motion flow back the other way. It looks simple, but the continuous ripple demands real control over the shoulder blades, rear shoulders, and upper back.
This drill is popular in dance, martial arts, yoga-inspired mobility work, and movement practice because it teaches the shoulders to move independently and fluidly rather than as one stiff block. The muscles highlighted in the working pattern are the rear delts, rhomboids, and mid and upper traps — the very areas that tend to get locked up from desk work, driving, and heavy pressing. If your shoulders feel glued to your ears or your upper back feels rigid, this is a gentle way to reintroduce segmental movement.
The seated setup matters more than it might seem. Sitting on your heels with a tall spine removes the legs from the equation and forces the movement to come purely from the shoulders and upper back. If you try to cheat, the wave turns into a whole-body sway, which defeats the purpose. Keep the arms lifted and out wide the entire time so the rear shoulder and upper back stay under gentle continuous tension.
To execute the wave well, think of the arm as a whip made of separate segments. Lead with the elbow, let the wrist follow, then finish through the fingers. Once that feels coordinated, reverse the direction so the fingertips lead. The motion should be continuous, slow enough to actually feel each joint contribute, and smooth enough that an observer could trace the ripple from shoulder to hand.
Use Seated Shoulder Waves as a warm-up before upper-body training, as active recovery between pressing sessions, or as part of a cooldown to settle the upper back after a long day of sitting. It is low-load and joint-friendly, which makes it accessible to beginners, but even experienced lifters benefit from the scapular coordination it builds. Move within a comfortable range, breathe steadily, and stop if any position pinches or causes sharp discomfort in the shoulder.
[ Workout Log & Planner ]
Put your next workout in Fitwill
Keep your plan and training log ready when you are.


Instructions
- Sit on the floor with your legs folded beneath you, resting your weight onto your heels, and place your hands lightly on your thighs to settle your posture.
- Sit up tall through the spine, soften the shoulders down away from the ears, and engage the core lightly so your torso stays stable.
- Extend both arms straight out to the sides at shoulder height, palms facing down or forward, with the elbows soft rather than locked.
- Keep the ribcage stacked over the pelvis and brace the midsection so the wave travels through the arms, not through a leaning torso.
- Start the wave by lifting one shoulder slightly, then let the movement roll through the elbow, into the wrist, and out through the fingertips of that same arm.
- As the wave finishes through the fingers, let it continue seamlessly into the opposite arm so the ripple alternates side to side in a continuous loop.
- After several reps in one direction, reverse the pattern: lead with the fingertips, then let the wrist, elbow, and shoulder follow in sequence.
- Breathe smoothly and continuously throughout, exhaling as each wave passes through the arm rather than holding your breath.
- Keep both arms lifted and wide for the entire set instead of letting the hands drift down as fatigue sets in.
- To finish, lower the arms slowly to your sides, take two or three deep breaths, and gently roll the shoulders before standing up.
Tips & Tricks
- The most common mistake is turning the wave into a torso rock — if your upper body leans side to side, narrow the motion and keep the chest facing forward.
- If your shoulders creep up toward your ears, reset the position and consciously press the shoulder blades down before starting the next wave.
- Locked elbows kill the wave; keep a micro-bend in each elbow so the ripple can actually pass through the joint.
- Moving too fast is another frequent error — slow the tempo down until you can feel each segment of the arm contribute, even if that means fewer waves per set.
- If sitting on your heels is uncomfortable on the knees or ankles, place a cushion between your hips and heels or sit cross-legged on a folded mat instead.
- Keep the wrists active rather than limp; a floppy wrist makes the hand end of the wave look like a flick instead of a controlled roll.
- Start with a smaller range and expand it as coordination improves — a big, sloppy wave trains nothing, while a modest, precise one teaches real shoulder control.
- Practice one arm at a time first if the alternating pattern feels uncoordinated; master the single-arm wave, then link the two sides together.
- If you feel pinching at the front of the shoulder when the arms are out wide, lower the arms slightly below shoulder height and reduce the wave amplitude.
Frequently Asked Questions
What muscles does Seated Shoulder Waves work?
It primarily trains the shoulders, especially the rear delts, along with the rhomboids, mid traps, and upper traps that control the shoulder blades. The wrists and forearms also stay active as the wave travels through the arm.
Is Seated Shoulder Waves a strength exercise or a mobility exercise?
It is best treated as a mobility and coordination drill. There is no external load, so it will not build significant strength, but it does develop muscular control, fluidity, and endurance in the upper back and shoulders.
Why is the wave performed from a seated position with the legs folded under?
The seated position locks out the hips and legs so the movement has to come from the shoulders, arms, and upper back. It also encourages a tall spine, which keeps the shoulder blades in a good position to move freely.
I cannot sit on my heels comfortably — can I still do Seated Shoulder Waves?
Yes. Sit cross-legged on the floor or even on a firm chair with your feet flat. As long as your torso is upright and your arms can extend out to the sides, the wave itself is unchanged.
How do I know if I am doing the wave correctly?
You should be able to see and feel a distinct ripple moving from the shoulder through the elbow, wrist, and fingers, without your torso swaying. If the whole arm moves as one stiff piece, slow down and isolate each joint in sequence.
When should I use Seated Shoulder Waves in my routine?
It works well as a warm-up before pressing or pulling workouts, as an active recovery drill on rest days, or as part of a cooldown. Many people also use it to break up stiffness after long periods of sitting.
How long should I perform the waves for?
Start with 30 to 45 seconds of continuous alternating waves, or about 10 to 15 waves in each direction. As coordination improves, you can extend to a minute or more while keeping the motion smooth.
Is Seated Shoulder Waves safe for someone with shoulder discomfort?
It is low-load and generally gentle, but any movement that causes sharp pain, pinching, or clicking with discomfort should be avoided. Reduce the arm height and wave size first, and consult a qualified professional if symptoms persist.
What can I substitute if the wave pattern feels too uncoordinated?
Practice single-arm shoulder rolls and isolated elbow-to-hand ripples first, then combine them. Arm circles and scapular retractions from the same seated position are simpler drills that build toward the full wave.