Seated Alternate Shoulders Circle
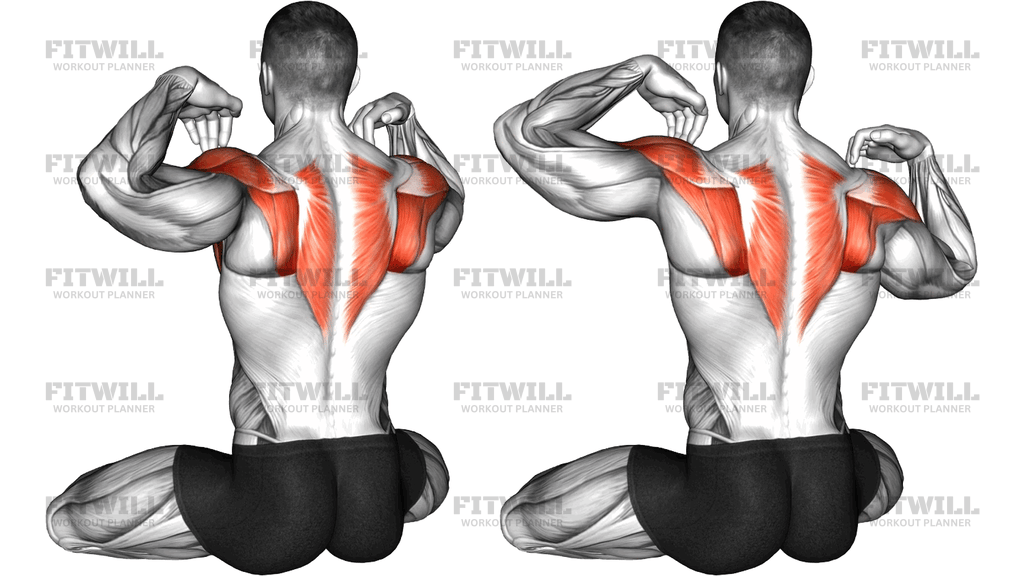
The Seated Alternate Shoulders Circle is a simple body-weight mobility drill that targets the shoulder joints one side at a time. You sit upright, place the fingertips of each hand on the corresponding shoulder, and draw a full circle with the elbow, alternating the direction each arm is circling so one arm moves forward while the other moves backward. Because the fingertips stay anchored on the shoulders, the movement isolates the shoulder girdle and forces the rotator cuff and surrounding muscles to do the guiding work.
The highlighted areas in this drill are the deltoids, the rotator cuff group, and the upper back musculature around the shoulder blades. Rolling the elbow through a large arc takes the shoulder through rotation, abduction, and extension in one continuous path, which is exactly the kind of combined motion everyday pressing and pulling exercises tend to skip. The seated position keeps the trunk quiet, so the shoulders cannot borrow momentum from leaning or swinging.
This movement is useful for nearly everyone. Desk workers with stiff shoulders, lifters warming up before pressing or pulling sessions, and older adults maintaining shoulder mobility all benefit from it. It also works well as an active recovery drill between heavy upper-body sets, since it keeps the joints moving without adding load.
Setup matters more than it looks. Sitting tall on a bench or on your heels with the spine neutral gives the shoulder blades a stable base to move from. If you slouch, the shoulder blades tilt forward and the circle becomes shallow and less effective. The fingertips rest lightly on the shoulders only as reference points; do not press hard into the joints.
To execute well, keep the circles large and smooth, deliberately tracing the biggest arc your shoulder allows. Move slowly enough that you can feel the shoulder sweeping through each quarter of the circle, especially the portion behind you, where most people are tightest. Breathe steadily throughout and switch directions halfway through your set so both shoulders get equal work in each direction.
The most common mistakes are shrugging toward the ears, shortening the circle when the arm passes behind the body, and letting the head drift forward. Keep the neck long, the chest open, and let the shoulder blade travel with the arm rather than locking it down. If one shoulder has noticeably less range than the other, spend a little extra time on the restricted side rather than rushing through the reps.
[ Workout Log & Planner ]
Put your next workout in Fitwill
Keep your plan and training log ready when you are.


Instructions
- Sit upright on a bench or sit back on your heels with your spine tall and your shoulders relaxed down away from your ears.
- Bring both arms up and place the fingertips of each hand lightly on the corresponding shoulder, elbows pointed out to the sides.
- Brace your trunk gently and keep your ribs stacked over your hips so your torso stays still during the circles.
- Begin circling with both elbows at the same time, making large, smooth arcs with each arm.
- Move the arms in opposite directions: as one elbow traces the circle forward and up, the other traces it down and back.
- Keep the fingertips in contact with the shoulders throughout so the motion stays in the shoulder joint and shoulder blade.
- Complete roughly half of your reps, then reverse the direction of both arms so each shoulder experiences both paths.
- Exhale smoothly as the elbows sweep upward and inhale as they come down and back, keeping the breathing continuous.
- Finish the set, lower your arms, and gently roll the shoulders once or twice before moving to the next exercise.
Tips & Tricks
- Make the circle as tall in front as it is behind; most people shrink the arc when the elbow passes the ear and again behind the back, and those are the two spots that need the most range.
- If you feel a pinching sensation at the top of the shoulder, make the circle slightly smaller and keep the elbow a little lower rather than pushing through the discomfort.
- Avoid pressing your fingertips hard into the shoulders; they are reference points for the movement, not anchors for leaning on.
- Do not let your head chase the moving elbow. Keep your gaze forward and your neck long so the upper traps stay relaxed.
- If sitting on a bench, plant both feet flat on the floor. If seated on your heels, sit tall through the spine so your torso does not round as you reach the elbows back.
- Start with slow, deliberate circles before speeding up. The drill loses value quickly once momentum takes over the rotation.
- If one shoulder moves noticeably worse, perform a few extra single-direction circles on that side, but stay within a pain-free range.
- A common error is shrugging as the elbow rises. Before each set, take a breath, drop the shoulders down, and hold that position as the arms move.
- Use this drill before overhead pressing, benching, or pull-ups to take the shoulders through rotation they will not get from the first work set alone.
Frequently Asked Questions
What muscles does the Seated Alternate Shoulders Circle work?
The primary muscles are the deltoids of the shoulders, supported heavily by the rotator cuff group. The upper traps and the muscles around the shoulder blades also work to control the blade as the elbow circles.
Why do my fingertips stay on my shoulders during this exercise?
Touching the shoulders removes the elbow and hand from the movement and turns the drill into pure shoulder joint rotation. It also gives you instant feedback if your contact breaks, which usually means the circle is getting sloppy.
Why do the arms circle in opposite directions?
Alternating directions challenges coordination between the two shoulders and lets each arm pass through both the forward and backward half of the circle at the same time. It also mirrors how the shoulders must work independently in real lifting and daily tasks.
Is the Seated Alternate Shoulders Circle suitable for beginners?
Yes, it is one of the safest shoulder drills to learn because it uses no load and the range is self-selected. Beginners should start with small, slow circles and gradually enlarge them as the shoulders loosen up.
How many reps and sets should I do?
Ten to fifteen circles in each direction per set works well, usually for one or two sets. Reverse direction halfway through the set so both shoulders cover both rotational paths.
Should I feel stretching in the back of my shoulder?
A mild stretch as the elbow sweeps behind you is normal, especially if your shoulders are tight. Sharp pain, pinching at the front of the shoulder, or numbness is a signal to reduce the circle size or stop.
Can I do this exercise standing instead of seated?
You can, but sitting is the point of this variation. The seat anchors your hips and spine so the shoulders cannot cheat by swaying or twisting, which makes it a cleaner shoulder mobility drill.
What is the most common mistake with this drill?
Shrugging the shoulders toward the ears and shrinking the circle behind the body. Keep the shoulders pulled gently down and deliberately make the elbow pass as far back and as high as comfortable.
When is the best time to use the Seated Alternate Shoulders Circle?
It fits best in a warm-up before any pressing or pulling workout, or as an active recovery drill between sets or on rest days. Because it is unloaded, it is gentle enough to perform daily if your shoulders feel stiff.