Standing Single Arm Circle On A Wall
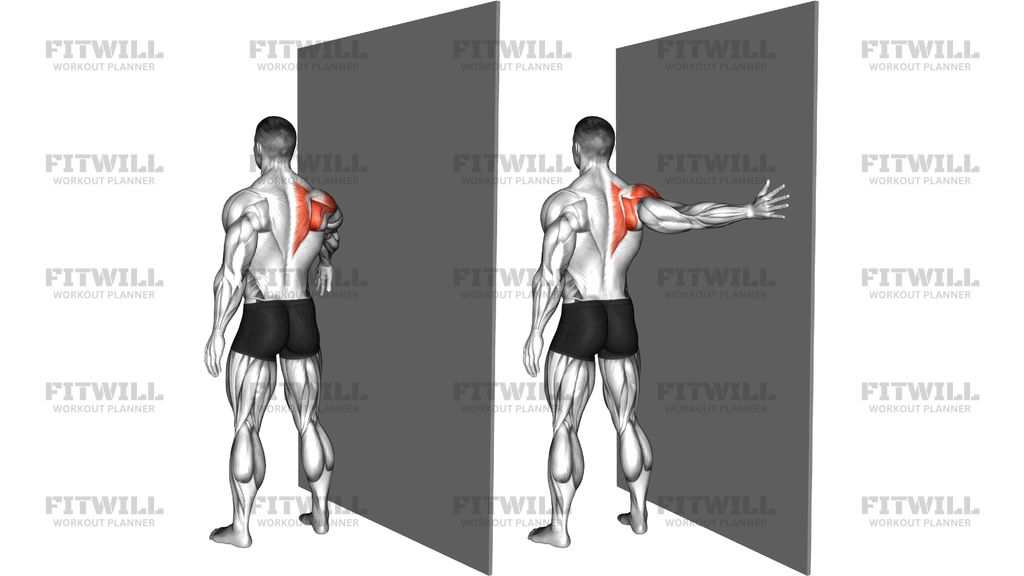
Standing Single Arm Circle On A Wall is a shoulder mobility and control drill performed with one arm close to a wall while you stand upright. You set up sideways to the wall, let your working arm hang relaxed at your side, and then sweep the straight arm out and up in a wide circular arc, keeping the hand traveling in the plane just in front of or grazing the wall surface. The wall acts as a reference point, which is what makes this drill different from a freestanding arm circle: it gives you instant feedback if your shoulder drifts forward, shrugs up, or loses its path.
The movement mainly works the deltoid group, with strong involvement from the rotator cuff and the upper trapezius as the arm travels overhead height. Because you are moving one arm at a time with no load, the drill is less about building muscle and more about teaching the shoulder blade and upper arm to move together smoothly. The muscles highlighted in this pattern sit around the back of the shoulder and between the shoulder blades, which is exactly where most people are stiff or uncoordinated from desk work and pressing exercises.
This drill is useful for anyone warming up before overhead pressing, pulling, throwing, or racquet sports. It is also a common choice in shoulder rehab and prehab settings because the wall keeps the movement honest while the arm passes through a large range. People with a habit of shrugging when they raise their arms often find that the wall immediately exposes the compensation, since the hand tends to bump into the surface or drift away from it.
Setup matters more here than in most arm circles. Stand tall with your feet about hip width apart, your side facing the wall, and your body a comfortable hand's distance away so the straight arm can pass close to the surface without slamming into it. Keep your ribs stacked over your pelvis and your neck relaxed. If you lean toward or away from the wall to help the arm get around, you change the path the drill is meant to train, so keep your torso quiet and let the shoulder do the work.
To execute it well, draw the circle with your fingertips rather than leading with your elbow or shrugging the shoulder toward your ear. Start with smaller circles and gradually widen them as the shoulder warms up, moving slowly enough that you can feel where the arm wants to cut the arc short. Breathe steadily throughout and switch sides after completing your set of circles in one direction, then repeat in the opposite direction if you are using the drill as a warm-up.
Because it needs no equipment beyond a clear stretch of wall, this movement fits easily into home programs, gym warm-ups, and travel routines. Keep the effort low and the motion smooth. If you feel pinching at the front of the shoulder or pain rather than mild stretch, reduce the circle size or stop and consult a qualified professional before continuing.
[ Workout Log & Planner ]
Put your next workout in Fitwill
Keep your plan and training log ready when you are.


Instructions
- Stand sideways to a clear wall with your working arm closest to it, feet about hip width apart and weight even across both feet.
- Position yourself roughly a hand's length from the wall so your straight arm can sweep past the surface without pressing hard into it.
- Let the working arm hang relaxed at your side, palm facing your thigh, and keep your opposite arm loose at your other side.
- Stand tall with ribs stacked over your pelvis, shoulders level, and neck long; brace your trunk lightly so your torso does not sway.
- Begin the circle by sweeping the straight arm out to the side and forward, letting the fingertips trace a wide arc close to the wall.
- Continue the arm up and over the top, then down and back behind you to complete the circle, keeping the elbow straight the whole way.
- Keep the shoulder blade controlled: avoid hiking the shoulder toward your ear as the arm rises past shoulder height.
- Breathe steadily, exhaling as the arm travels up and inhaling as it comes back down.
- Complete your planned number of circles in one direction, then switch sides and repeat.
- Reset your stance between sides, checking that you have not leaned toward the wall or twisted your trunk to help the arm around.
Tips & Tricks
- The most common mistake on this drill is shrugging the upper trap as the arm passes shoulder height; imagine lengthening your fingertips toward the ceiling instead of lifting the shoulder.
- If your hand scrapes or bangs into the wall, you are standing too close or letting the shoulder roll forward—step back slightly and draw the circle with the fingertips, not the elbow.
- Bending the elbow is a subtle cheat that shortens the lever; if the arm keeps bending, the range is likely too large, so make the circles smaller until you can keep the elbow straight.
- Watch for trunk rotation toward the wall as the arm goes overhead; think about keeping both shoulders facing squarely ahead of you while only the arm moves.
- Start with circles about the size of a dinner plate and widen them gradually over a set—jumping straight to the biggest arc often causes a pinch at the top of the range.
- Do both directions on each arm if you are using the drill as a warm-up, since forward and backward circles emphasize slightly different parts of the shoulder range.
- Your non-working arm should stay relaxed; gripping it or stiffening the opposite shoulder tends to carry tension into the working side.
- If one side feels noticeably stiffer or bumpier through the arc, spend extra circles on that side but stay within a pain-free range rather than forcing the top of the circle.
- Keep the movement slow enough to feel control—this is a coordination drill, and racing through the circles turns it into a mindless swing.
Frequently Asked Questions
What muscles does the Standing Single Arm Circle On A Wall work?
It primarily uses the deltoids of the working shoulder, with support from the rotator cuff and the upper trapezius as the arm travels up and over the top of the circle. Because the effort is low, it trains coordination and control more than muscle size.
Why is one arm done against a wall instead of freestanding arm circles?
The wall gives you a fixed reference plane, so it immediately shows whether your hand drifts forward, your shoulder rolls, or your trunk twists. One arm at a time also makes it easier to notice left-to-right differences in your shoulder range.
How far should I stand from the wall during the Standing Single Arm Circle On A Wall?
About a hand's length works for most people—close enough that the fingertips trace near the surface, far enough that the arm passes without pressing or scraping into it. Adjust your distance so the circle stays smooth at its widest point.
Should my elbow stay straight during the circle?
Yes, keep the arm straight so the shoulder does the moving and the circle stays wide. If the elbow keeps bending, your circle is probably too big for your current range, so reduce the size until you can hold the arm straight.
Is the Standing Single Arm Circle On A Wall good for beginners?
Yes, it is low load and easy to self-correct, which makes it a good first shoulder mobility drill. Beginners should start with small circles and only widen them once the arm travels smoothly without shrugging or trunk lean.
Should I circle forward, backward, or both directions?
Both directions is the most complete option for a warm-up, since each direction stresses the shoulder through the arc differently. If time is short, favor the direction that feels tighter or clunkier on that side.
What should I do if I feel a pinch at the top of the circle?
Shrink the circle so the arm stops just below the pinch, keep the movement smooth, and see whether the range improves as you warm up. Persistent pinching or pain warrants assessment by a qualified professional rather than pushing through.
Can I replace the Standing Single Arm Circle On A Wall with another exercise?
Freestanding single arm circles are the closest substitute, though you lose the wall feedback. Wall slides and wall angels train a similar overhead shoulder range in a more vertical plane if you want variety.
How many circles should I do per side?
Around 8 to 12 circles per direction per arm is a practical starting point. Treat it as a warm-up or mobility drill, so the goal is smooth, controlled arcs rather than fatigue or a training stimulus.
Can I do this drill every day?
Yes, its low intensity makes it suitable for daily use as a warm-up or movement break, as long as it stays pain-free. If a shoulder is currently irritated, keep the circles small and check with a professional about the appropriate range.