Bridge March (Version 2)
The Bridge March (Version 2) is a floor-based core and hip exercise performed from a glute bridge hold with the arms crossed over the chest. From the top of the bridge, you lift one knee toward your chest, lower the foot back to the floor, and repeat on the other side while keeping the hips elevated and level throughout. Because the hands are not available to prop or steady the hips, the trunk has to do far more of the stabilizing work than in a standard bridge.
This movement is useful for anyone who wants to bridge well but has outgrown the basic two-legged version. Lifting one leg at a time forces the standing hip to extend fully against a shifting load, which challenges the glutes and hamstrings, while the lifted leg's hip flexors work to pull the knee in. At the same time, the abdominals and deep trunk muscles fight to keep the pelvis from tipping or rotating as the weight shifts from side to side.
Setup matters here more than in most floor exercises. Your foot position determines how hard the bridge is before you even start marching: too far away and the hamstrings dominate, too close and the knees cave inward and the quads take over. Crossing the arms over the chest removes any temptation to push off the floor with the hands, which is exactly what makes this version worth doing.
To execute it well, build a strong bridge first, then march slowly. Each knee lift should be deliberate, and the hips should stay at the same height from the first rep to the last. The most common failure is the pelvis dropping or rotating toward the lifting side; if that happens, march with a smaller knee lift or slow the tempo until you can control it.
The Bridge March (Version 2) fits well into warm-ups, glute-focused sessions, and rehab or postpartum-style progressions where loaded hip extension is not yet appropriate. It also pairs naturally with planks and dead bugs as part of an anti-extension and anti-rotation core block. Two to three sets of 8 to 12 marches per side is a practical working range, and the exercise requires nothing more than floor space and a mat.
Fitwill
Log Workouts, Track Progress & Build Strength.
Achieve more with Fitwill: explore over 9600 exercises with images and videos, access built-in and custom workouts, perfect for both gym and home sessions, and see real results.
Start your journey. Download today!




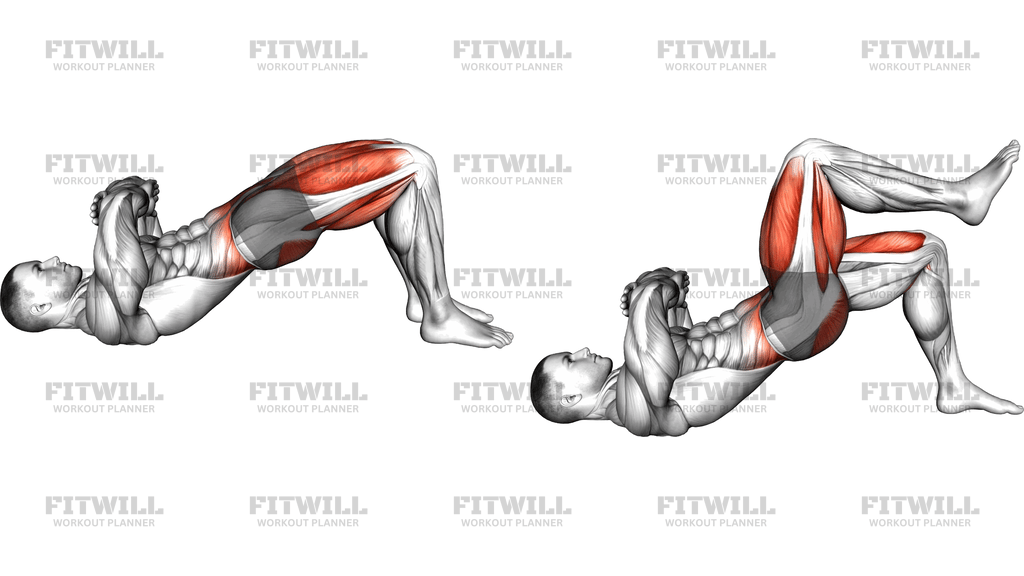
Instructions
- Lie on your back on an exercise mat with your knees bent and your feet flat on the floor about hip-width apart, heels roughly a hand span from your glutes.
- Cross your arms over your chest so each hand rests on the opposite shoulder or upper arm, and let your head and upper back stay relaxed on the mat.
- Brace your abdominals gently and drive through your heels to lift your hips until your body forms a straight line from shoulders to knees, squeezing the glutes at the top.
- Keep your ribs down and your neck neutral, with your gaze directed straight up rather than tucking the chin to the chest.
- Without letting the hips drop, shift your weight slightly over the supporting foot and lift one knee toward your chest until the thigh is roughly vertical.
- Lower that foot back to the floor under control, then lift the opposite knee in the same way, alternating sides for each repetition.
- Breathe steadily throughout, exhaling as you lift a knee and inhaling as you return the foot, and avoid holding your breath while holding the bridge.
- Keep checking that both hips stay at the same height; if the bridge height drops during a set, finish the set rather than sagging through the remaining reps.
- When finished, lower your hips back to the mat with both feet down, uncross your arms, and gently stretch the hip flexors before moving on.
Tips & Tricks
- If your hips dip every time a foot leaves the floor, shorten the knee lift — bring the thigh to about 45 degrees instead of vertical — and earn the taller march over time.
- Avoid letting the supporting knee fall inward when the other foot lifts; think about pressing the standing knee slightly outward and the big toe into the floor.
- Drive the bridge from the heels rather than the toes; lifting through the toes shifts tension to the quads and makes the pelvis harder to control.
- Do not push the hips so high that the lower back arches — the top position is a straight line with glutes engaged, not an exaggerated arch.
- Keep the arms truly crossed and still; reaching a hand down to prop the hips defeats the purpose of this version and hides the weakness you are trying to expose.
- Slow the marching tempo before reducing reps — a three-second lift and three-second lower builds more control than rushing through a higher count.
- If your hamstrings cramp, move the feet an inch or two closer to the glutes and focus on squeezing the glutes harder at the top of the bridge.
- Place the mat on a non-slip surface so the feet do not slide outward as the hips lift, which changes the leverage mid-set.
- Film yourself from the side for one set: if the hip line drops visibly on each march, that is your cue to regress the height or tempo.
Frequently Asked Questions
What muscles does the Bridge March (Version 2) work?
The glutes and hamstrings drive the bridge hold, the hip flexors lift each knee toward the chest, and the abdominals and deep trunk muscles stabilize the pelvis as the load shifts from leg to leg.
How is the Bridge March (Version 2) different from a regular glute bridge?
In this version you hold the top of the bridge with arms crossed over the chest and alternately lift each knee, so the standing hip works alone and the trunk must resist tipping and rotating — a much greater stability demand than a two-legged bridge.
Is the Bridge March (Version 2) suitable for beginners?
Yes, provided you can first hold a solid two-legged glute bridge with the arms crossed for 20 to 30 seconds. Beginners should start with small, slow knee lifts and fewer repetitions per side.
Why are the arms crossed over the chest in this exercise?
Crossing the arms removes the option of pressing into the floor with the hands, which forces the glutes, hamstrings, and core to control the hips entirely on their own.
My hips drop or twist when I lift one knee — what should I fix?
That is the most common breakdown in this movement. Reduce the height of the knee lift, slow the tempo, and consciously squeeze the glute of the supporting leg; rebuild the full-height march only when the hips stay level.
How far should I lift each knee during the march?
Lift only as high as you can while keeping the hips at bridge height and level — a thigh at roughly 45 degrees is a perfectly valid starting point, progressing toward vertical as control improves.
Can I substitute the Bridge March (Version 2) with another exercise?
A single-leg glute bridge trains similar hip strength with less pelvis control demand, while a stability ball or bench-based single-leg bridge increases the challenge if you find the floor version too easy.
How many sets and reps should I do?
Two to three sets of 8 to 12 marches per side with a slow tempo is a solid working range; focus on hip height and control rather than chasing higher rep counts.
Is it safe for the lower back?
When performed with a braced trunk and hips kept in a straight line, it is generally a back-friendly movement. Avoid arching past a neutral line at the top, and stop if you feel sharp or pinching discomfort.
Why do my hamstrings cramp during the Bridge March (Version 2)?
Hamstring cramps usually mean the feet are set too far from the hips or the glutes are not contributing enough at the top; slide the feet slightly closer and prioritize an active glute squeeze to shift the work back to the hips.