Push Up Medicine Ball
Push Up Medicine Ball is an asymmetric push-up variation where one hand rests on a medicine ball while the other stays flat on the floor. Because the two hands sit at different heights and one works on an unstable surface, each side of your body is challenged differently. The hand on the ball has to control wobbling in every direction, while the hand on the floor takes on a slightly deeper range of motion. The result is a push-up that builds pressing strength and shoulder stability at the same time.
This variation is especially useful once a standard push-up feels comfortable but before you need extra load to keep progressing. It is a popular choice for people training at home with minimal equipment, since one medicine ball adds instability, extra range, and anti-rotation demand without any weights. It also transfers well to sports, because the shoulder on the ball has to resist and correct small shifts continuously, which mimics the reactive stability needed in throwing, tackling, and change-of-direction situations.
The primary work comes from the chest, triceps, and front of the shoulders, with the ball-side arm working through a slightly extended range. Underneath that, your core and obliques work hard to keep your hips level, because the uneven hand position constantly tries to rotate your torso. The supporting shoulder muscles, including the rotator cuff and serratus anterior, get plenty of low-load stability work controlling the ball.
Setup matters a lot here. The ball should be firmly inflated so it does not collapse, placed directly under the ball-side hand and shoulder rather than drifting toward your midline. Your fingers should spread over the top of the ball, and the floor-side hand sits just outside shoulder width. A wide, stable foot position makes the movement far easier to control, so start there and narrow your stance as you improve.
To execute it well, lower under control with your elbows tracking at roughly 45 degrees from your torso, let your chest approach the floor, then press back up while pushing firmly into the ball. Expect the ball to shift a little at first; the goal is to make the correction small and smooth, not to eliminate all movement by stiffening up. Breathe in on the way down and out as you press.
As a safety point, keep your wrists on top of the ball rather than letting them fold backward under load, and stop the set if your shoulder starts rolling forward or your hips sag. If the wobble feels unmanageable, use a larger or heavier ball, which moves less, or place the ball against a wall corner until your control improves.
[ Workout Log & Planner ]
Put your next workout in Fitwill
Keep your plan and training log ready when you are.


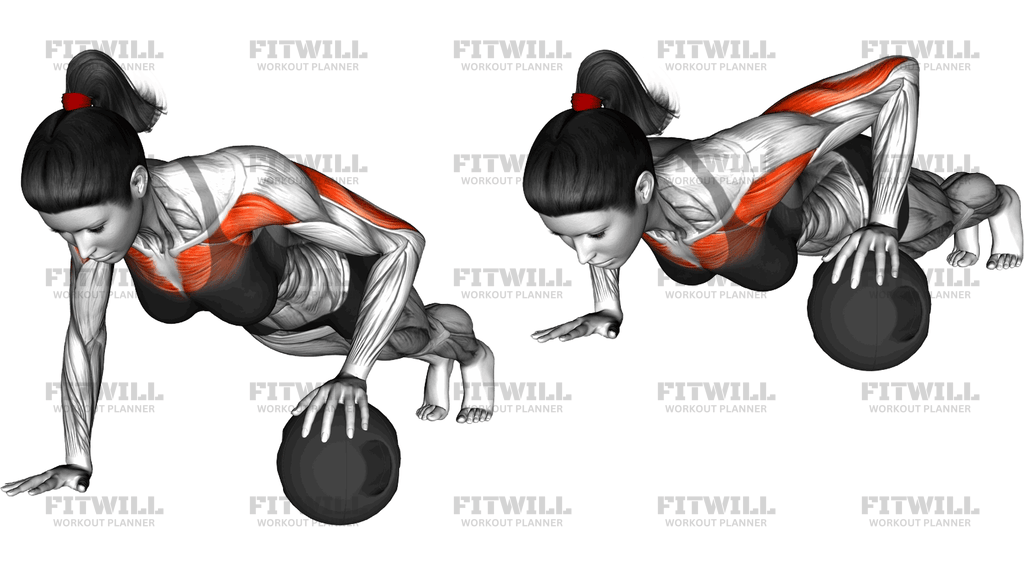
Instructions
- Place a firmly inflated medicine ball on the floor and position yourself so the ball sits directly under where your right hand will be, with your left hand flat on the floor just outside shoulder width.
- Spread the fingers of your right hand over the top of the ball so your palm and fingertips grip the surface, and set your feet wider than hip width to create a stable base.
- Form a straight line from your head through your hips to your heels, then squeeze your glutes and brace your core as if preparing for light contact.
- Shift slightly more of your weight onto the ball-side arm so both hands feel actively loaded before you descend.
- Lower your chest toward the floor with your elbows at about 45 degrees to your torso, letting the ball-side shoulder travel slightly deeper than usual while keeping the ball from rolling.
- Pause briefly at the bottom, making sure your hips stay level and your head stays in line with your spine rather than dropping toward the floor.
- Press back up by driving firmly into the ball and pushing the floor away with the other hand, keeping the pressure evenly spread across your fingers on the ball.
- Breathe in as you lower and exhale as you press up, keeping the breath steady instead of holding it.
- Complete all repetitions with one hand on the ball, then switch sides so the left hand is on the ball and repeat for the same number of reps.
- Between sets, reset your hand position on top of the ball and recheck that your hips are square before starting the next set.
Tips & Tricks
- Use a heavier or larger medicine ball early on, because it deforms and rolls less, making the stability demand manageable while you learn the movement.
- If the ball keeps sliding away, place it on a non-slip mat or set it against the corner of a wall to limit movement while you build control.
- The most common mistake is letting the ball-side wrist bend sharply backward as you press; keep the wrist stacked over the ball and push through the fingertips instead.
- Watch for hip rotation, which shows up as one hip riding higher than the other; widen your feet and consciously square your hips before each rep.
- Do not rush the descent. The ball amplifies every wobble, so a two-second lowering phase gives your shoulder stabilizers time to track smoothly.
- Keep the floor-side elbow from flaring straight out to the side; think of pushing the floor away slightly to keep the shoulder joint in a strong position.
- If pressing deep causes the ball to shift under your palm, reduce your depth slightly and earn the full range over several weeks.
- Start with fewer reps per set than your normal push-ups allow, because the stabilizing muscles usually fatigue faster than the pressing muscles.
- When both sides feel solid, progress by narrowing your foot stance or moving to two medicine balls for an even harder stability challenge.
Frequently Asked Questions
What muscles does the Push Up Medicine Ball work?
The chest, triceps, and front shoulders do the main pressing work, with the ball-side chest working through a slightly longer range. Your core, obliques, and shoulder stabilizers work continuously to keep your body level on the uneven, unstable surface.
Why put one hand on a medicine ball instead of doing regular push-ups?
The raised, unstable hand forces one shoulder to stabilize in all directions and adds anti-rotation demand for the torso. It also loads each side independently, which helps expose and correct left-right differences in strength and control.
Is the Push Up Medicine Ball suitable for beginners?
It is better as a step after you can perform at least 10 to 15 solid standard push-ups. Beginners can start with knees on the floor, a larger ball that moves less, or the ball placed against a wall to reduce the wobble.
How firm should the medicine ball be?
It should be firm enough that it does not compress noticeably under your hand when you press, but a slightly textured or rubber surface helps with grip. A ball that deforms or rolls freely makes the exercise frustrating rather than productive.
Should my hand be in the center of the ball or on top of it?
Your palm should sit on the upper center of the ball with fingers spread over the sides, so pressure goes through the whole hand. Placing your hand too far toward the edge makes the ball roll out from under you as you descend.
Why do my hips twist during this exercise?
The uneven hand heights create a rotational pull, and your obliques have to fight it the entire set. Widen your feet, squeeze your glutes, and slightly increase your brace; if twisting continues, reduce depth or reps until control improves.
How many reps should I do per side?
Start with 5 to 8 controlled reps per side and switch the ball to the other hand for an equal amount, since the weaker or less coordinated side sets your target. Quality of stability matters more here than squeezing out extra reps.
What can I use if I do not have a medicine ball?
A firm basketball or a small stability ball works in a pinch, though both move more than a weighted medicine ball. You can also perform one hand elevated on a low step or bench, which keeps the asymmetry but removes the instability.
Is this exercise safe for the shoulders?
For healthy shoulders it is generally well tolerated because the load is your body weight, but the unstable surface does require active joint control. Stop if you feel sharp pain, keep the ball-side wrist from folding backward, and build up depth gradually.
How does the Push Up Medicine Ball differ from a two-ball push-up?
With one ball, one hand remains on the floor, so you get an asymmetric press with mixed stability demands. Two balls remove the floor hand entirely and create a wider, deeper, and considerably less stable pressing position, making it a harder progression.