Side Bend Plank
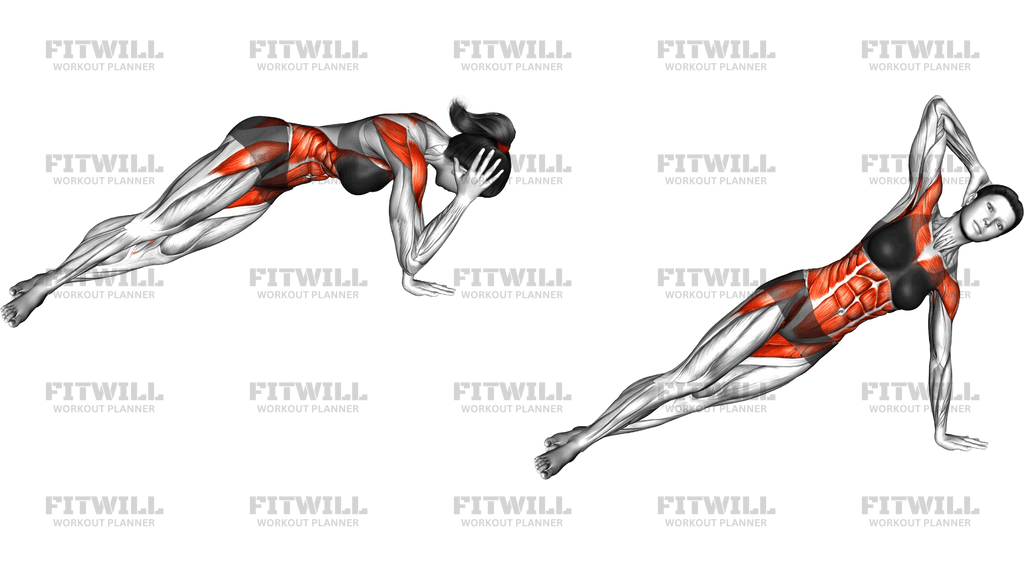
The Side Bend Plank is a lateral core exercise performed from a side plank position, supporting your body on one hand with your legs stacked and extended. From there, you lower your hips toward the floor and then drive them back up to a lifted position, creating a controlled side-bending arc through the waist. The highlighted areas in the movement are the obliques and the muscles running along the side of the lower spine, which work together to control the drop and pull the torso back into a straight line.
This exercise earns its place in a routine because it trains lateral core strength in a way that front planks and crunches simply cannot. Everyday movements like carrying groceries on one side, swinging a racket, or changing direction while running all require the waist to resist and produce side-to-side motion. If your training only hits the front of the trunk, the side wall of the core stays underdeveloped, and that gap often shows up as poor stability during single-sided work.
The setup matters a great deal here because everything is balanced on a narrow base. Your support hand should sit directly under your shoulder with the arm straight, and your body should form one long diagonal from head to feet before the bending begins. If the hand drifts forward or the shoulder sinks, the arm and shoulder joint take load they are not positioned to handle, and the obliques lose their role as the prime movers.
To execute well, think of the hips as the hinge point. Lower them in a straight vertical path toward the mat with control, letting the side of your waist lengthen, then squeeze the obliques on your underside to lift the hips slightly past neutral so the top side of the waist compresses. Reaching the top arm overhead as you lift adds length to the moving side and increases the demand on the stabilizing shoulder, though you can keep the hand on the hip if the shoulder feels overworked.
The Side Bend Plank suits intermediate trainees who already own a solid static side plank, as well as athletes in rotational sports and anyone wanting stronger, more resilient hips and waist. Because it loads the shoulder in a weight-bearing position, it also doubles as shoulder stabilizer work. Start with a small range and a few reps per side, and only deepen the bend once you can keep the body in one rigid line throughout.
[ Workout Log & Planner ]
Put your next workout in Fitwill
Keep your plan and training log ready when you are.


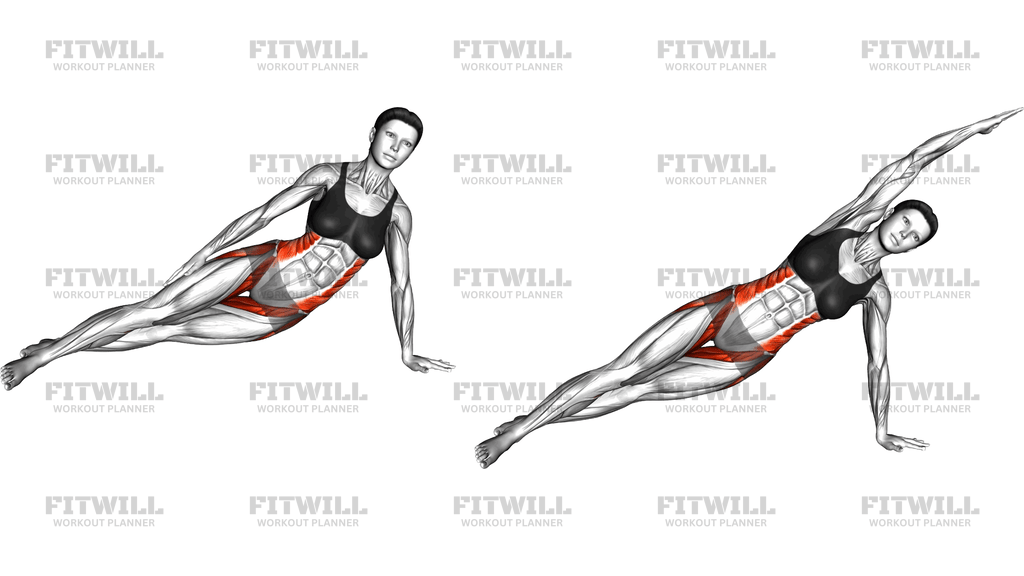
Instructions
- Lie on your side on an exercise mat with your legs fully extended and stacked, one foot on top of the other.
- Place your lower forearm or palm flat on the mat directly under your shoulder; use the straight-arm palm position shown here for the full version, with the support elbow locked but not hyperextended.
- Lift your hips off the mat until your body forms one straight diagonal line from head to heels, and rest your top hand on your hip or reach it toward the ceiling.
- Brace your abs and squeeze your glutes lightly so the pelvis does not sag forward or backward.
- Inhale, then slowly lower your hips straight down toward the mat in a controlled arc, keeping your legs stacked and your support arm steady.
- Stop just before your hip touches down, keeping tension in the underside of your waist rather than resting on the floor.
- Exhale and drive your hips upward past the starting line, squeezing the obliques on your lower side; reach your top arm overhead as you lift for a longer side stretch.
- Pause briefly at the top with your body in a firm side-bend arc, then begin the next lowering rep.
- Breathe steadily throughout, inhaling on the descent and exhaling on the lift, and complete all reps on one side before switching.
- To reset, lower your hips to the mat with control, shake out your supporting wrist and shoulder, then set up on the opposite side.
Tips & Tricks
- If your supporting shoulder creeps up toward your ear, actively press the mat away and pull the shoulder blade down; a shrugged shoulder turns this into an arm exercise instead of a waist exercise.
- A common mistake is letting the hips drop forward so the movement becomes a front plank dip; film yourself from the front to confirm your shoulders and hips stay stacked in one vertical plane.
- Do not bounce off the floor at the bottom. Touching down or bouncing releases the tension your obliques need to work, so reverse the rep an inch or two above the mat.
- If the straight-arm position bothers your wrist, spread your fingers and grip the mat, or drop to a forearm support; the side-bending action stays the same either way.
- Keep the neck long and eyes forward rather than craning to watch the floor, since the head should travel as an extension of the spine.
- Struggling to lift past neutral usually means the glutes have switched off; squeeze the top glute before each lift and the hip drive becomes noticeably easier.
- Widen your stance by placing the top foot on the mat just in front of the bottom foot if you wobble; the extra base makes balance easier while you build control.
- Quality beats depth here. A small, smooth arc with a rigid torso trains the obliques better than a big sway with a sagging waist.
- If your top arm overhead reach pulls you off balance, hold that hand on your hip until the base position feels stable.
Frequently Asked Questions
Which muscles does the Side Bend Plank work the most?
The obliques on the underside of your waist do the bulk of the work, supported by the quadratus lumborum in the lower back, the glute medius holding the pelvis steady, and the supporting shoulder stabilizing your whole body weight.
Is the Side Bend Plank suitable for beginners?
Beginners should master a static side plank first, since this exercise adds dynamic bending on top of that base. A good starting regression is the same movement from a forearm support with the bottom knee bent and resting on the mat.
How is the Side Bend Plank different from a regular side plank?
A side plank is a static hold with the hips locked at one height, while the Side Bend Plank moves the hips down and up through a controlled arc, turning the obliques from stabilizers into active movers.
Why does my supporting shoulder hurt during the exercise?
Pain usually means the shoulder has sunk or the hand has drifted out from under the shoulder line. Reposition the palm directly beneath the shoulder, press the mat away, and reduce the reps; if discomfort persists, switch to a forearm support.
Should I reach my top arm overhead or keep it on my hip?
Reaching overhead lengthens the working side and increases the challenge, so treat it as a progression. Keep the hand on your hip if your balance or shoulder stability is still developing.
How many reps and sets should I do?
Start with 6 to 10 controlled bends per side for 2 to 3 sets, resting briefly between sides. Prioritize a smooth, wobble-free arc over hitting a higher number.
What is the most common mistake in this exercise?
Letting the hips sag and the torso rotate forward, which shifts the work from the obliques to the front of the core and the shoulder. Keep shoulders and hips stacked vertically and move the hips in a straight up-and-down path.
Can I do the Side Bend Plank if I have lower back discomfort?
Side bending with load can aggravate some lower back conditions, so check with a qualified professional first. If cleared, use a small range on a forearm support and stop well before any pinching or discomfort appears.
What can I use instead if a mat or floor setup is not available?
A firm carpet or grass surface works, though a mat is kinder to the wrist and ankle. Standing side bends with a light weight train a similar side-bending pattern but remove the shoulder-loading element.