Lying Hamstring Sciatic Nerve Mobilization
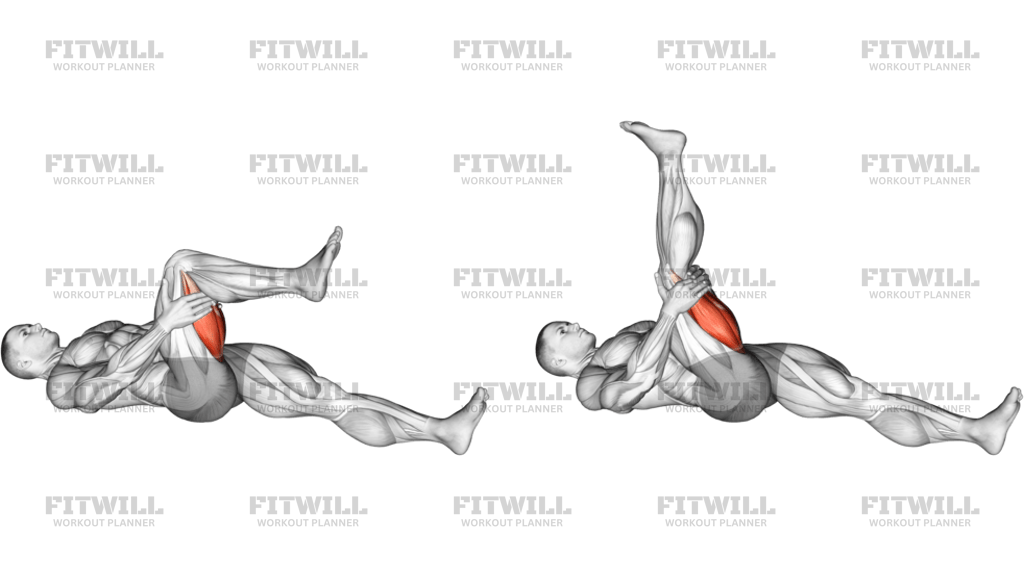
Lying Hamstring Sciatic Nerve Mobilization is a gentle nerve glide performed on your back, where you hold one thigh and rhythmically bend and straighten the knee to move the sciatic nerve through the hamstrings without forcing a hard stretch. Unlike a static hamstring stretch, the goal here is smooth, oscillating motion, which is why this drill is a favorite in rehab settings and warm-ups for people whose hamstrings always feel tight no matter how much they stretch.
This movement is most useful for people who feel pulling, tightness, or tingling that runs from the back of the hip down through the hamstring and into the calf, especially after long periods of sitting, heavy deadlift or hinge training, or running volume increases. It also suits desk workers with chronically shortened hip and hamstring positions, and lifters who want to improve tolerance to end-range hip flexion before training. Because you control every angle with your own hands, it is one of the safest ways to work on the back of the leg.
Mechanically, the setup does most of the work. Lying on your back fixes the pelvis and low back to the floor, so when you pull the thigh toward your chest and then extend the knee, the tension lands on the hamstring group and the sciatic nerve pathway rather than being absorbed by a rounded spine. Adding ankle movement, such as pulling your toes toward or away from your shin, increases or eases the nervous system tension on demand, letting you fine-tune the intensity in a way a static stretch cannot.
The key to doing this well is staying honest about intensity. A nerve mobilization should produce mild stretch, light tingling, or a faint pulling sensation, never sharp pain, numbness that lingers, or symptoms that march further down the leg. Keep the other leg flat on the floor to anchor the pelvis, keep your head relaxed, and move in a slow, steady rhythm for a set number of repetitions rather than holding a long static position. If symptoms consistently worsen or radiate past the knee during daily activities, pair this drill with guidance from a qualified health professional rather than pushing through it on your own.
Fitwill
Log Workouts, Track Progress & Build Strength.
Achieve more with Fitwill: explore over 9600 exercises with images and videos, access built-in and custom workouts, perfect for both gym and home sessions, and see real results.
Start your journey. Download today!




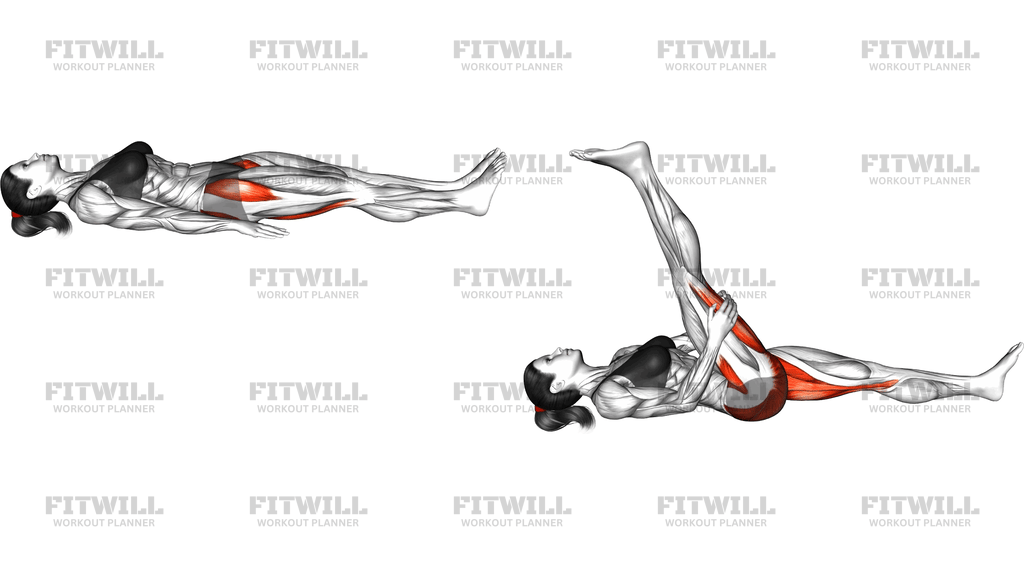
Instructions
- Lie on your back on an exercise mat with both legs extended and your arms resting at your sides.
- Bend one hip and draw the knee toward your chest, then clasp both hands behind that thigh to support it.
- Keep the other leg flat on the floor with the toes pointing up so your pelvis stays anchored.
- Take a breath in, then slowly straighten the held knee until you feel a light stretch or faint pulling along the back of the thigh or calf.
- Pause for a second at the end of the range, and if you want more tension, pull your toes toward your shin; if it feels too strong, let the toes relax away.
- Bend the knee again to reduce the tension, then straighten it, moving in one smooth continuous cycle.
- Exhale as the knee straightens and inhale as it bends, keeping your breathing relaxed and your low back in contact with the floor.
- Complete around 8 to 15 gentle repetitions, staying within a mild, comfortable sensation the entire time.
- Lower the leg back to the floor, let it rest briefly, then switch legs and repeat on the other side.
Tips & Tricks
- Hold the thigh, not the back of the knee or the calf, so your hands control hip angle while the knee does the moving.
- The classic mistake is turning this into a hard static hamstring stretch; if you are gritting your teeth and holding at end range, reduce the angle until the sensation drops to a mild pull.
- If your raised leg starts shaking or your hip crease cramps, the hip is flexed too far; back the thigh away from your chest a few degrees and rebuild from there.
- Watch the anchored leg: if it lifts or the low back arches off the floor, the pelvis is tilting and stealing tension from the hamstring and nerve path.
- Tingling that spreads or intensifies with each rep is a sign to ease off immediately; shorten the range or skip ankle movement for that session.
- Ankle position is your intensity dial, so use it deliberately, adding toe pull only in the last few reps if the basic glide feels easy.
- Keep your head and neck resting on the mat; straining to watch the moving leg adds unnecessary tension through the whole nervous system.
- Nerve glides respond better to frequency than force, so several short sets through the day generally beat one aggressive long session.
- Do this after training or after long sitting sessions when the tissue feels restricted, rather than as a maximum-effort stretch first thing in the morning.
Frequently Asked Questions
Which muscles and structures does Lying Hamstring Sciatic Nerve Mobilization target?
The movement primarily mobilizes the sciatic nerve pathway and lengthens the hamstring group, including the biceps femoris, semitendinosus, and semimembranosus. The calf and glute area may also feel mild tension depending on your ankle and hip angles.
How is this different from a regular Lying Hamstring Stretch?
A static stretch holds the knee straight in one position, while this drill rhythmically bends and straightens the knee to slide the nerve through the surrounding tissue. The goal is movement and tolerance, not a long held end-range stretch.
Is it normal to feel tingling during Lying Hamstring Sciatic Nerve Mobilization?
A faint tingle or light electrical sensation can appear with nerve glides, but it should stay mild and fade as soon as you reduce the range. Sharp pain, spreading numbness, or symptoms that linger afterward mean you should stop and use a much gentler version.
How many repetitions should I do per leg?
Eight to fifteen smooth repetitions per leg, once or twice a day, is a practical starting point. Because the drill is low intensity, consistency matters far more than volume.
Can beginners do Lying Hamstring Sciatic Nerve Mobilization?
Yes, and the supine setup makes it one of the most beginner-friendly hamstring drills because the floor supports your spine and your hands control every angle. Start with a smaller knee range and no ankle movement until you learn what a comfortable tension level feels like.
Why should my other leg stay flat on the floor during the exercise?
The extended leg pins your pelvis so the tension from the moving leg travels into the hamstring and nerve pathway instead of pulling your low back into a tilt. If the bottom leg lifts, reduce how far you draw the top thigh toward your chest.
What does pointing and flexing my foot change?
Pulling your toes toward your shin adds tension to the sciatic nerve pathway and usually deepens the sensation down the back of the leg, while relaxing the foot eases it. Treat the ankle as a fine adjustment rather than the main driver of the movement.
What can I use instead if lying on the floor is uncomfortable?
You can perform a similar knee-bending nerve glide while seated at the edge of a chair with the thigh supported by your hands. The seated version changes the tension slightly, so start with a smaller range there.
When should I avoid Lying Hamstring Sciatic Nerve Mobilization?
Skip it if you have an acute low back injury flare-up, recent hamstring tear, or leg symptoms that are currently worsening day to day. In those situations, get assessed by a qualified health professional before adding any nerve or hamstring work.