Kneeling Push Up To Hovering Table Top
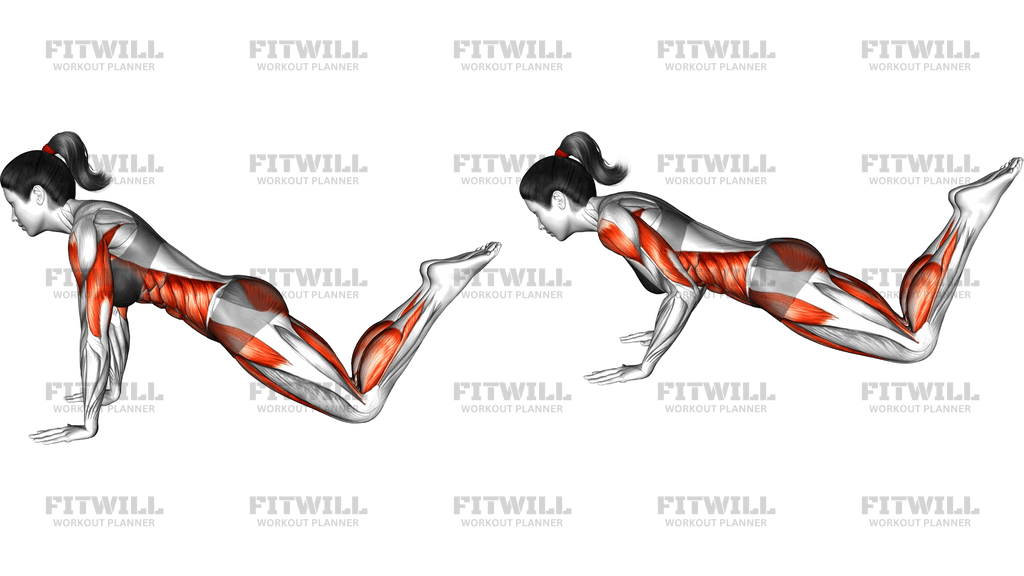
The Kneeling Push Up To Hovering Table Top combines two demanding bodyweight positions into one flowing movement. You begin in a kneeling push-up position on your hands and knees, then lift your knees a few inches off the floor so your entire body weight rests on your hands alone, with your knees bent beneath your hips and your shins raised behind you. That hovering position, held for a moment, is what makes this exercise far harder than it looks.
This movement is popular in Pilates and bodyweight strength training because it builds deep core control rather than just raw pressing power. When your knees leave the floor, your abdominals, glutes, and lower back have to work together to hold a flat, rigid line from head to hips. At the same time your shoulders, triceps, and chest support your upper body and keep you from sinking between your shoulder blades.
The setup matters more than in most core exercises because the hovering position gives you nowhere to hide. If your hands are too far forward, your lower back arches; if your hips sag or hike, the load shifts away from your abs and into your joints. Setting up with your shoulders stacked directly over your wrists and your ribcage drawn down toward your hips puts the work exactly where it belongs.
To execute it well, press the floor away firmly before you lift, so your arms are already active and your upper back is engaged. Exhale as you raise your knees, squeeze your glutes, and hover only as high as you can while keeping a perfectly straight torso. Pause briefly at the top, then lower your knees back to the mat with control rather than dropping them.
This exercise suits beginners working toward full planks and push-ups, as well as experienced trainees who want a precise core-stability drill. It is commonly used in Pilates mat classes, warm-up routines, and strength circuits. Because it requires no equipment beyond a mat, it travels well and slots easily into any home workout.
The main safety point is protecting your lower back and wrists. Stop the set as soon as your hips start to sag or your back arches, and keep the hovering time short and high-quality rather than long and sloppy. If your wrists complain, make fists and press on your knuckles or use push-up handles to keep them neutral.
[ Workout Log & Planner ]
Put your next workout in Fitwill
Keep your plan and training log ready when you are.


Instructions
- Place an exercise mat on the floor and kneel down on both knees, then plant your palms flat on the mat slightly wider than shoulder width, with your shoulders stacked directly over your wrists.
- Walk your knees back a few inches so your body forms a straight diagonal line from the crown of your head to your knees, keeping your knees bent at roughly 90 degrees with your shins and feet lifted behind you.
- Spread your fingers, grip the mat, and press the floor away so your upper back rounds slightly and your shoulder blades are actively engaged rather than collapsed.
- Brace your abdominals as if preparing for a light tap to the stomach, squeeze your glutes, and tuck your ribcage down so your lower back stays long and flat.
- Exhale and lift both knees a few inches off the mat, keeping the same bent-knee shape so your weight is supported entirely by your hands in the hovering table top position.
- Hold the hover for two to three seconds, checking that your hips are level with your shoulders and not sagging toward the floor or piked up toward the ceiling.
- Inhale and slowly lower your knees back to the mat until they touch down lightly, keeping tension in your core the whole way down.
- Reset your brace before the next rep, making sure your hand position and knee placement have not drifted.
- Breathe steadily throughout: exhale as the knees rise, inhale as they lower, and avoid holding your breath during the hover.
- Complete your planned repetitions, then rest by sitting back on your heels and shaking out your wrists before the next set.
Tips & Tricks
- The most common mistake is letting the hips sag once the knees lift, which dumps the load into the lower back. If you cannot hover with a flat line, reduce the hold to one second and build up gradually.
- Watch that your knees travel straight down to the mat on the return. Letting them drift wide or stagger one at a time usually means your core has fatigued and the set should end.
- Keep your gaze slightly forward and down rather than craning your neck up, so the back of your neck stays in line with your spine during the hover.
- If the hover feels impossible at first, shift your knees slightly closer to your hands. A more compact table top shortens the lever and makes the knee lift easier while you build strength.
- Press actively through the floor with straight elbows throughout the movement. Soft, sinking arms turn the exercise into a shoulder strain instead of a core drill.
- Squeeze your glutes hard at the top of the hover. Many people rely only on their abs, and the glute contraction is what locks the pelvis in a neutral position.
- Time your quality reps rather than chasing a number. Five clean two-second hovers beat fifteen where your back arches after the third rep.
- If your wrists ache, curl your fingers under and balance on your fingertips, or place push-up handles under your palms to keep the wrists stacked and neutral.
- Perform this on a mat rather than a hard floor so your kneecaps are protected every time you return to the kneeling position.
Frequently Asked Questions
What muscles does the Kneeling Push Up To Hovering Table Top work?
The primary work comes from the abdominals and deep core, which hold your torso rigid while the knees hover. Your glutes and lower back stabilize the pelvis, while the shoulders, triceps, and chest support your body weight on your hands.
Is the Kneeling Push Up To Hovering Table Top good for beginners?
Yes, it is one of the best progressions toward a full plank or push-up because the bent-knee hover shortens the body lever. Beginners should start with short one-second hovers and only add time once they can keep the hips level.
How high should my knees be during the hover?
Only a few inches. The height matters far less than keeping a straight line from head to hips, so hover just high enough to clear the mat while maintaining a flat back.
Why does my lower back arch when I lift my knees?
An arching back means your core is not braced hard enough or your glutes are switched off. Reset with your ribcage tucked, squeeze your glutes before lifting, and shorten the hold until you can hover without the sag.
Can I use this as a push-up variation?
It is better treated as a core-stability exercise than a pressing one, since the hover demands more from your abs than from your arms. If you want more chest and triceps work, add a small press-up from the hover or pair this drill with regular kneeling push-ups.
How long should I hold the hovering table top position?
Two to three seconds per repetition is a solid target, building toward five to eight seconds as your control improves. End the set as soon as your hips drop or your back arches, because sloppy hovers teach poor patterns.
My wrists hurt when I do the Kneeling Push Up To Hovering Table Top. What can I do?
Make loose fists and press on your knuckles, or use push-up handles so your wrists stay straight instead of extended. Wrist discomfort usually comes from full extension under load, not from weakness in the exercise itself.
What can I substitute if the hover is too difficult?
Practice a standard kneeling push-up and a static plank first, then try lifting only one knee at a time off the mat. This single-knee version trains the same stability with half the demand.
Should my shoulders be over my wrists or behind them?
Stack them directly over your wrists at setup and keep them there through the hover. Shoulders drifting behind the hands shifts weight backward onto the knees, while drifting forward overloads the shoulders and arches the back.