Resistance Band Hammer Curl
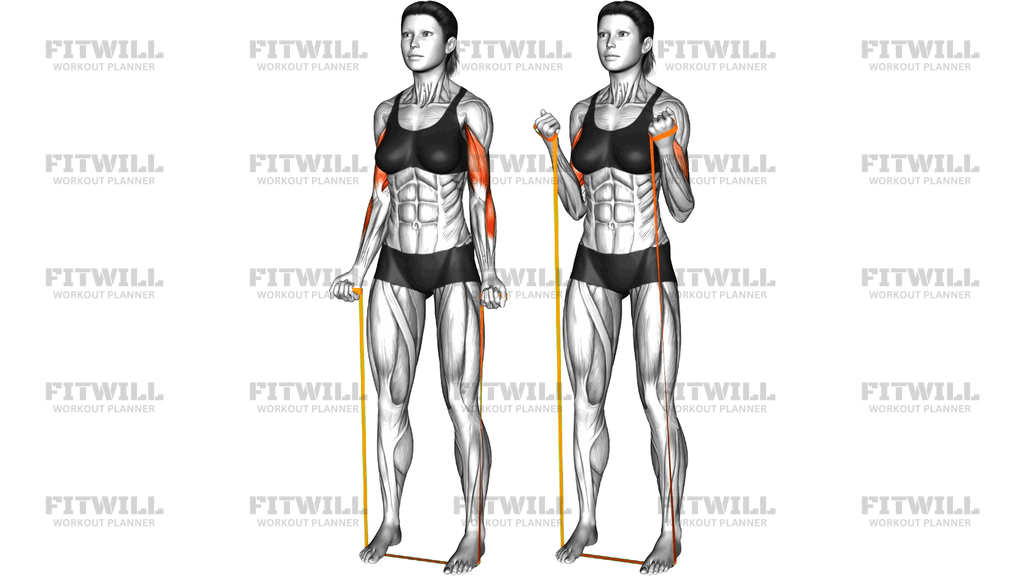
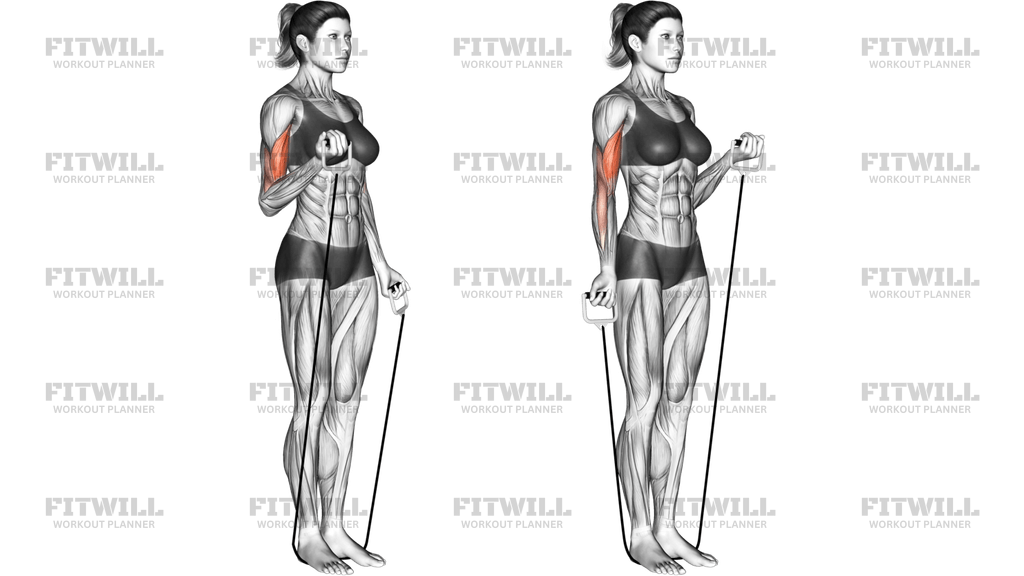
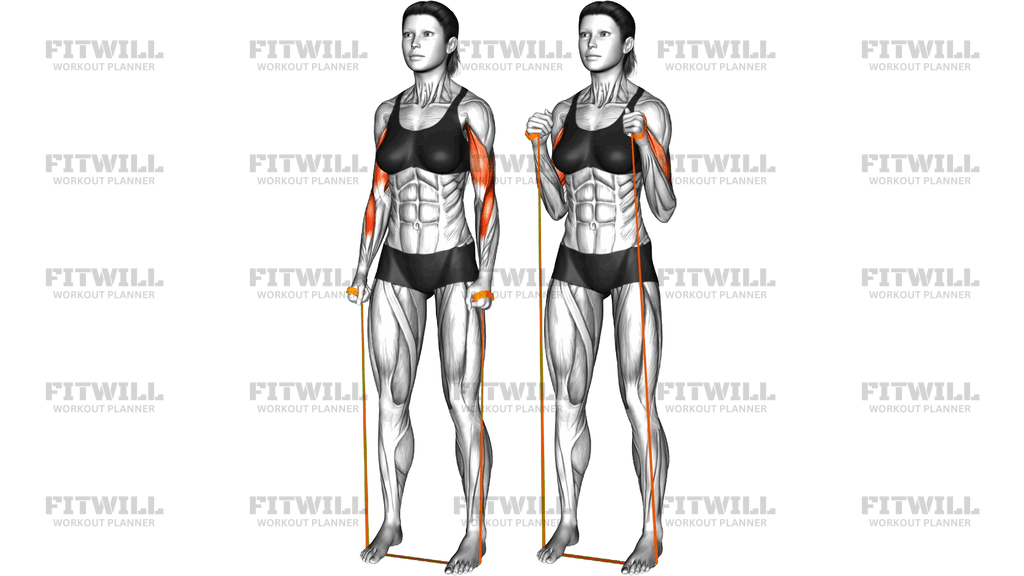
The Resistance Band Hammer Curl is a standing arm exercise performed with a resistance band anchored under both feet. Instead of turning the palms up like a regular curl, you keep the hands in a neutral, thumbs-forward position throughout the lift, which shifts more work toward the brachioradialis in the forearm and the brachialis underneath the biceps while the biceps brachii still contracts strongly. The image shows the classic setup: the band runs under the arches of both feet, and the handles or ends are held at the sides with the elbows locked in next to the torso.
This movement is useful for almost anyone training at home, traveling, or working out without access to dumbbells. Because the band's resistance increases as it stretches, the top of each rep feels harder than the bottom, which gives the arms a strong peak contraction that is easy to feel and control. Lifters who experience wrist or elbow discomfort with a fully supinated curl often find the neutral hammer grip more comfortable because the forearm stays in a natural alignment.
The main muscles trained are the biceps and the brachioradialis, with the brachialis acting as a strong helper and the forearm and grip muscles working hard to hold the band under tension. Because you are standing, the core and shoulders also do quiet stabilizing work to keep the torso upright while the arms move.
Setup matters more than most people expect. Anchoring the band evenly under both feet equalizes tension on each side, and the amount of slack left in the band determines how hard the starting position feels. Standing too tall with lots of slack means the first half of the rep does nothing; a modest stretch at the bottom keeps tension on the elbows from the very start.
To execute the movement well, curl both hands up at the same time, keeping the elbows pinned beside the ribs and letting only the forearms travel. The hands should rise in a straight line along the sides of the body until they are near the fronts of the shoulders, pause briefly, then lower under control. Avoid letting the elbows drift forward or the shoulders shrug upward, both of which steal work away from the arms.
Common use cases include home arm training, accessory work after heavier pulling exercises, high-repetition finishers, and rehab-friendly upper arm training where a gradual, adjustable resistance is helpful. If any wrist or elbow pain occurs, reduce the band tension or shorten the range rather than pushing through discomfort.
[ Workout Log & Planner ]
Put your next workout in Fitwill
Keep your plan and training log ready when you are.


Instructions
- Stand with your feet about hip-width apart and lay a resistance band on the floor so the middle of it runs under the arches of both feet, with an equal length of band on each side.
- Grip one end or handle of the band in each hand with a neutral, hammer-style grip, so your palms face each other and your thumbs point forward.
- Stand tall with a soft bend in the knees, pull the slack out of the band until you feel light tension at your sides with your arms fully extended, and brace your core to keep your ribcage down.
- Pin your elbows against the sides of your ribs and keep them there for the entire set; they are the hinge, not the movers.
- Exhale and curl both hands upward at the same time, letting only your forearms travel, until your hands are in front of your shoulders and the band is tightest at the top.
- Squeeze the arms at the top for a one-second pause while keeping your wrists straight and your thumbs facing forward.
- Inhale and lower your hands slowly back to full arm extension, keeping tension in the band instead of letting it snap your arms down.
- Reset your stance, re-check that the band is still secure under both feet, and begin the next repetition with the same tempo.
- Complete your set, release the tension in one hand first, then the other, and step off the band carefully so it cannot snap back.
Tips & Tricks
- If the first third of the rep feels empty, shorten the band by widening your stance or wrapping it once around each foot; the curl should start with tension already on the elbows.
- Watch for the elbows creeping forward as you fatigue. When the elbows travel toward the front of the body, the shoulders take over, so stop the set or lighten the band.
- Keep the hammer grip honest: if your palms rotate upward during the curl, it becomes a standard band curl, so think about holding two vertical tubes, not turning doorknobs.
- Slowing the lowering phase to two or three seconds makes a light band feel much heavier, which is one of the easiest ways to progress this exercise without new equipment.
- Do not shrug your shoulders up toward your ears as you curl; keep the tops of the shoulders relaxed so the upper traps stay out of the movement.
- If one side always feels looser, check that the band is centered under both feet before every set rather than mid-set, which prevents uneven loading.
- Alternate between two-armed reps and alternating reps in different sessions; alternating lets each arm travel a cleaner path when you struggle to keep both sides even.
- A slightly staggered stance can help you stay balanced if you find yourself rocking back and forth, but keep the band still anchored under both feet.
Frequently Asked Questions
Which muscles does the Resistance Band Hammer Curl work?
It primarily targets the biceps brachii along with the brachioradialis in the forearm, with strong support from the brachialis. Your grip and forearm muscles also work to hold the band securely.
Why use a hammer grip instead of a normal palms-up curl?
The neutral, thumbs-forward grip shifts more emphasis to the brachioradialis and brachialis, which build thickness in the upper arm and forearm. Many people also find this wrist position more comfortable than a fully supinated curl.
How do I anchor the band correctly for the Resistance Band Hammer Curl?
Stand with the middle of the band under the arches of both feet and hold one end in each hand with equal lengths on both sides. Before your first rep, pull out the slack so you already feel light tension with your arms hanging straight down.
Can beginners do Resistance Band Hammer Curls?
Yes, it is one of the most beginner-friendly curl variations because the band provides smooth, adjustable resistance and no free weight to drop. Start with a light band and eight to twelve controlled reps while you learn to keep the elbows pinned.
Why do my shoulders rise when I curl the band?
That is usually a sign the band is too heavy or the set has gone on too long, so the upper traps jump in to assist. Reduce the tension or end the set, and focus on keeping the shoulders pressed down away from your ears.
What can I substitute if I do not have a resistance band?
Dumbbell hammer curls are the closest substitute with the same neutral grip. A cable with a rope or single handles held in a neutral grip also replicates the movement pattern well.
Should my elbows move during the Resistance Band Hammer Curl?
No, the elbows should stay pinned to the sides of your ribs and act only as the hinge. If they drift forward, the front shoulders start assisting and the arms get less work.
Is it safe to stand on the band with both feet?
Yes, provided the band is in good condition without thin spots or small tears. Always check the band before training, keep it centered under your arches, and release the tension one hand at a time when you finish.
How can I make the Resistance Band Hammer Curl harder without buying a heavier band?
Widen your stance or wrap the band around each foot once to shorten it and increase tension at the start. You can also slow the lowering phase to three seconds or add a two-second pause at the top of each rep.