Side Lying Lateral Costal Breathing
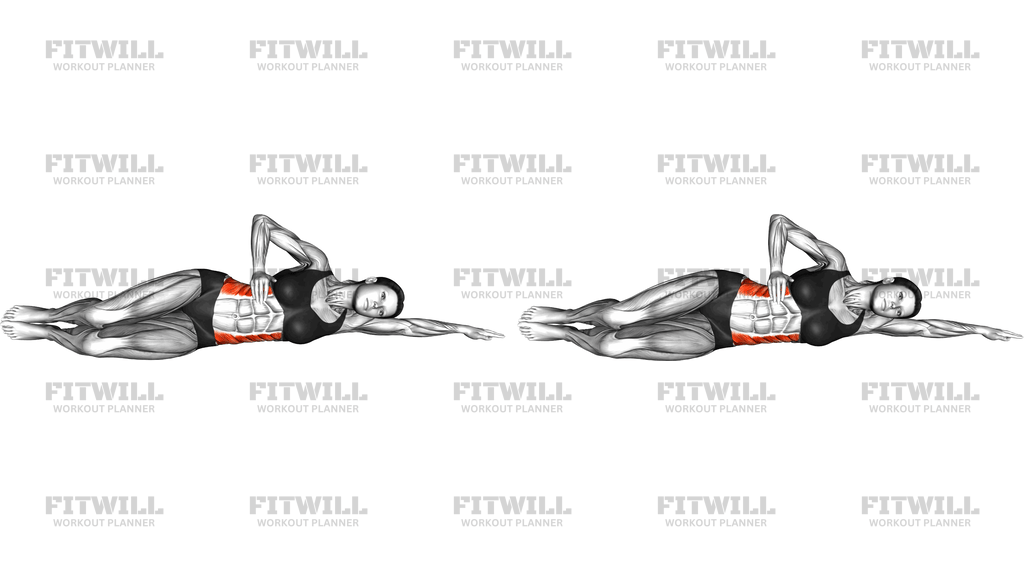
Side Lying Lateral Costal Breathing is a breathing drill, not a strength or stretching exercise in the traditional sense. You lie on your side on a mat with your lower arm extended overhead along the floor and your top hand resting on the side of your ribcage, then practice directing each breath into the ribs that face the ceiling. The hand on the ribs gives you instant feedback: if you feel the ribs pushing sideways into your palm as you inhale, you are doing it correctly.
The side-lying position is what makes this drill valuable. When you lie on your back or stand up, it is easy to cheat by lifting the chest, shrugging the shoulders, or pushing the belly outward. Lying on one side restricts movement on the bottom half of the ribcage, so the air you take in has to travel into the upper ribs and the space between the ribs on the open side. That targeted expansion is hard to achieve in any other position, which is why this drill appears so often in Pilates classes and rehabilitation settings.
This exercise is useful for almost anyone. It is a staple in Pilates practice, where lateral breathing is coordinated with core engagement. It also helps people who feel locked into shallow chest breathing, athletes working on ribcage and trunk control, and anyone spending long hours sitting with a compressed, rounded upper body. People recovering from around the ribcage or after long periods of reduced activity often use it to gently restore awareness of the ribcage, though it should never replace guidance from a qualified health professional.
Execution is simple but requires attention. Lie on your side with your hips and shoulders stacked, head supported on the lower arm, and place the top hand on the side of your ribs with fingers spread. Breathe in slowly through the nose and imagine the breath filling the ribs under your top hand, feeling them widen into your palm. Exhale slowly through the mouth, as if through a straw, and feel the ribs draw back in and the deep trunk muscles gently engage. The belly, chest, and shoulders should stay relatively quiet compared to a normal breath.
A common mistake is forcing the breath so hard that the neck and shoulders tense up, or letting the upper body roll forward and back as you breathe. Keep the spine long and neutral, stay stacked, and let the only moving part be the ribcage. If you feel strain, make the breaths smaller and slower rather than bigger.
Practice two to three minutes per side, alternating which side you lie on so both ribcages get the same attention. It works well as a warm-up before Pilates or core training, a reset between heavier lifts, or a calm-down drill at the end of a session. Because there is no load and no fast movement, the main risk is simply doing it carelessly, so treat it as a skill to be refined rather than a box to tick.
Fitwill
Log Workouts, Track Progress & Build Strength.
Achieve more with Fitwill: explore over 9600 exercises with images and videos, access built-in and custom workouts, perfect for both gym and home sessions, and see real results.
Start your journey. Download today!




Instructions
- Place an exercise mat on the floor and lie on your right side with your hips and shoulders stacked in a straight line, knees comfortably together or slightly bent for stability.
- Extend your bottom (right) arm along the floor overhead so your head can rest lightly on it, and place your top (left) hand flat on the side of your ribcage with fingers spread.
- Check your alignment: head neutral, spine long, and shoulders relaxed away from your ears. Take one normal breath to settle before starting the drill.
- Inhale slowly through your nose and direct the air into the side of your ribs facing the ceiling, feeling them expand outward into your top hand.
- Keep your chest, belly, and shoulders quiet as you inhale; the movement should be felt under your palm on the upper ribs, not at the collarbones.
- Exhale slowly through pursed lips, as if blowing through a straw, and feel the ribs draw back down and in under your hand.
- As you exhale, let your deep trunk muscles respond naturally with a gentle inward draw, without forcefully bracing or gripping the abdominals.
- Complete 6-10 slow breath cycles, keeping each inhale and exhale smooth and even in length.
- Switch to your left side, restack your hips and shoulders, place the opposite hand on the upper ribs, and repeat for the same number of breaths.
- To finish, take one relaxed full-body breath lying flat on your back and notice how much easier your breathing feels before moving on.
Tips & Tricks
- If your hand barely feels the ribs move, you are likely breathing into your chest. Exaggerate the intention of sending air to your top hand for the first few breaths to relearn the path.
- Watch for the trunk rolling forward or backward with each breath. Keep your shoulders and hips stacked over each other; a small bend in the bottom knee can anchor the position.
- Avoid lifting the shoulder toward the ear on the inhale. That is accessory breathing taking over. Soften the top shoulder down and make the breath smaller until the ribs do the work.
- Do not force a huge breath. Lateral expansion is subtle in the beginning; a calm, moderate volume of air with good rib movement beats a big gulping breath with tension.
- A slightly flexed bottom hip and knee often helps beginners stay stable. If you feel wobbly, bend the bottom leg to about 45 degrees and rest the top leg against it.
- If your lower arm or shoulder aches from lying on it, fold a small towel under the arm or head instead of abandoning the drill; comfort is what lets you breathe slowly.
- Match your exhale length to your inhale or make it slightly longer. A rushed exhale usually comes with a loss of rib control and trunk engagement.
- Practice both sides even if one ribcage feels easier to expand. Most people have a stiff side, and the drill works best when both get equal time.
- Use this drill before heavy lifts or Pilates work rather than after. Improved rib position and breathing control carry over into better trunk bracing during loaded exercises.
Frequently Asked Questions
What muscles does Side Lying Lateral Costal Breathing work?
It primarily trains the diaphragm and the muscles between the ribs, with supporting contribution from the obliques and deep core as you control the exhale. It is a breathing control drill, so do not expect the muscle effort of a loaded core exercise.
Why is the drill done side lying instead of lying on the back?
Lying on your side restricts the ribs closest to the floor, which encourages the air to move into the open upper ribs where your hand can feel it. On your back, it is much easier to default to belly or chest breathing without noticing.
Is Side Lying Lateral Costal Breathing suitable for complete beginners?
Yes, it is one of the most accessible breathing drills because there is no load and no complex position. Beginners should start with 5-6 slow breaths per side and focus on feeling the ribs move under the top hand.
How far should my ribs expand during the inhale?
The movement is modest, usually a centimeter or two of widening into your palm. If you feel your whole trunk twisting or your chest heaving, the breath has gone too large and lost its focus.
My shoulders and neck tense up when I do this. What should I change?
That usually means you are over-breathing or pulling air in too fast. Reduce the volume of each breath, slow the inhale down, and consciously keep the top shoulder heavy and relaxed throughout.
Can I substitute a different breathing exercise for Side Lying Lateral Costal Breathing?
Supine diaphragmatic breathing or seated lateral breathing are reasonable alternatives, but neither isolates the upper ribs as well as the side-lying position. If you cannot lie on your side comfortably, a seated version with hands wrapped around the ribcage is the next best option.
How many breaths and how long should each set last?
Aim for 6-10 breath cycles per side with each inhale and exhale lasting roughly 3-5 seconds, which gives you about two minutes per side. Quality of rib movement matters far more than the total number of breaths.
Should my bottom arm be stretched overhead or bent under my head?
Extending the lower arm overhead lengthens the side of the trunk and gives the ribs more room to expand, which is the setup shown for this drill. If that position strains your shoulder, bend the arm and rest your head on it instead.
Is this exercise safe if I am pregnant or have a rib or back injury?
The drill is gentle and low load, but pregnancy and any rib, trunk, or breathing-related condition change what is appropriate. Check with your doctor or a qualified prenatal or rehab professional before practicing, and stop if anything causes discomfort.
When is the best time in a workout to use this drill?
It works well as a warm-up before Pilates, core, or lifting sessions because it sets up rib position and breathing rhythm. It can also be used at the end of a session to bring the nervous system down and finish with calm, controlled breathing.