Elevanted Single Leg Bridge
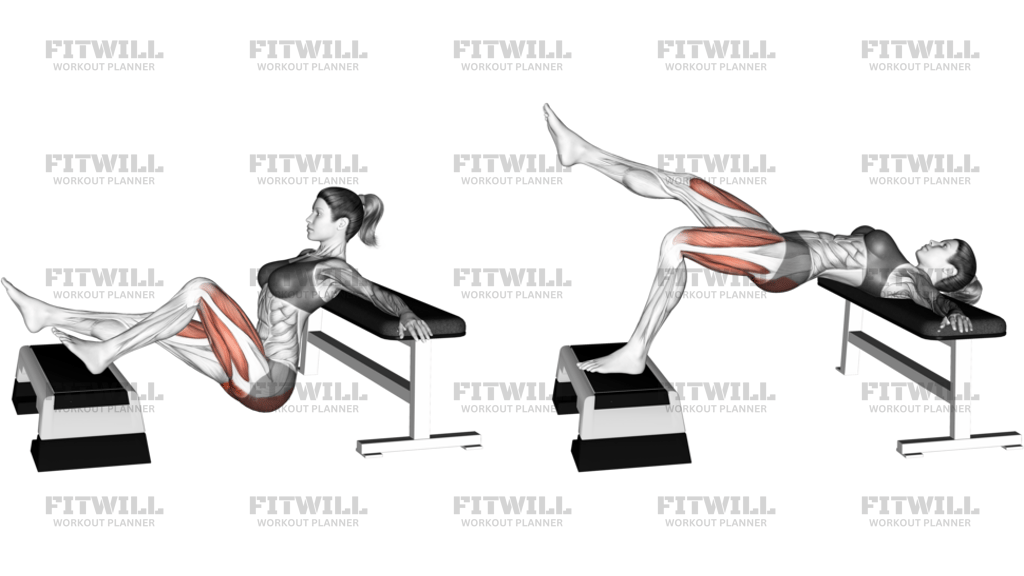
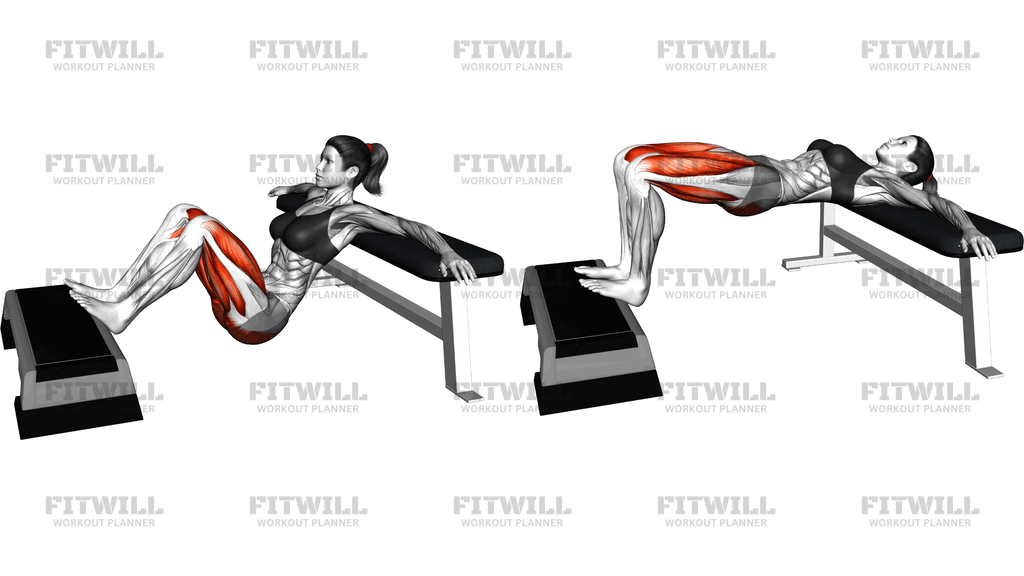
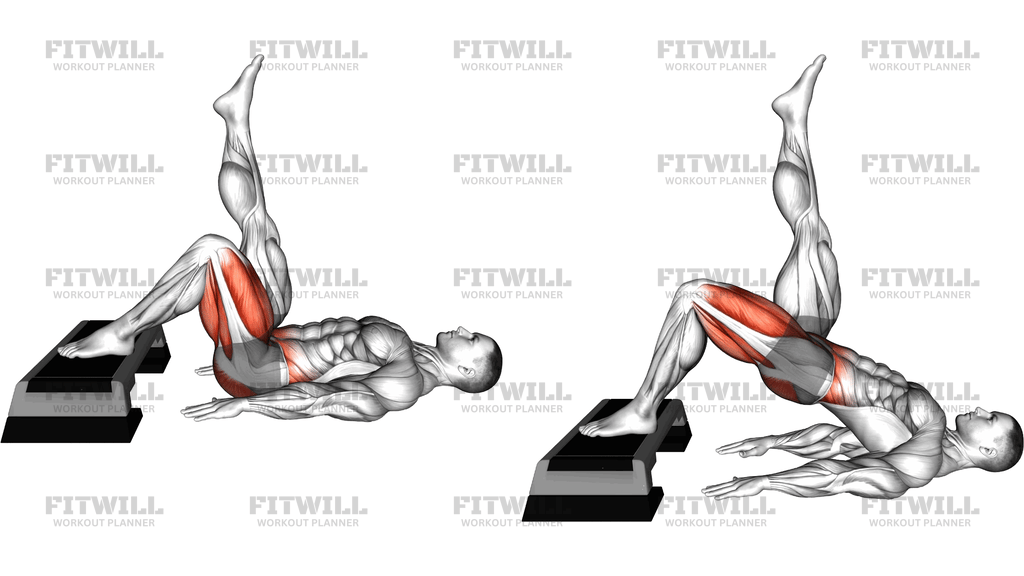
The Elevated Single Leg Bridge is a unilateral hip extension exercise performed lying on your back with one foot planted on a step platform and the opposite leg extended straight up toward the ceiling. From this position you drive through the working heel to lift your hips until your body forms a straight line from shoulders to knee, then lower back down under control. Raising the foot onto a step increases the range of motion at the hip compared to a floor-based bridge, and removing one leg from the floor forces each side of your body to work on its own.
This movement targets the gluteus maximus as the primary driver, with the hamstrings assisting on the lift and the gluteus medius and deep core working hard to keep your pelvis level. The elevated foot position lengthens the glutes and hamstrings more at the bottom of each rep, which is why the exercise feels noticeably harder than a standard single leg bridge even with no added weight.
The Elevated Single Leg Bridge is a strong choice for anyone who sits a lot and needs focused glute work, for runners and cyclists looking to address left-right imbalances, and for lifters who want a demanding hip hinge pattern without loading the spine with a barbell. Because it is unilateral, it will quickly reveal if one hip is weaker or less stable than the other, making it a useful assessment tool as well as a training exercise.
Setup matters here. The height of the step, the placement of your working foot, and the position of your arms all influence whether the lift comes from your hips or from your lower back arching and your pelvis tilting. Keep the working foot flat on the platform with the knee bent roughly 90 degrees at the top, and keep the raised leg pointing straight up rather than drifting forward or sideways.
Execution should be smooth and deliberate: brace the trunk first, press the heel into the step, and think about pushing the floor away rather than yanking the hips up. Pause briefly at the top with the hips fully extended, then lower slowly until the glutes lightly touch the floor before starting the next rep. Rushing the lowering phase is the most common way people turn a glute exercise into a lower back exercise.
As for safety, the main risks are lumbar hyperextension at the top and pelvic drop on the side of the raised leg. Stay within a range where you can keep the ribs down and the pelvis square, and if you feel the work shifting into your lower back, reduce the step height or regress to a two-leg elevated bridge until your control improves.
[ Workout Log & Planner ]
Put your next workout in Fitwill
Keep your plan and training log ready when you are.


Instructions
- Place a step platform on the floor and lie on your back with your knees bent and your feet flat on the floor.
- Position one foot flat on the top of the step platform so the knee is bent around 90 degrees, and extend the opposite leg straight up toward the ceiling with the foot relaxed.
- Rest your arms on the floor alongside your body with palms facing down to give yourself a stable base.
- Brace your abdominals and gently pull your ribs down so your lower back is not already arched before you move.
- Press the heel of your working foot firmly into the platform and lift your hips until your shoulders, hips, and knee of the raised leg form a straight line.
- At the top, squeeze the glute of the working leg and hold for a short pause, keeping the pelvis level rather than letting the raised-leg hip sag or rotate.
- Lower your hips slowly and with control until the glutes lightly touch the floor, keeping tension in the working leg the whole way down.
- Exhale as you press up and inhale as you lower back down, keeping the breath steady throughout the set.
- Complete all reps on one leg, then switch the working foot to the platform, extend the other leg up, and repeat for the same number of reps.
- Between sets, reset your position on the step so your foot placement and distance from the platform stay identical on both sides.
Tips & Tricks
- If your lower back arches at the top of the lift, the step is likely too high for your current hip extension range; lower the platform height and retest.
- Keep the raised leg pointing straight up from the hip. Letting it tilt outward or pull toward your chest changes the lever and makes the pelvis twist.
- Drive through the heel, not the toes. Pushing off the front of the foot on the step shifts effort toward the quads and away from the glutes.
- Aim for the lift to come from squeezing the glute, not from thrusting the chest or overextending the spine. Stop the rep when the hips reach full extension, no higher.
- Press your palms into the floor lightly for balance, but avoid pushing down hard with the arms, which can start tilting the torso and hips.
- If the working hip cramps in the hamstring, you are likely starting each rep from a completely relaxed position; keep light tension in the leg at the bottom.
- Slower lowering phases, around two to three seconds down, dramatically increase how hard the Elevated Single Leg Bridge feels without adding any load.
- Film yourself from the side once: if your hips are visibly lower on the raised-leg side at the top, that hip is dropping and you need to work on keeping the pelvis square.
- If you cannot keep control at all, regress to a two-leg elevated bridge or a floor-based single leg bridge and build up over a few weeks.
Frequently Asked Questions
What muscles does the Elevated Single Leg Bridge work?
The gluteus maximus is the main muscle driving the lift, with the hamstrings assisting and the gluteus medius and deep core stabilizing the pelvis. The lower back muscles also work isometrically to hold your trunk steady.
How high should the step platform be for the Elevated Single Leg Bridge?
A standard step height that puts your knee at roughly 90 degrees at the top of the bridge works well for most people. If you feel your lower back arching at the top, the step is too high for your current range of motion.
Is the Elevated Single Leg Bridge suitable for beginners?
Yes, but most beginners should start with a two-leg elevated bridge or a floor-based single leg bridge first. Move to the elevated single leg version once you can keep your pelvis level and avoid arching your lower back for all reps.
Why does one side feel much weaker during the Elevated Single Leg Bridge?
That is the point of doing it unilaterally. Each leg has to lift and stabilize on its own, so a strength difference between sides becomes obvious; simply match the rep count to your weaker side rather than doing extra reps on the stronger one.
Should the raised leg stay perfectly vertical?
Roughly vertical is the target, held by active tension in the hip rather than just letting the leg hang. If it drifts sideways or toward your chest, your pelvis will rotate and you will lose stability on the working side.
My hamstrings cramp during the Elevated Single Leg Bridge. What should I do?
Cramping usually comes from starting each rep fully relaxed from a stretched position. Keep light tension in the leg at the bottom, slow the tempo slightly, and consider shortening the range by using a lower step until it improves.
Can I add weight to the Elevated Single Leg Bridge?
Yes, once body weight reps feel easy you can hold a weight plate or dumbbell on the hip of the working leg. Master the pelvic control first, because added load on an unstable pelvis tends to expose the lower back instead of the glutes.
What can I use if I do not have a step platform?
Any stable, non-slip elevated surface around step height works, such as a low bench, a sturdy ottoman, or the bottom stair. Avoid anything that can slide or tip when you press your heel into it.
How many reps and sets should I do of the Elevated Single Leg Bridge?
Two to four sets of eight to twelve reps per leg works well for strength and muscle, with higher rep sets of fifteen to twenty useful for endurance and glute activation. Rest enough between sides to keep the quality of each rep high.
Is it safe for the lower back?
When performed with a braced trunk and full hip extension without lumbar arching, it is generally a back-friendly way to train the hips. If you feel spinal stress rather than muscular effort, reduce the step height, slow down, or regress to a two-leg version.