Bird Dog Hold
The Bird Dog Hold is an isometric core stability exercise performed from a hands-and-knees position, where you extend one arm forward and the opposite leg back, then hold that long, level position for time. Unlike the classic bird dog rep, where you extend and return repeatedly, the hold version locks you into the end position and forces your trunk to stay still against the challenge of a long lever on each end. It looks simple from the outside, but keeping a neutral spine while one arm and one leg are lifted is genuine stability work.
This exercise is useful for almost anyone. It is a staple in low-back rehab and prevention programs because it trains the spinal stabilizers without loading the spine with weight, and it is equally valuable for lifters who want better bracing under a barbell, runners who want a steadier pelvis, and beginners who need to learn what a neutral spine actually feels like. Because it is done on a mat with no equipment load, it is one of the safest entry points into serious core training.
The main muscles at work are the deep core and the muscles along the spine, including the erector spinae, which fight to keep your torso from twisting or sagging. The glute of the extended leg drives the lift and holds the hip in extension, while the hamstrings assist, the shoulder stabilizers of the supporting arm keep you planted, and the upper back helps the reaching arm stay level with your torso. The real training effect comes from the anti-rotation demand: with only one knee down, your body wants to tip and twist, and holding it square is the exercise.
Setup matters more here than in most bodyweight moves. Your hands sit under your shoulders, knees under your hips, and your spine starts neutral before anything lifts. If you begin with a rounded back or an arched, rib-flared position, the hold simply locks in that fault. The goal of the extended position is a straight line from the heel of the lifted leg through your hips, spine, and neck, with the raised arm reaching long rather than high.
To execute it well, brace your trunk as if bracing for a light nudge, then slide one heel back until the leg is level with your hip, and reach the opposite arm forward at the same time. Hold for five to thirty seconds depending on your level, keeping your hips square to the floor and your gaze down so your neck stays in line. Then bring the limbs back down with control, reset your brace, and switch sides.
Common use cases include warm-ups before squats and deadlifts, core circuits, postpartum and back-health progressions, and Pilates or yoga-style sessions where controlled holds are the focus. The practical safety point is simple: a smaller, perfectly level hold beats a higher, wobbly one every time. If your back arches, your hips rotate, or you feel the work in your low back rather than your trunk and glutes, shorten the lever or reduce the hold time until your form catches up.
Fitwill
Log Workouts, Track Progress & Build Strength.
Achieve more with Fitwill: explore over 9600 exercises with images and videos, access built-in and custom workouts, perfect for both gym and home sessions, and see real results.
Start your journey. Download today!




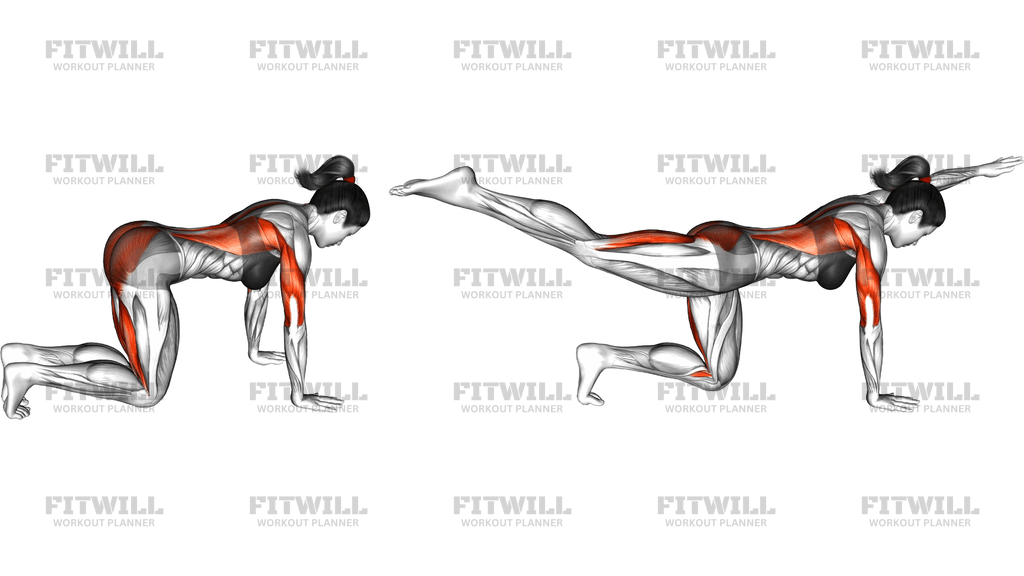
Instructions
- Place an exercise mat on the floor and kneel on all fours with your hands directly under your shoulders and your knees directly under your hips.
- Set your spine neutral: imagine a straight line from the crown of your head to your tailbone, tuck your chin slightly, and let your gaze fall to the floor between your hands.
- Brace your trunk by gently tightening your abdominal wall and squeezing your glutes, as if preparing for a light push against your side.
- Keeping your hips square to the floor, slide your right heel straight back until your right leg is extended and roughly level with your hip, toes pointing down.
- At the same time, extend your left arm straight forward so it lines up beside your ear, thumb toward the ceiling, reaching long rather than lifting it high.
- Hold this position for five to thirty seconds, maintaining a straight line from your extended heel through your hips, spine, and fingertips, with your supporting arm locked straight and shoulders away from your ears.
- Breathe steadily throughout the hold, inhaling and exhaling through your nose or mouth without letting your brace collapse or your ribcage flare.
- On finishing the hold, slowly lower your extended arm and leg back to the starting position under control rather than dropping them.
- Re-establish your neutral spine and brace, then repeat on the other side with your left leg and right arm.
- Complete equal holds on both sides, resting briefly between rounds as needed.
Tips & Tricks
- The most common fault is rotating the hips open as the leg lifts. Imagine a cup of water balancing on your lower back and keep both hip points facing the floor the entire hold.
- Do not chase height with the leg. If your extended foot climbs above hip level, your low back usually arches to get there; keep the leg at hip height and the position level instead.
- Avoid arching your neck to look forward. Your head should continue the line of your spine, with your eyes on the mat, or you will strain the neck and lose upper-back position.
- If you wobble side to side, widen your base slightly by moving your supporting knee and hand a little outward, then narrow it again as your balance improves.
- When the low back takes over and feels strained, shorten the hold to five seconds, re-brace between repetitions, and focus on squeezing the glute of the lifting leg rather than dumping into your spine.
- Press the floor away with your supporting arm so your upper back does not sag between your shoulder blades; the shoulder blade should lie flat against your ribcage, not collapse inward.
- For a harder version without adding equipment, hold the top position longer, or try lifting the extended arm and leg slightly higher than parallel once you can hold level with zero hip rotation.
- Keep your supporting knee pointing straight down rather than splaying outward, so the hip of the kneeling leg stays stacked under the hip and the base stays stable.
- Use a mirror from the side occasionally to check that your back is not sagging toward the floor or arching upward; both ends of the spectrum mean the brace has been lost.
- Pair it with slow breathing rather than holding your breath; if you cannot breathe calmly, the hold is probably too long or too aggressive for your current control.
Frequently Asked Questions
What muscles does the Bird Dog Hold work?
It primarily targets the deep core and the erector spinae along the spine, with strong contributions from the glutes and hamstrings of the extended leg. The shoulder stabilizers of the supporting arm and the muscles of the upper back also work to keep you level.
Is the Bird Dog Hold good for beginners?
Yes, it is one of the best beginner core exercises because it requires no load and teaches neutral spine and bracing. Beginners should start with five-second holds and can even extend just the leg or just the arm first before combining both.
Why does my lower back hurt when I hold the Bird Dog?
This usually means the leg is lifting too high and arching your lumbar spine, or your brace is collapsing so the spinal muscles compensate. Keep the extended leg at hip height, squeeze the glute of the lifting leg, and shorten the hold until the work shifts back to your trunk.
How long should I hold the Bird Dog position?
Most people do well with holds of five to twenty seconds for two to four rounds per side. If you cannot hold the position perfectly level and square for the full time, use shorter holds with a fresh brace rather than one long, wobbling set.
Should my arm and leg be higher than my back during the Bird Dog Hold?
No, aim for a straight line from your extended heel through your hips and spine to your fingertips. Lifting the leg above hip level typically causes the low back to arch, which defeats the purpose of the hold.
How is the Bird Dog Hold different from regular Bird Dog reps?
Regular bird dogs extend and return for repetitions, while the hold version keeps you in the extended position for time. The hold removes momentum entirely and places a continuous anti-rotation and anti-extension demand on the trunk, which makes it stricter and often harder.
Can I do the Bird Dog Hold without a mat?
Yes, it can be done on carpet or any firm, comfortable surface, since you are only supporting yourself on one hand and one knee. A mat is simply recommended because it cushions the kneeling knee and gives your palm a non-slip surface.
What can I substitute if the Bird Dog Hold is too difficult?
Start with single-limb versions: extend only the leg, or only the arm, while keeping the other limbs grounded. Once you can hold those level and square, combine the opposite arm and leg into the full position.
How do I know if my hips are rotating during the hold?
Set a light object like a folded towel on your lower back and check that it stays flat, or have someone watch from behind. Any tipping or twisting of the pelvis means the hip of the extended leg has opened, so lower the leg slightly and re-squeeze that glute.
When is the best time to include the Bird Dog Hold in my workout?
It works well as part of a warm-up before squats, deadlifts, or running because it activates the trunk stabilizers without fatiguing them heavily. It also fits at the end of a session as a controlled core-stability finisher.