Glute Single Leg Bridge From Bench
The Glute Single Leg Bridge From Bench is a unilateral hip extension exercise where your upper back rests on a flat bench while one foot drives into the floor and the other leg is held off the ground. Because your shoulders are elevated on the bench, you get a longer hip extension range than a standard floor bridge, which means the glutes have to work through more of their length before you reach full lockout. The arms stay crossed over the chest, so there is nothing to push with — everything has to come from the hips.
Taking one leg out of the equation is what makes this movement valuable. With both feet down, the stronger side quietly takes over and you can hide imbalances for years without noticing. When only one foot is planted, each glute has to produce the force on its own, and the lifted leg's hip flexors and stabilizers work to keep the pelvis from sagging or rotating. This makes the exercise useful for runners, lifters coming back from unilateral weaknesses, and anyone whose glutes go quiet during squats and deadlifts.
The main muscles working are the glute of the standing leg, with the hamstrings assisting on the way up and at the top. The lifted leg's hip flexors hold the knee up, and your trunk works isometrically to keep the ribcage and pelvis stacked — if your core gives up, you will see the low back arch instead of the hip extending. Expect a challenging balance and coordination demand the first few sessions even if your glutes are strong.
The bench setup matters more than most people expect. Your upper back should rest on the bench with your head supported or just off the edge, and your working foot needs to be far enough forward that, at the top, your shin is roughly vertical and your knee stacks over your ankle. If the foot is too close, the knees and quads dominate; too far and the hamstrings take over the pull. Since your torso is elevated, a mistake of a few inches in foot placement changes the feel of the whole rep.
Execution comes down to one idea: drive the floor away and finish with the glute, not the low back. Lower under control until the hips drop toward the floor without the glutes fully relaxing, then push through the heel and midfoot to lift until your body forms a straight line from shoulders to knee. Squeeze the glute at the top without pushing the ribs toward the ceiling. Do all your reps on one side, reset, then match them on the other.
This is a bodyweight movement that scales well. Beginners can shorten the range or keep the hips higher throughout, while advanced lifters can pause at the top, slow the lowering phase, or add load once bodyweight reps feel easy. Keep the reps honest — a bridge where the low back does the finishing is not doing what the name promises.
[ Workout Log & Planner ]
Put your next workout in Fitwill
Keep your plan and training log ready when you are.


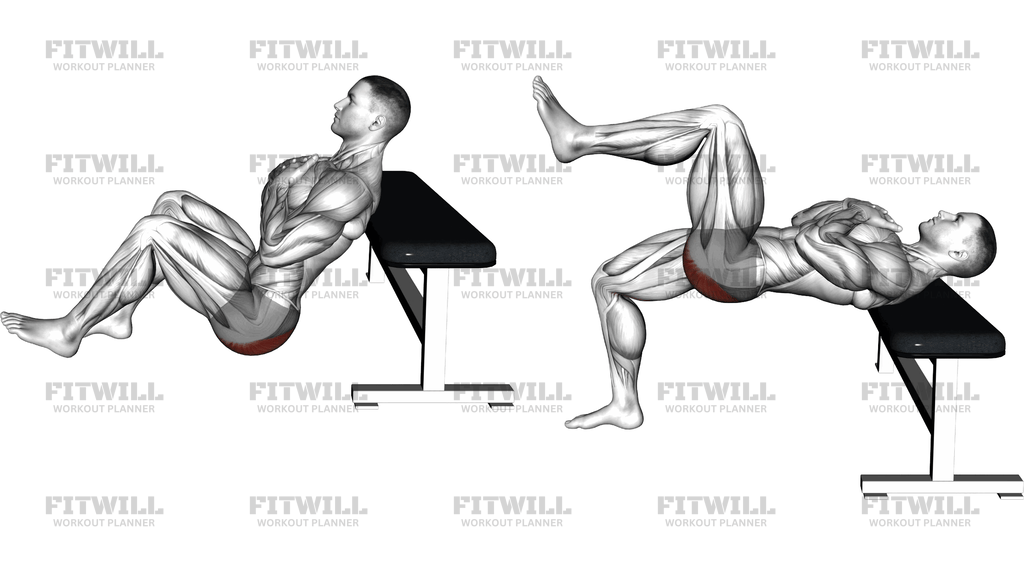
Instructions
- Sit on the floor with a flat bench behind you, then walk your upper back onto the bench so your shoulders and the back of your head are supported and your arms are crossed over your chest.
- Plant one foot flat on the floor about a foot in front of your hip, knee bent, and check that when you lift your hips your shin will be close to vertical.
- Bend your other knee and lift that leg so the foot is off the floor, holding the knee up in front of you for the entire set.
- Brace your trunk gently and keep your ribs stacked over your pelvis before you start moving.
- Push through the heel and midfoot of the planted leg to lift your hips until your body forms a straight line from shoulders to knee, and squeeze the glute of the working leg at the top.
- Lower your hips under control toward the floor without sitting fully down or letting the glutes completely relax at the bottom.
- Breathe out as you drive up, breathe in as you lower, and avoid holding your breath through the whole set.
- Keep the bench contact steady on your upper back only — do not let your neck press into the bench or roll during reps.
- Complete all reps on one side, then set the hips down, reset your foot position, and match the reps on the other leg.
- Stop the set if the lifted foot drifts down or your pelvis starts twisting — rest and resume with the same rep quality.
Tips & Tricks
- Check your foot placement before your first rep: lift once and look at your shin. If the knee is past your toes, move the foot forward; if it is far behind your ankle, slide it back.
- The most common mistake is finishing the rep by arching the lower back. At the top, think 'tuck the tailbone slightly and squeeze the glute' rather than 'lift higher.'
- If your pelvis drops on the side of the lifted leg, you are losing hip stabilization — imagine a glass of water balanced on that hip and keep it level.
- Do not let the lifted leg rest or swing. Holding that knee still recruits the hip flexors of the working-side opposite hip and keeps the pelvis honest.
- Keep pressure in the heel and midfoot. If you feel your toes gripping or the heel lifting, your weight has drifted forward and the quads will start doing the job.
- Pause for one to two seconds at the top of each rep before adding any external load — the pause exposes whether the glute or the low back is finishing.
- If the bench edge digs into your upper back or your neck feels loaded, slide a few inches so more of your shoulder blades are on the pad and your head is supported.
- Lower slowly for a two to three count. Dropping fast into the bottom makes you bounce out of the stretch instead of loading the glute.
- Match reps and effort exactly between legs, and always start with your weaker side so the stronger side never sets the standard.
Frequently Asked Questions
What muscles does the Glute Single Leg Bridge From Bench work?
The gluteus maximus of the standing leg is the primary mover, with the hamstrings assisting through the lift. The hip flexors of the lifted leg and your trunk muscles work statically to hold the pelvis level.
Why put the upper back on a bench instead of doing this on the floor?
Elevating the shoulders increases the hip extension range of motion, so the glutes work through a longer arc than a floor bridge allows. It also raises the torso, which makes the top position more demanding on the hips.
Is the Glute Single Leg Bridge From Bench suitable for beginners?
Yes, if you first master a two-leg bridge from the bench and a single-leg bridge on the floor. Beginners can also limit the range on the way down while they build balance and control.
How far should my working foot be from the bench?
Far enough that at the top of the rep your knee sits roughly above your ankle with the shin vertical. Too close shifts work to the quads and knees, too far shifts it to the hamstrings.
Why does my lower back hurt when I do the Glute Single Leg Bridge From Bench?
That usually means you are arching into the top position instead of finishing with the glute, or your ribs are flaring up. Reduce the range, keep a slight posterior tilt at lockout, and squeeze the working glute deliberately.
Should I keep my arms crossed over my chest or use them for support?
Cross them over your chest as shown, because pushing through the bench with your hands takes work away from the hips and lets you twist. Once the movement is solid, keep the arms crossed to stay honest.
How many reps and sets should I do per side?
Start with two to three sets of eight to twelve controlled reps per leg, resting between sides. Prioritize a clean top position and a level pelvis over hitting a higher number.
My pelvis twists toward the lifted leg — how do I fix that?
Hold the lifted knee steady in front of you, slow the tempo, and imagine both hips pointing straight up at the top. If twisting persists, regress to a floor single-leg bridge until the stabilizers catch up.
What can I use instead of the Glute Single Leg Bridge From Bench?
A single-leg glute bridge on the floor trains the same pattern with less range, while a single-leg hip thrust from the bench adds more load potential. Both are reasonable substitutions depending on your level.
Can I add weight to this exercise?
Yes, once you can control twenty or more clean bodyweight reps per side, a dumbbell or plate held on the working hip adds load. Keep the arms-crossed setup in mind — you will need one hand to steady the weight, so brace carefully.