Lying Hip Internal Rotation
Lying Hip Internal Rotation is a low-load, floor-based drill that trains the hips to rotate inward while the trunk stays quiet. You lie on your back with the knees bent and feet flat, set the pelvis in a flat, neutral position, then rotate both thighs inward so the toes swing out and the knees draw gently toward each other. Because you are lying down and working against no external load, the exercise gives you a clean way to feel and control a rotation that many people have never consciously trained.
Internal rotation of the hip is often the forgotten half of hip rotation. Most gym programs are full of external rotation work, yet walking, running, changing direction, and even squatting to depth all require the thigh to rotate inward over a stable foot. People who struggle to let the knee track inward, who feel stuck or pinched at the front of the hip, or who overuse their lower back to fake rotation tend to benefit from practicing this pattern in isolation first.
The muscles doing the rotating are the internal rotators of the hip, mainly the front fibers of the gluteus medius and the tensor fasciae latae on the outer hip. Just as important, the trunk muscles highlighted in this position, including the deep abdominals and obliques, work to keep the ribcage and pelvis still so the movement actually happens at the hip joint instead of being borrowed from the spine. That combination of hip control and trunk stability is what makes the drill useful beyond its simple appearance.
Setup matters more here than in most exercises. If you start with an arched lower back or a pelvis tilted forward, the hips are already positioned in a way that limits internal rotation, and you will end up tilting or twisting the pelvis to create the appearance of movement. Flattening the lower back toward the floor first, and keeping the arms relaxed out to the sides for balance, puts the hip joint in a position where a small, honest rotation is possible.
Execute the movement slowly and within a modest range. A few degrees of controlled rotation with the pelvis anchored is worth far more than a large sweep that drags the spine and pelvis along with it. This drill fits well into warm-ups, hip mobility routines, and rehab-style programs for the hips, and it can also be used between sets of heavier lower body work to remind the hips how to rotate before loading them.
As with any rotational drill, the main safety point is to stay inside a pain-free range. A stretching sensation on the outer or back hip is normal; sharp pinching at the groin or front of the hip is a signal to reduce the range or adjust the pelvis before continuing.
Fitwill
Log Workouts, Track Progress & Build Strength.
Achieve more with Fitwill: explore over 9600 exercises with images and videos, access built-in and custom workouts, perfect for both gym and home sessions, and see real results.
Start your journey. Download today!




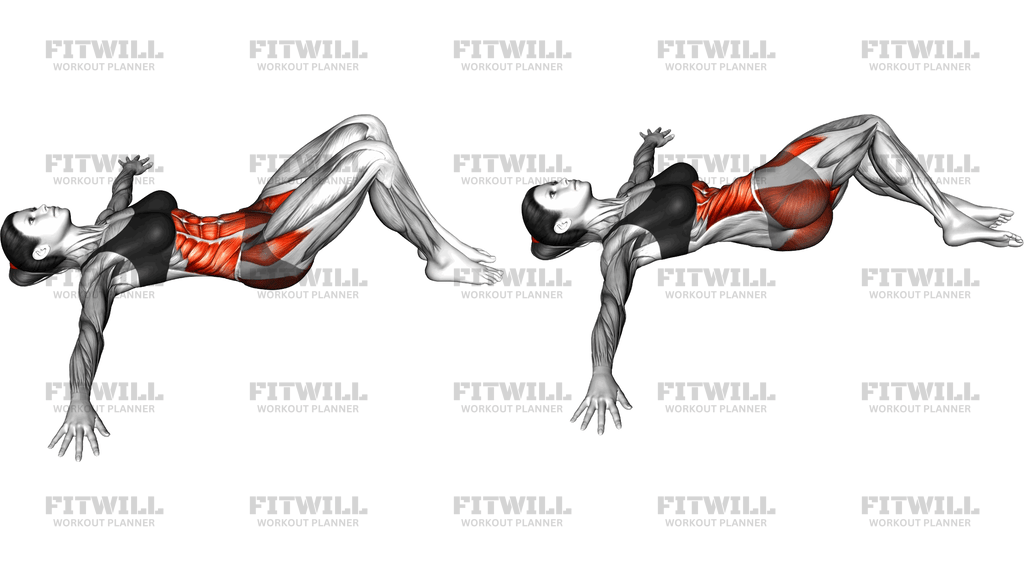
Instructions
- Lie on your back on an exercise mat with your knees bent and your feet flat on the floor about hip-width apart.
- Extend your arms out to the sides at roughly shoulder height with the palms down, so your upper body is stable and relaxed.
- Gently flatten your lower back toward the floor by tilting the pelvis slightly back, and hold this position for the whole set.
- Brace your abdominals lightly, as if protecting your midsection, without holding your breath.
- Keeping both feet flat and your pelvis still, rotate both thighs inward so your toes turn outward and your knees drift slightly toward each other.
- Stop at the first point where you feel a comfortable stretch on the outer hip or the pelvis begins to move, and hold the end position for one to two seconds.
- Slowly rotate the legs back out until the knees point back up toward the ceiling and the feet return to their start position.
- Exhale as you rotate inward, inhale as you return, keeping the breathing smooth and continuous.
- Complete the planned number of repetitions in one direction, then reset the pelvis and breathe before starting the next set.
Tips & Tricks
- If your lower back arches off the floor as the knees drift in, you have gone past your true hip range; reduce the rotation and re-tuck the pelvis.
- The feet should stay planted and act as the pivot point. Lifting the toes or heels to fake extra rotation moves the ankle, not the hip.
- Keep the knees from slamming together at the end of the rotation. The drift toward each other should be gradual and controlled.
- Watch the ribcage, not just the legs. If the ribs flare up and the chest tilts as you rotate, your trunk has taken over the job your hips should be doing.
- Small ranges are normal early on. Many people only have a few degrees of true internal rotation in this position, and that small range is where improvement happens.
- Press the outer edges of the feet lightly into the floor as the toes turn out; this helps the outer hip muscles do the rotating instead of letting gravity flop the knees in.
- If you feel a pinch at the front of the groin, back off the depth and try slightly less knee bend, since deeper knee flexion can crowd the front of the hip in some people.
- Move slower than feels necessary. The drill's value comes from control of the transition, not from reaching the largest angle possible.
- Use it as a warm-up before squats, lunges, or running rather than as a heavy finisher; the hips respond well to frequent, fresh practice.
Frequently Asked Questions
Which muscles does Lying Hip Internal Rotation actually work?
The rotation is driven by the hip's internal rotators, mainly the front fibers of the gluteus medius and the tensor fasciae latae on the outer hip. The abdominals and obliques work isometrically to keep the pelvis and ribcage from twisting with the legs.
Why do my knees move toward each other instead of my hips rotating?
That inward knee drift is exactly how hip internal rotation looks when the feet stay planted, so it is the intended path. The key is that the pelvis stays flat on the floor while it happens.
Is Lying Hip Internal Rotation suitable for beginners?
Yes, it is one of the most beginner-friendly hip rotation drills because it is body weight, performed lying down, and requires only a small range of motion. Start with slow, short rotations and let the range grow over weeks.
How many sets and repetitions should I do?
One to three sets of eight to twelve slow repetitions per session is a practical starting point. Because the load is low, the exercise can be done most days, including as part of a warm-up.
Should I feel this in my lower back?
No, the work should stay in the outer hips and a light holding tension in the abdominals. If your lower back strains or arches, your pelvis is tilting instead of staying anchored, so reduce the rotation range and re-flatten the back.
Can I do Lying Hip Internal Rotation if I feel a pinch at the front of my hip?
A mild stretch is fine, but a sharp or pinching feeling at the groin or front of the hip is a cue to back off. Try a slightly shallower rotation, a bit less knee bend, or stop and have the hip assessed if the pinch repeats consistently.
What can I use instead if I cannot get on the floor?
A bench or firm bed works as a substitute surface for the lying version, since you only need something that supports your back with the feet still able to rest flat. Seated hip internal rotation on a bench is another option once the lying pattern feels natural.
Why keep the arms out to the sides during the movement?
The arms give you a wide, stable base so the upper body does not roll as the legs rotate. If your shoulders are uncomfortable in that position, lower the arms closer to your sides while keeping the palms down.
How is this different from hip external rotation exercises?
External rotation drills turn the thigh outward, while Lying Hip Internal Rotation turns the thigh inward over a planted foot. Training both directions keeps rotation balanced, but the internal rotation side is usually the weaker link and needs more attention.