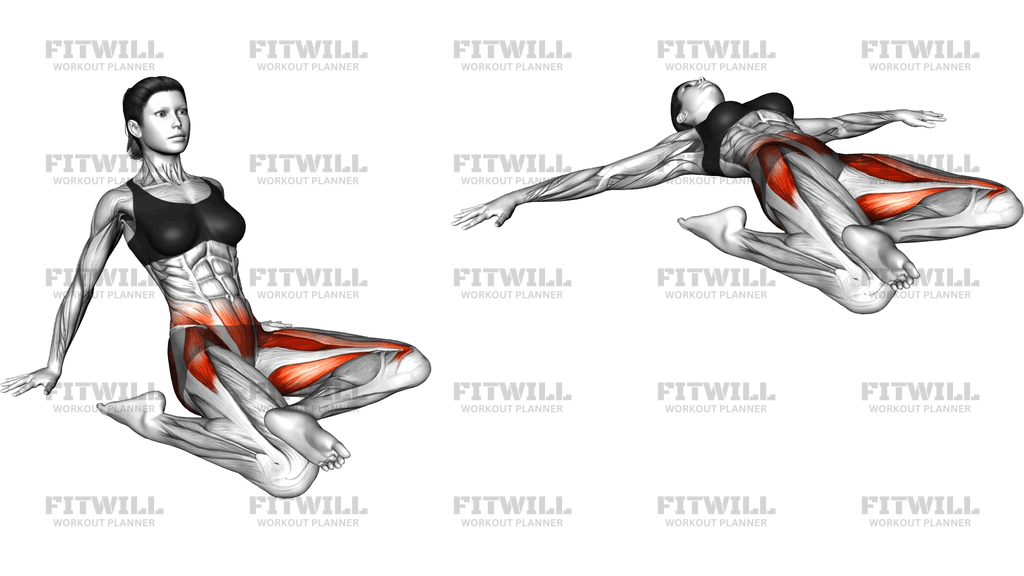
Lying Sartorius Stretch
The Lying Sartorius Stretch is a reclined flexibility drill that targets the sartorius, the long strap-like muscle that runs diagonally from the outer front of the hip down across the inner thigh to just below the inside of the knee. Because the sartorius crosses both the hip and the knee and is involved in hip flexion, external rotation, and abduction, it tightens easily with sitting, running, cycling, and squatting. In this stretch you lie on your back with the soles of your feet drawn in and your knees allowed to fall open, which places the sartorius and surrounding inner-thigh tissue in a lengthened position while your spine stays fully supported by the floor.
The supine setup is what makes this version worth choosing. When you stretch the inner thigh and hip in a seated butterfly position, a rounded or fatigued lower back often absorbs tension that should be going into the target muscle. Lying down removes that problem entirely: the pelvis can settle neutrally, the abdominal muscles can stay relaxed, and the only work you feel is the gentle pull across the front of the hip and down the inner thigh. This makes it a comfortable option for people who find floor-sitting stretches awkward or who want to release the hips at the end of a training session without loading the spine.
This stretch is useful for a wide range of people. Runners and cyclists often develop short, dense hip flexor and inner-thigh tissue from repetitive forward movement, and a few unhurried rounds of this stretch help restore some of that lost range. Lifters who squat deep benefit from better hip external rotation and adductor length. It is also a common choice in warm-down routines after leg day, in mobility work for people who sit long hours, and as a low-strain entry point for beginners who are new to hip stretching and need a position they can relax in rather than fight.
To execute it well, the goal is relaxation, not force. Lie back, draw your heels in toward your pelvis, and let your knees drift toward the floor under their own weight. You should feel a mild to moderate pull along the front-inner hip and upper inner thigh on each side, but never sharp pain in the groin or a pinching sensation deep in the hip joint. Breathing slowly and letting each exhale soften the hips a little further will get you more range than pushing harder ever will.
A few practical points keep this stretch safe and effective. Never bounce your knees toward the floor, and do not press down on them with your hands unless you can do so with very light pressure and zero discomfort. If your hips are particularly tight, place a folded towel or low cushion under the outer thighs so the knees have something to rest toward instead of hanging unsupported. Hold each position for twenty to forty seconds, breathe steadily throughout, and come out of the stretch slowly rather than snapping the legs straight.
[ Workout Log & Planner ]
Put your next workout in Fitwill
Keep your plan and training log ready when you are.


Instructions
- Lie on your back on an exercise mat with both legs extended and your arms resting at your sides or out slightly from your shoulders.
- Bend your knees and slide your heels in toward your pelvis until your feet are close to your body.
- Let your knees fall open toward the floor so the soles of your feet face the ceiling or the soles come together, whichever feels comfortable.
- Rest the back of your head, shoulders, and entire spine flat against the mat, and let your pelvis settle without tucking or arching it.
- Relax your hip muscles completely and allow the weight of your legs to draw the knees gently toward the floor; do not force them down.
- Breathe slowly through your nose, and on each exhale let the hips soften a little deeper into the stretch.
- Hold the position for twenty to forty seconds while the pull stays mild to moderate along the front-inner hip and upper inner thigh.
- To come out, bring your knees together with your hands or by engaging your inner thighs, then extend one leg at a time back down onto the mat.
- Rest briefly and repeat for a second or third round if you are using this as part of a flexibility routine.
Tips & Tricks
- If you feel pinching at the front of the hip instead of a lengthening pull, reduce how far your heels are drawn in; a smaller knee bend often removes joint compression while keeping the sartorius engaged.
- Placing a folded towel or yoga block under each outer thigh gives tight hips a target to relax toward and prevents the legs from hanging under unsupported tension.
- Avoid pressing your knees toward the floor with your hands. The reclined position already supplies enough leverage, and pushing usually makes the groin guard against the stretch.
- Keep your lower back in contact with the mat. If it arches and lifts, your heels are too close to your body and your hip flexors are compensating for the stretch.
- Do not let your head or shoulders creep off the mat as the stretch deepens; a lifted chin tenses the whole trunk and works against relaxation.
- For a stronger inner-thigh emphasis, bring the soles of the feet together; for more of a front-of-hip emphasis, keep the knees slightly narrower and the heels a little further away.
- If the groin feels sharp or electric rather than gently taut, come out immediately, bend the knees less, and rebuild the range over several sessions.
- Perform this stretch after training or on warm muscles rather than before heavy squatting, since long holds on cold, pre-loaded hips can temporarily reduce force output.
Frequently Asked Questions
Which muscles does the Lying Sartorius Stretch target?
The main target is the sartorius, the long muscle running diagonally across the front-inner thigh, with supporting lengthening of the hip flexors and inner-thigh adductors. Deep hip external rotators also receive a mild stretch as the knees fall open.
Is the Lying Sartorius Stretch good for beginners?
Yes, it is one of the more beginner-friendly hip stretches because the floor supports the spine and you control the intensity simply by how far the knees open. Beginners should start with a small range and a short hold, then progress gradually.
How is the Lying Sartorius Stretch different from a seated butterfly stretch?
Both lengthen the inner thigh and hip, but the reclined version removes the demand on your trunk and lower back, so tension goes into the target muscle instead of the spine. It is usually the better choice if sitting upright causes your back to round or your hips to grip.
Should my feet be together or ankles crossed during the Lying Sartorius Stretch?
Soles of the feet together emphasizes the inner thigh and groin, while keeping the knees slightly apart with heels drawn in biases the front-of-hip line of the sartorius. Try both and use whichever produces a comfortable pull without joint pinching.
How long should I hold the Lying Sartorius Stretch?
Twenty to forty seconds per round works well for most people, repeated two to three times. Longer holds of up to a minute are fine once the position feels completely comfortable and your breathing stays relaxed.
Why do I feel the Lying Sartorius Stretch more in my groin than my front hip?
The wider your knees open, the more the adductors take over the stretch. Narrow the knee position slightly and keep the heels a little further from your body to shift the sensation toward the front-inner hip where the sartorius sits.
Can I do the Lying Sartorius Stretch every day?
Yes, gentle static stretching of the hip in this position is generally fine daily, especially if you sit for long hours or run regularly. Keep the intensity mild so the tissue responds to consistent, relaxed exposure rather than aggressive forcing.
What should I do if my knees cannot reach the floor?
That is completely normal and not a sign of poor form. Support each outer thigh on a rolled towel or low cushion so the legs can fully relax, and let the range improve over weeks rather than pressing the knees down.
When is the best time to use the Lying Sartorius Stretch?
It works best after leg training, running, or cycling, or as part of an evening mobility routine when the muscles are warm. Avoid long static holds immediately before heavy lower-body lifting.