Push Up On A Chair (Version 2)
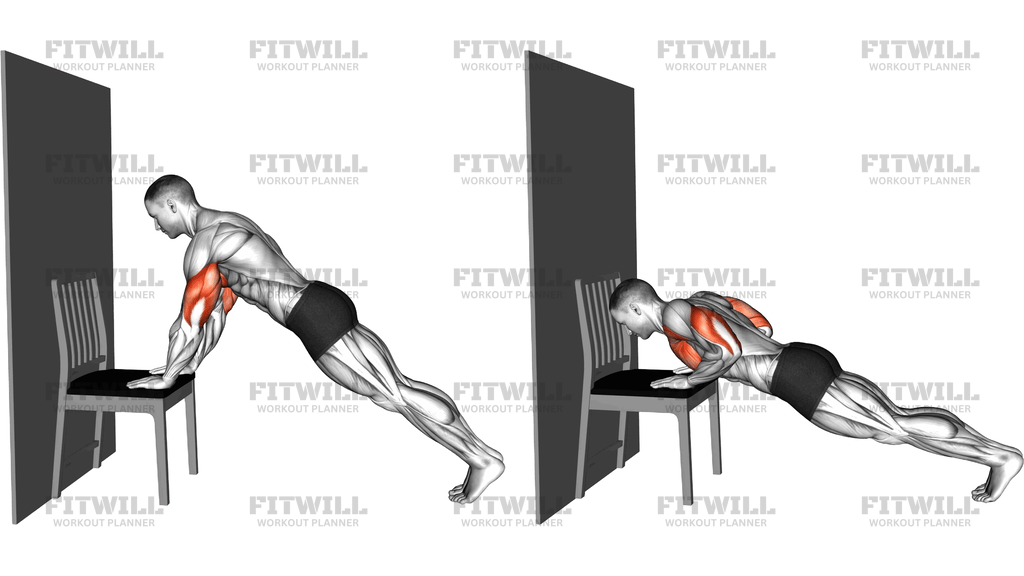
Push Up On A Chair (Version 2) is an incline push-up performed with your hands planted on the seat of a sturdy chair while your feet stay on the floor. Because your upper body is elevated, the angle shifts a meaningful share of the workload away from the chest and toward a position that is noticeably easier than a floor push-up, making it one of the most practical ways to scale the pushing pattern up or down depending on your strength level.
The main movers are the chest, triceps, and front of the shoulders, while the core, glutes, and legs work isometrically to hold a straight line from head to heel. The elevated hand position also reduces the demand on the shoulder joints at the bottom of the rep, which is why this variation shows up so often in beginner programs, return-to-training phases, and rehab-friendly upper body routines.
Setup matters more than it looks. Place the chair with its back resting against a wall so it cannot slide or tip backward, and check that all four legs sit flat on the floor without wobbling. Your grip goes on the front edge of the seat with fingers wrapped around it if the seat allows, arms straight, and your body forms one long diagonal line toward your feet on the ground. A chair that shifts even a few centimeters mid-set is the most common cause of a wasted or risky rep.
To execute it, lower your chest toward the seat by bending your elbows at roughly a 45-degree angle to your torso, keeping your head in line with your spine rather than poking your chin forward. Touch or come close to the seat, then press back up until your arms are straight again without letting your hips sag or your shoulders shrug toward your ears. Breathe in on the way down and out as you press.
This version suits anyone who cannot yet perform full floor push-ups with clean form, trainees who want higher-rep volume without loading the shoulders heavily, and people working out at home with nothing but household furniture. It also works well as a burnout movement after heavier pressing, since you can extend a set well past the point where floor push-ups would break down.
If the chair seat feels too high, you can progress by using a lower surface such as a step or a low bench, then eventually moving to the floor. If it feels too hard, widen your foot stance slightly or elevate the hands a bit higher. Whatever height you choose, the priority is the same: a rigid body line, controlled lowering, and a chair that does not move.
Fitwill
Log Workouts, Track Progress & Build Strength.
Achieve more with Fitwill: explore over 9600 exercises with images and videos, access built-in and custom workouts, perfect for both gym and home sessions, and see real results.
Start your journey. Download today!




Instructions
- Place a sturdy chair with its back against a wall so it cannot slide or tip, and confirm all four legs sit flat and stable on the floor.
- Grip the front edge of the chair seat with both hands, slightly wider than shoulder width, fingers pointing forward or wrapped around the edge if the seat allows.
- Walk your feet back until your arms are straight and your body forms one straight line from head through hips to heels.
- Brace your core, squeeze your glutes, and pull your shoulder blades gently down away from your ears before you start the rep.
- Lower your chest toward the front edge of the seat by bending your elbows, keeping them at about 45 degrees to your torso rather than flared straight out.
- Descend until your chest is close to or lightly touches the seat, keeping your neck neutral and in line with your spine.
- Press through your palms to straighten your arms, driving the seat away while keeping your hips from sagging or lifting.
- Exhale as you press up and inhale as you lower into the next rep.
- Complete your set, then step your feet forward and stand up out of the position rather than collapsing onto the floor.
- Reset your body line between reps if you feel your hips drop, and stop the set when your form starts to break.
Tips & Tricks
- Test the chair with a few firm hand pushes before your first rep; if it rocks or slides against the floor, move it against a wall or pick a heavier chair.
- If your shoulders shrug up toward your ears at the bottom, you are descending too deep for your current mobility — cut the range slightly and keep the blades pulled down.
- A sagging hip line is the most common fault in this variation; film one set from the side and check whether your body stays straight from head to heel.
- Keep your elbows around 45 degrees to your torso. Elbows pinned tight turns it into a triceps-dominant lockout drill, while fully flared elbows stress the shoulder capsule.
- Grip the front edge of the seat rather than placing palms flat on the middle of it — the edge gives your wrists a more neutral angle and a more secure hold.
- The higher the seat, the easier the rep. If a chair is too hard at first, start on a table or countertop and work down in height over weeks.
- Lower for two to three seconds on each rep; the elevated position makes it easy to rush, and slow negatives are where most of the strength carryover happens.
- If the seat edge digs into your palms or your wrists complain, place a folded towel over the edge or use push-up handles set on the seat.
- Stop the set the moment your hips start to drop or your head leads the descent — grinding out sloppy reps here teaches bad floor push-up habits later.
Frequently Asked Questions
What muscles does Push Up On A Chair (Version 2) work?
The chest is the primary mover, supported by the triceps and the front of the shoulders. Your core, glutes, and legs hold the straight-body plank position throughout the set.
Why are my hands on a chair instead of the floor?
Elevating the hands shifts more weight toward your feet, which reduces the load on your chest, arms, and shoulders. This makes the movement a scalable stepping stone toward full floor push-ups.
Is Push Up On A Chair (Version 2) good for beginners?
Yes, it is one of the best beginner push-up progressions because the incline reduces the resistance while keeping the exact movement pattern intact. Start with a higher surface and lower the height as you get stronger.
How do I keep the chair from sliding during the set?
Place the chair so its back presses against a wall and check that all four legs sit flat before starting. A chair on a smooth floor can slide even with a careful setup, so a rubber mat under the legs helps.
My hips sag during the rep — what should I fix?
Sagging usually means your core has disengaged or the set has gone on too long. Squeeze your glutes, brace your abs as if bracing for a light punch, and end the set when you can no longer hold a straight line.
Can I use this exercise if floor push-ups hurt my shoulders?
The inclined position reduces the depth of shoulder extension at the bottom, which many people find more comfortable. Keep your elbows at about 45 degrees to your torso and stay in a pain-free range, and check with a professional if discomfort persists.
What can I use if I do not have a suitable chair?
Any stable elevated surface works: a low bench, a sturdy step platform, a countertop, or even a wall for the easiest version. Just make sure the surface cannot tip, slide, or collapse under your weight.
How does this compare to a decline push-up with feet on the chair?
They are opposites in difficulty. With hands on the chair your upper body is elevated and the rep is easier; with feet elevated the chest takes more load and the set is harder than a floor push-up.
How many reps should I do of Push Up On A Chair (Version 2)?
Aim for sets of 8 to 15 clean reps where the last two feel challenging but your body line stays intact. When you can comfortably exceed that range, progress to a lower surface or add floor push-ups.