Resistance Band Standing Y Raise
The Resistance Band Standing Y Raise is a shoulder-dominant movement where you anchor a band under both feet and raise your arms overhead and outward so your body forms a wide Y shape at the top. Because the band runs crossed beneath your stance, tension builds smoothly from your hips all the way to your hands, which keeps the shoulders and upper back working through the entire range instead of only at the top.
This exercise is a solid choice for anyone who wants stronger, more resilient shoulders without pressing heavy weight overhead. It trains the front and side delts as the primary movers, while the upper traps and the muscles that control the shoulder blade assist as your arms travel up and out. The wide, angled finish also encourages upward rotation of the shoulder blade, which is valuable for people who spend long hours sitting or whose pressing movements dominate their training.
Setup matters here because the band determines the resistance curve. Stand with both feet on the band roughly hip-width apart, and grip the ends so the band crosses beneath you — each hand works against the length anchored under the opposite foot. If your stance is too narrow or the band is too long, you will run out of tension before your arms reach the Y position; if it is too short, the start position becomes jerky and pulls you forward.
To execute it well, keep your torso tall and ribs stacked over your pelvis, then sweep your arms up and out in front of your body rather than straight out to the sides. Your elbows stay nearly straight with a soft bend, and your hands finish well above shoulder height, wider than your head. The return is just as important: lower the arms slowly and under control so the band does not snap your shoulders back down.
Use the Resistance Band Standing Y Raise as a warm-up activation before upper-body sessions, as a high-rep finisher after presses, or as a standalone shoulder exercise when traveling or training at home with minimal equipment. Because the load is light and joint-friendly, it suits beginners learning the raise pattern as well as experienced lifters looking for controlled volume.
The main safety points are simple: keep the band securely under your feet, never let it snap back on the way down, and stop the set if you feel pinching at the top of either shoulder. If raising fully overhead bothers your shoulders, shorten the range so your hands finish around eye level and progress gradually from there.
[ Workout Log & Planner ]
Put your next workout in Fitwill
Keep your plan and training log ready when you are.


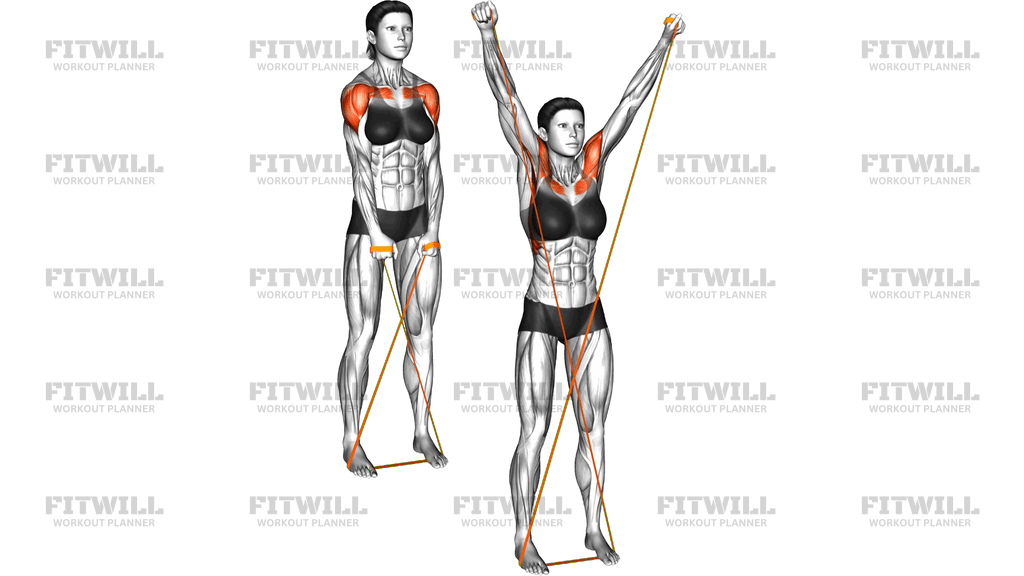
Instructions
- Stand in the middle of a resistance band with both feet flat on it, hip-width apart, so the band crosses under your stance.
- Grip one end of the band in each hand with your palms facing behind you or toward your thighs, and stand tall with your arms hanging at your sides.
- Take up the slack so there is light tension at the bottom, adjusting your grip or stance width if the band feels loose.
- Brace your core, draw your shoulder blades gently down and back, and keep your ribs stacked over your hips.
- Raise both arms up and outward at roughly 30 to 45 degrees from your body, leading with your hands and keeping your elbows almost straight.
- Continue until your hands are above shoulder height and wider than your head, forming a Y shape with your torso.
- Pause briefly at the top without shrugging your shoulders toward your ears.
- Lower your arms slowly back to your sides over two to three seconds, resisting the band's pull the whole way down.
- Exhale as you raise your arms and inhale as you lower them, keeping your breathing steady throughout the set.
- Complete your reps, then step off the band one foot at a time while still holding it so it cannot snap up toward you.
Tips & Tricks
- If you feel the tension vanish halfway up, shorten your grip on the band or widen your stance slightly — the resistance should be noticeable by the time your arms reach chest height.
- A common mistake is turning this into a shrug: if your shoulders creep toward your ears at the top, consciously pull your shoulder blades down as your hands go up.
- Bending the elbows heavily turns the movement into a press; keep a soft, almost locked elbow so the shoulders do the work.
- If your lower back arches as your arms rise, tighten your glutes slightly and exhale at the top — the band pulling forward can drag your torso into extension.
- Lead the raise with your thumbs and hands slightly in front of your shoulders; sweeping straight out to the sides shifts stress away from the angle this exercise is built around.
- Choose a lighter band than you think you need — the crossed setup doubles the effective tension at the top, and form usually breaks down with a band that is too heavy.
- Check that the band sits flat under the middle of each foot; a band bunched at the arch can slip forward mid-set.
- Control the descent rather than letting the band recoil — most of the trap and shoulder-blade work happens on the way down.
- If one arm fatigues before the other, do a set per side to keep the movement symmetrical instead of letting the strong side dominate.
Frequently Asked Questions
Which muscles does the Resistance Band Standing Y Raise work?
The front and side delts do most of the lifting, with the upper traps and shoulder-blade stabilizers assisting as your arms reach the Y position. Because the band crosses under your feet, tension stays on these muscles through nearly the whole range.
Why does the band cross under my feet in this exercise?
The crossed setup lets each hand work against the length anchored under the opposite foot, which creates a stable, even pull and keeps the band from sliding sideways. It also means resistance climbs steadily as your arms rise overhead.
Is the Resistance Band Standing Y Raise good for beginners?
Yes, it is one of the friendlier ways to learn overhead raising because the band's resistance is light at the start and only becomes challenging near the top. Begin with a light band and a range that stops around eye level if full overhead feels uncomfortable.
How is a Y raise different from a lateral raise?
A lateral raise takes your arms straight out to the sides to shoulder height, while the Y raise angles your arms up and forward so your hands finish above shoulder height and wider than your head. That angle brings the upper traps and shoulder-blade rotators more into play.
How do I know if my band tension is set up correctly?
At the bottom, with arms at your sides, there should be mild tension; at the top of the Y, the last few inches should feel genuinely challenging. If you can sail through the top without slowing down, grip lower on the band or widen your stance.
What should I do if I feel a pinch in my shoulder at the top?
Stop just short of the pinch point — finishing around eye or forehead level still trains the delts and traps effectively. Also check that you are not shrugging or arching your lower back, since both can narrow the space at the top of the shoulder joint.
How many reps should I do for the Resistance Band Standing Y Raise?
Because the load is light, sets of 12 to 20 controlled reps work well. Use it for one to three sets as an activation drill before pressing, or push to higher reps as a finisher.
Can I substitute this exercise if I don't have a band?
You can do a bodyweight Y raise lying face down on a bench or the floor, or use light dumbbells in the same standing Y pattern. The band version is unique in that tension increases toward the top, which dumbbells actually reverse.
Why do my arms shake near the top of the movement?
That is where band tension peaks and where the smaller shoulder stabilizers are working hardest. It usually settles as you get stronger, but if shaking comes with form breakdown, drop to a lighter band.
Is it safe to step on the band during this exercise?
Yes, as long as the band lies flat under the middle of both feet and you keep hold of it when stepping off. Inspect the band for tears or thin spots before each session, since a snapped band under load is the main hazard with this setup.