Sitting Thoracic Spine Mobilization On A Chair
Sitting Thoracic Spine Mobilization On A Chair is a gentle mobility drill that takes the middle spine through flexion and extension while you stay seated. You sit tall on a sturdy chair with your hands resting on your thighs, then slowly round the upper back forward and arch it backward, letting the ribcage and mid-back lead the movement. Because the chair stabilizes your hips and the seat blocks your pelvis from tilting excessively, the motion stays focused in the thoracic spine rather than spilling into the lower back or shoulders.
This movement is especially useful for people who spend long hours sitting at a desk or driving. Prolonged sitting tends to lock the mid-back into a slightly rounded posture, which often shows up as stiffness when you try to rotate, reach overhead, or stand up tall. Seated thoracic mobilization is one of the simplest ways to counteract that stiffness, and it requires nothing more than a chair, so it works as a warm-up before training, a mid-day reset at the office, or a cooldown after a workout.
The area being trained is the thoracic spine, the twelve vertebrae between your neck and lower back, along with the muscles and joints that attach to it. The small spinal muscles that control segmental movement work as you articulate through the range, while the deeper core helps you keep the pelvis quiet so the movement comes from the ribcage rather than the hips. It is not a strength exercise in the traditional sense; the goal is controlled, segmental motion and better body awareness.
Setup matters more than it looks. Sit on the front half of the seat with both feet flat on the floor and your hands resting lightly on your thighs. If your hips are tucked or your weight is sunk back into the chair, the pelvis will dominate the movement and the thoracic spine will barely move. Sitting slightly forward gives your pelvis a neutral position and leaves room for the ribcage to lift and lower.
To execute it well, move slowly and think of peeling the spine one section at a time. Exhale as you round the upper back and let the chest sink, then inhale as you lift the sternum and draw the mid-back into a gentle arch, keeping the head level so the neck stays relaxed. Two to three degrees of motion done with attention beats a big swinging arc done fast. Keep the range comfortable and pain-free, especially if you have any history of back issues, and stop short of forcing the end range.
Common use cases include desk-bound workers breaking up long sitting stretches, lifters preparing the mid-back for pressing or squatting, and older adults maintaining spinal mobility without getting on the floor. Because it is low load and seated, it is also a practical choice for recovery days or rehabilitation-style programs under professional guidance.
[ Workout Log & Planner ]
Put your next workout in Fitwill
Keep your plan and training log ready when you are.


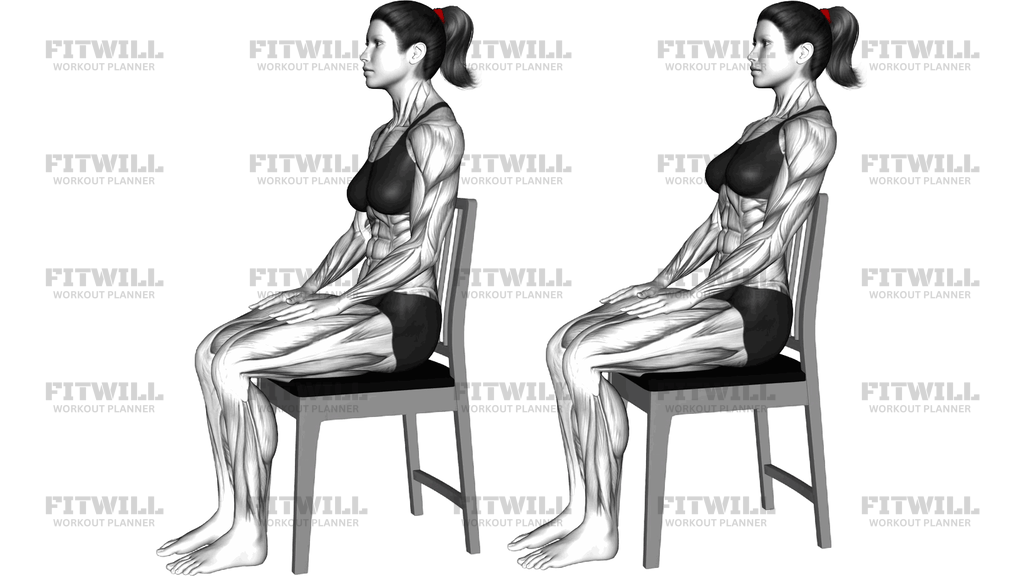
Instructions
- Sit on the front half of a sturdy, armless chair with both feet flat on the floor, hip-width apart, and your weight balanced evenly across both sitting bones.
- Place your hands palms-down on the middle of your thighs and sit up tall, stacking your ribs over your pelvis so your ears, shoulders, and hips line up.
- Brace your core lightly to settle the pelvis into neutral; the hips should stay quiet for the entire drill.
- Exhale slowly as you round the upper back, letting the chest sink and the ribcage close down while your hands slide lightly toward your knees.
- Keep your head level and your neck relaxed rather than tucking the chin hard or letting the head drop.
- Pause briefly at the rounded end position, feeling the mid-back separate and widen.
- Inhale as you slowly reverse the motion, lifting the sternum and drawing the mid-back into a gentle arch while the chest opens forward.
- Pause at the arched position without flaring the ribs or tilting the pelvis, then continue the cycle.
- Breathe continuously, exhaling on the rounding phase and inhaling on the arching phase, for 8 to 12 slow repetitions.
- On the final rep, return to the tall seated position, take one full breath, and reset your posture before the next set or the next exercise.
Tips & Tricks
- If your lower back starts doing most of the moving, gently squeeze your sitting bones down into the seat; the pelvis should stay nearly still while the ribcage rocks.
- A common mistake is turning this into a neck exercise by dropping the head forward. Keep your gaze on a fixed point ahead of you and let the neck ride along passively.
- Move no faster than one full breath per cycle. Racing through reps turns a mobilization into mindless bobbing with little benefit to the thoracic joints.
- Do not chase a huge arch at the top. A modest, controlled lift of the sternum mobilizes the mid-back more effectively than cranking into an exaggerated chest-out position.
- If the chair has wheels or is unstable, push it against a wall first; a sliding chair is the most common setup problem with this drill.
- Your hands should rest on the thighs, not push into them. Pressing down hard changes the drill into a core exercise and restricts the ribcage.
- For desk workers, do a short set every hour or two rather than one long session; frequent small doses of motion work better for sitting-related stiffness.
- If rounding forward feels pinchy at the front of the shoulder, reduce the depth of the forward phase and stay in the mid-range until the motion feels smooth.
Frequently Asked Questions
Which muscles and joints does Sitting Thoracic Spine Mobilization On A Chair work?
The main target is the thoracic spine itself, along with the small spinal muscles such as the erector spinae group that control segmental motion. The deeper core contributes by holding the pelvis still, but this is a mobility drill, not a strengthening exercise.
Can beginners do Sitting Thoracic Spine Mobilization On A Chair?
Yes, it is one of the most beginner-friendly mobility drills available. The seated position removes balance demands, and you can make the range as small and gentle as you need.
Why do my hands rest on my thighs during this exercise?
The hands on the thighs keep the shoulders relaxed and give you a light reference point as the chest sinks and lifts. Pressing hard into the legs would restrict ribcage movement, so keep the contact light.
How is this different from a standing or floor-based thoracic mobilization?
The chair fixes your hips in place, which makes it easier to isolate movement in the mid-back. On the floor or standing, the pelvis often tilts and steals range from the thoracic spine.
What is the most common mistake with Sitting Thoracic Spine Mobilization On A Chair?
Letting the whole spine and pelvis rock back and forth as one block. To fix it, sit tall on the front half of the seat, keep the sitting bones planted, and move only the ribcage and mid-back.
How many repetitions should I do?
Around 8 to 12 slow cycles, roughly one breath per repetition, works well as a warm-up or a desk break. Two to three sets are plenty, and frequent short sessions beat occasional long ones.
Is a special chair required?
No, any sturdy, armless chair without wheels works. Avoid soft couches or chairs with armrests, because they either let your hips sink or block your arms.
Can I substitute this with cat-cow on the floor?
Cat-cow is a reasonable substitute if you can get down and up comfortably, and it moves a similar flexion-extension arc. The seated version is preferable when floor access is difficult or when you want the pelvis more strictly fixed.
Is it safe if I have lower back discomfort?
Because the pelvis stays fixed and the load is zero, this drill is generally gentle, but the range should stay pain-free and modest. If any movement reproduces your symptoms, shorten the range or consult a qualified professional before continuing.