Resistance Band Bridge Yoga Pose Setu Bandha Sarv
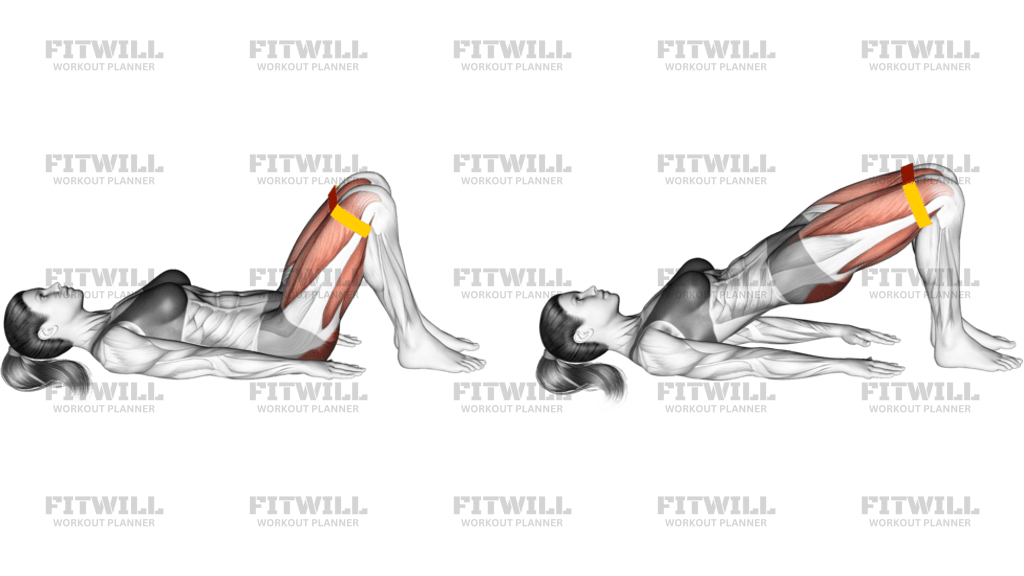
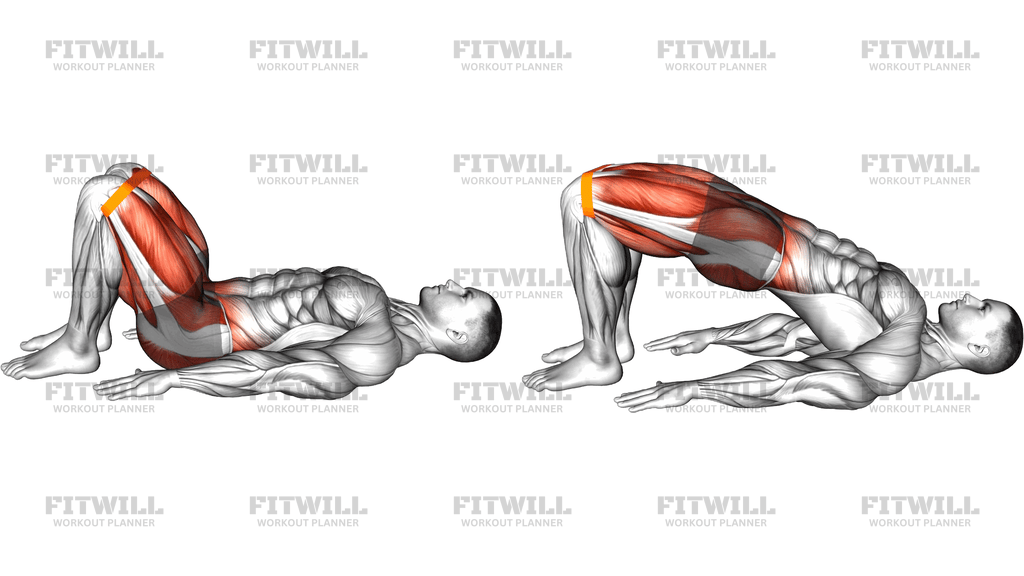
The Resistance Band Bridge Yoga Pose Setu Bandha Sarv is a floor-based hip bridge performed with a small loop band placed around the thighs, just above the knees. You lie on your back with the knees bent and feet flat, press outward lightly against the band, and lift the hips until the body forms a straight line from shoulders to knees. The band adds an outward pull at the knees that you have to actively resist, which is what separates this version from a standard bridge.
The band changes the demand in two ways at once. First, pushing the knees outward against the tension recruits the outer hip muscles, especially the gluteus medius, which usually stay quiet in a normal bridge. Second, keeping that outward pressure while you lift and lower forces the glutes to work continuously rather than only at the top of the movement. The gluteus maximus and hamstrings still drive the hip extension, while the core works to keep the ribcage and pelvis connected as the hips rise.
This version is useful for almost anyone. Beginners can use it to learn what a glute-driven hip extension feels like before touching heavier exercises like hip thrusts or deadlifts. People who spend long hours sitting often find it helps wake up lazy glutes and reestablish control around the hips. Lifters use it as a warm-up or as a high-rep finisher to fatigue the glutes without loading the spine.
Setup matters more here than it looks. If the feet are too far from the hips, the hamstrings take over and the lower back arches; if they are too close, the knees flare inward and the quads dominate. Feet roughly hip-width apart with the band sitting snugly above the knees gives you the cleanest leverage. The arms stay relaxed along the sides, palms down, simply providing a stable base.
To execute well, exhale as you press the knees slightly outward and drive through the heels, lifting from the hips rather than pushing the belly up. At the top, you want a straight line from shoulders to knees with the glutes squeezed, not a hyperextended lower back. Pause briefly, then lower the hips with control until they hover just above the floor before starting the next rep. Keep the outward knee pressure the entire time; letting the band collapse the knees together mid-rep is the most common breakdown.
Because it needs only a band and floor space, this movement fits easily into home workouts, yoga-inspired mobility sessions, and warm-up routines. Start with two to three sets of ten to fifteen slow reps. If you feel it mostly in the hamstrings or lower back, shorten the range slightly and focus on squeezing the glutes to lift rather than lifting as high as possible.
[ Workout Log & Planner ]
Put your next workout in Fitwill
Keep your plan and training log ready when you are.


Instructions
- Lie on your back on an exercise mat with your arms resting at your sides, palms facing down.
- Bend your knees and place your feet flat on the floor, about hip-width apart, with the heels roughly a hand's distance from your glutes.
- Loop a small resistance band around both thighs just above the knees so it sits snug but not painfully tight.
- Gently press both knees outward against the band until you feel the outer hips engage, and keep that outward pressure for the whole set.
- Brace your core lightly and tuck the pelvis so your lower back rests flat against the floor before you lift.
- Exhale and drive through your heels to lift the hips, squeezing the glutes until your body forms a straight line from shoulders to knees.
- Pause at the top for one to two seconds with the glutes fully contracted and the knees still pressed outward.
- Inhale and lower the hips slowly back toward the floor, stopping just before your glutes touch down.
- Repeat for the desired number of reps, then relax the knees, remove the band tension, and rest before the next set.
Tips & Tricks
- The most common fault is letting the band pull the knees inward as the hips rise. Actively push outward the whole rep; if you cannot, the band is too heavy.
- If you feel the exercise in your hamstrings instead of your glutes, move your heels an inch or two closer to your hips and re-check that you are squeezing the glutes to lift.
- Do not chase height. Overarching at the top to lift higher shifts the work to the lower back. Stop when the shoulder-to-knee line is straight.
- Push through the heels rather than the toes. Lifting onto the toes usually means the quads are taking over and the glutes are switching off.
- Keep your head neutral on the floor and your neck relaxed. Craning forward to watch your hips can create neck tension over a full set.
- Lower with control instead of dropping. A slow two-second descent keeps the glutes under tension and makes light bands feel meaningful.
- Exhale on the lift and inhale on the lower. Holding your breath tends to make the ribcage flare and the lower back arch at the top.
- Place the band above the knees, not on or below the knee joint. A band on the joint itself can be uncomfortable and restrict circulation.
- If your feet slide outward on a smooth floor, wear shoes or place your feet on a mat surface so the band pressure does not turn into a foot battle.
Frequently Asked Questions
What muscles does the Resistance Band Bridge Yoga Pose Setu Bandha Sarv work?
The gluteus maximus drives the hip lift, and the band adds significant work for the outer hip muscles, particularly the gluteus medius, as you press the knees outward. The hamstrings assist the lift and the core stabilizes the pelvis throughout.
Why is the band placed above the knees in the Resistance Band Bridge Yoga Pose Setu Bandha Sarv?
Placing the loop just above the knees creates outward tension exactly where the band wants to pull the legs together, forcing the outer glutes to resist. This turns a basic bridge into a combined hip extension and hip abduction exercise.
Is the Resistance Band Bridge Yoga Pose Setu Bandha Sarv good for beginners?
Yes. The load is light, the floor supports the spine, and the band gives instant feedback when the knees collapse. Beginners should master this before moving to weighted hip thrusts or barbell bridges.
How high should I lift my hips in the Resistance Band Bridge Yoga Pose Setu Bandha Sarv?
Lift only until your shoulders, hips, and knees form one straight line. Pushing beyond that point requires the lower back to arch, which shifts work away from the glutes without adding benefit.
My lower back aches after the Resistance Band Bridge Yoga Pose Setu Bandha Sarv. What am I doing wrong?
You are most likely overextending at the top or letting the ribcage flare as you lift. Tuck the pelvis slightly before lifting, shorten the range, and focus on squeezing the glutes rather than lifting as high as possible.
Can I do the Resistance Band Bridge Yoga Pose Setu Bandha Sarv without a band?
Yes, it becomes a standard glute bridge, but you lose the outward knee pressure that trains the outer hips. As a substitute, place a folded pillow between the knees and squeeze it, which mimics the same adduction resistance in reverse.
How many reps and sets of the Resistance Band Bridge Yoga Pose Setu Bandha Sarv should I do?
Two to three sets of ten to fifteen slow reps work well, whether as a glute warm-up or a finisher. Pause one to two seconds at the top of each rep rather than adding many rushed reps.
Should my arms be flat on the floor during the Resistance Band Bridge Yoga Pose Setu Bandha Sarv?
Yes, rest your arms alongside your body with palms down. They act as a stabilizing base, and pressing them lightly into the floor helps you keep the ribcage down as the hips rise.
Can I do the Resistance Band Bridge Yoga Pose Setu Bandha Sarv every day?
Because the resistance is light and the movement is low impact, daily practice is generally fine, especially as a warm-up or desk-break mobility drill. If your glutes are still sore from a previous session, give them a day to recover first.