Seated Elbow To Knee On Chair
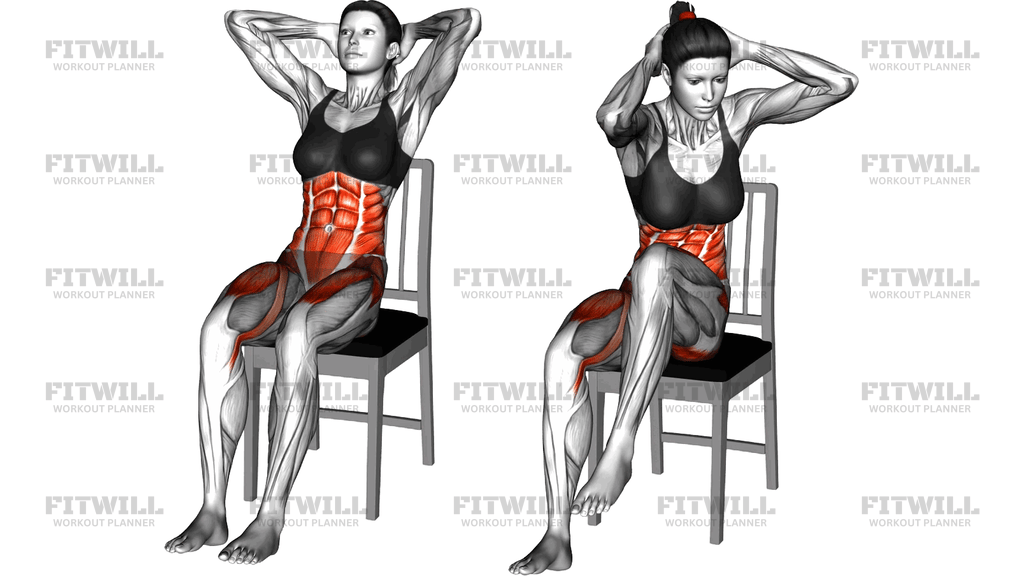
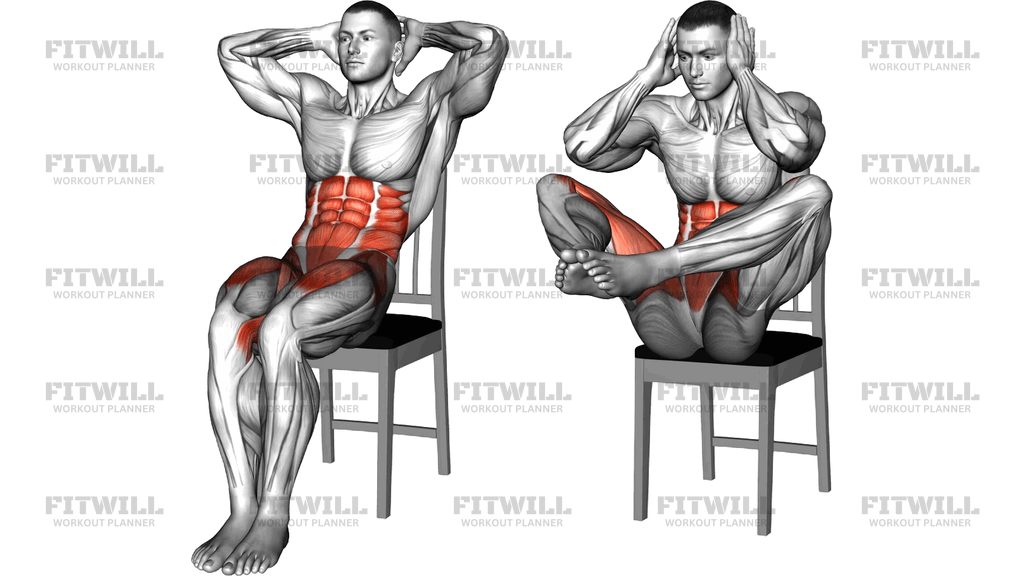
Seated Elbow To Knee On Chair is a body weight abdominal exercise performed on an ordinary sturdy chair. You sit upright near the front edge of the seat with your hands lightly placed behind your head, then draw both knees up toward your chest while rounding your torso forward so your elbows travel down toward your raised knees. From there you lower your feet back to the floor under control and repeat.
The main work comes from the rectus abdominis, the sheet of muscle running down the front of your belly, which contracts hard as you curl your ribs toward your pelvis. The hip flexors assist strongly by lifting the thighs, and the obliques stabilize your trunk so the movement stays straight rather than twisting side to side. Because your torso starts reclined slightly and curls forward, the abs work through a longer range than in a standard seated knee lift.
This movement is especially useful if you are training at home, in an office, or traveling with no equipment beyond a stable chair. It suits beginners who find hanging knee raises or floor leg raises too demanding, as well as anyone rehabbing back toward more intense core work who wants spinal flexion without lying down. More advanced trainees can slow the tempo, add a pause at the top, or use it as a high-rep finisher.
The setup matters more than it looks. Sitting too far back on the seat removes room for your knees to travel and turns the exercise into a hip squeeze, while a chair that is too high or unstable shifts stress into your lower back and hip flexors. Choose a chair that will not tip, plant your feet hip-width apart to start, and keep only a light contact between your fingertips and the back of your head so your neck never gets pulled.
Executed well, each rep is a deliberate curl: exhale as your knees rise and your trunk rounds forward, squeeze briefly when your elbows and knees are closest, then inhale as you lower with control. Avoid swinging your legs or yanking your head forward, and keep the motion smooth from start to finish. If you feel it mostly in the front of your hips, reduce the range and focus on consciously rounding your lower spine rather than simply lifting your thighs.
[ Workout Log & Planner ]
Put your next workout in Fitwill
Keep your plan and training log ready when you are.


Instructions
- Sit on a sturdy chair with your buttocks near the front edge of the seat and your feet flat on the floor, hip-width apart.
- Place your hands lightly behind your head with elbows flared out to the sides, and lean your torso back a few degrees so your chest is tall.
- Brace your abdominal muscles and keep your neck neutral, eyes forward rather than chin tucked to your chest.
- Exhale and drive both knees up toward your chest at the same time, letting your feet leave the floor.
- As the knees rise, curl your upper body forward and down so your elbows move toward the tops of your knees and your spine rounds.
- Pause for a beat in the top position with elbows and knees as close together as your range allows.
- Inhale and reverse the movement slowly: unfold your torso back to upright as you lower both feet to the floor.
- Reset your posture at the bottom with a brief pause before starting the next repetition.
- Keep the chair planted throughout; if it slides or tips, stop and reposition or choose a heavier chair.
Tips & Tricks
- The most common mistake is lifting only the legs without curling the torso, which shifts the work to the hip flexors. Think ribs toward pelvis, not just knees up.
- Do not interlace your fingers behind your head; resting them loosely makes it much harder to pull on your neck during the curl.
- If your chair has armrests, pick a different one, because the armrests block your elbows from traveling down beside your knees.
- Move deliberately rather than fast. Bouncing your knees off the floor each rep turns the exercise into momentum practice instead of abdominal work.
- Keep your lower back rounding at the top instead of staying arched. A flat, hinged-forward torso mostly trains the hips rather than the abs.
- Press your sitting bones into the seat as you curl to stop yourself from sliding forward on smooth chair surfaces.
- Shorten the range first if your feet scrape the floor at the top; a partial knee lift with a strong crunch beats a full lift with a slack torso.
- Breathe out forcefully through the curling phase. Holding your breath tends to make people strain through the neck and jaw instead of the abdominals.
Frequently Asked Questions
Which muscles does Seated Elbow To Knee On Chair work?
The rectus abdominis of the front of the trunk is the prime mover during the curl, with the hip flexors lifting the thighs and the obliques keeping the torso from twisting. The lower abs tend to feel it strongly because the legs and trunk move toward each other at the same time.
Is Seated Elbow To Knee On Chair good for beginners?
Yes. Because the chair supports your weight and the range can be shortened easily, it is far more accessible than hanging knee raises. Beginners can start with a partial knee lift and a modest forward curl, then gradually increase the range.
Why do I feel Seated Elbow To Knee On Chair in the front of my hips instead of my abs?
That usually means the hip flexors are dominating because your torso stays upright while your legs do all the lifting. Exaggerate the spinal rounding, pull your ribs down toward your pelvis, and consider reducing how high the knees travel until the crunch sensation returns.
What kind of chair should I use for this exercise?
Use a stable chair without wheels, without armrests, and heavy enough that it will not tip when your knees come up. An armless dining chair against a wall works well for extra security.
How many repetitions of Seated Elbow To Knee On Chair should I do?
Start with 2 to 3 sets of 10 to 15 controlled repetitions, resting between sets. Since it is a body weight movement, prioritize slow tempo and a strong top squeeze over chasing high numbers.
Can I do Seated Elbow To Knee On Chair every day?
Light versions can be done often, but the abdominal muscles still need recovery like any other muscle. Two to four focused sessions per week with at least a day between harder sessions is a sensible rhythm.
What can I use instead of a chair for this movement?
Any stable elevated seat works, such as a sturdy bench or the edge of a solid ottoman. If no seat is available, a seated knee tuck on the floor with hands behind your head offers a similar, though slightly different, curling pattern.
Is it safe for my lower back?
For most people yes, as long as the movement stays smooth and you avoid wrenching the neck or jerking the knees. If you have a history of back issues, start with a small range, keep the motion pain-free, and stop if any discomfort appears.