Elevated Mountain Climber With Hands On A Chair
The Elevated Mountain Climber With Hands On A Chair is an incline variation of the classic mountain climber, performed with your palms planted on a sturdy chair seat while your feet stay on the floor behind you. Because the hands are raised, your torso sits at an angle rather than parallel to the ground, which shifts load toward your core and hip flexors while demanding far less wrist, shoulder, and upper-body strength than the floor version. It is a controlled, alternating knee drive: one knee travels toward your chest while the other leg stays extended, then the legs switch.
This version is a strong fit for beginners building toward floor mountain climbers, for anyone with wrist discomfort that makes full planks unpleasant, and for intermediate lifters who want to use the movement as a core burner or conditioning finisher without burning out their shoulders first. The elevated angle also makes it easier to keep your lower back from sagging, which is the most common fault in traditional mountain climbers.
The main work comes from the abs and hip flexors, which power each knee drive and control the return. Your shoulders, triceps, and chest stabilize the upper body against the chair, while the glutes and quads of the planted leg keep your hips from drifting upward. Because one leg leaves the floor at a time, your deep core also works to resist rotation, which is where most of the benefit hides if you do the movement slowly and deliberately.
Setup matters more than speed here. A lightweight chair can slide or tip, so press it against a wall or verify it can handle your body weight before you commit. Place your hands roughly shoulder-width on the seat edge, walk your feet back until your body forms a straight line from head to heels, and only then begin the knee drives. The incline changes everything about the lever length, so resist the urge to rush.
To execute well, think of driving the knee forward with your lower abs rather than simply lifting the foot, and stop the knee when it is under or near your chest. Return the foot under control, keep your hips level throughout, and alternate legs at a rhythm you can sustain without your hips bouncing. Once the movement feels smooth, you can speed up gradually, but quality reps at a moderate pace will train your core better than fast, sloppy ones.
Use this exercise as a warm-up core activator, a mid-workout abdominal set, or a low-impact conditioning interval in circuits. It pairs naturally with incline push-ups on the same chair, letting you train pressing and core work in one compact setup at home.
A few practical safety points: check that the chair will not fold, roll, or slide, keep your fingers curled over the front edge rather than flat and jammed against it, and stop the set as soon as your hips start to pike upward or your lower back begins to arch, since both signal that your core has checked out.
[ Workout Log & Planner ]
Put your next workout in Fitwill
Keep your plan and training log ready when you are.


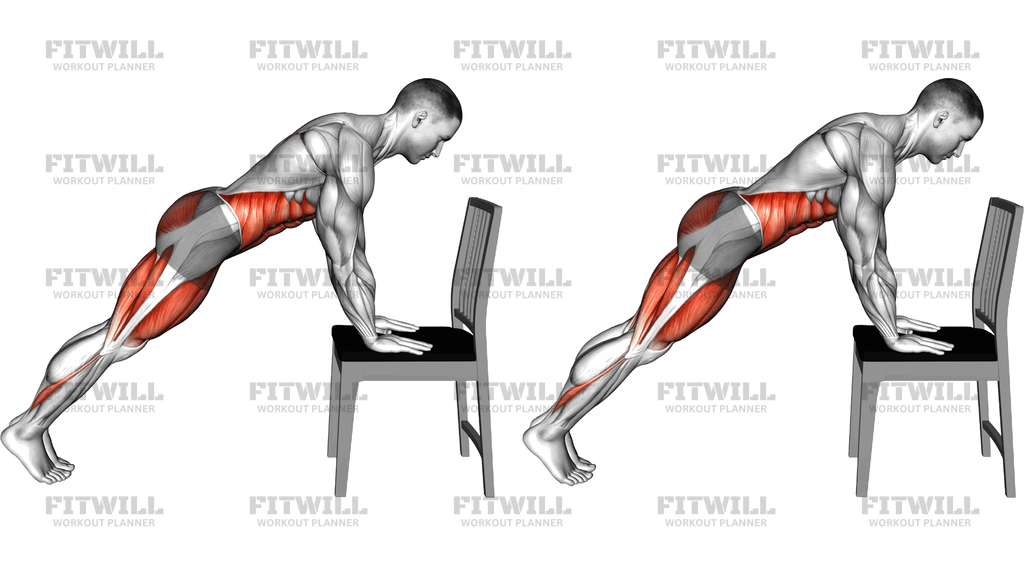
Instructions
- Place a sturdy chair against a wall so it cannot slide, and confirm the seat is stable under pressure.
- Place both palms flat on the seat, about shoulder-width apart, with your fingers facing forward and curled slightly over the front edge.
- Walk your feet back until your arms are extended and your body forms a straight line from head to heels, resting on the balls of your feet.
- Brace your abs and squeeze your glutes so your hips neither sag toward the floor nor pike toward the ceiling.
- Keeping your hips level, drive one knee forward toward your chest, letting the foot come off the floor.
- Pause briefly with the knee under or near your chest, then return that foot to the starting position under control.
- Immediately drive the opposite knee forward and continue alternating legs in a steady rhythm.
- Exhale on each knee drive and inhale as the leg returns, keeping your breathing consistent rather than holding it.
- Keep your shoulders stacked over your wrists and your gaze down at the chair so your neck stays neutral.
- When finished, step both feet forward, stand up, and reset the chair before your next set.
Tips & Tricks
- If the chair slides forward with each rep, back it fully against a wall or choose a heavier chair, because a shifting seat breaks your hand position mid-set.
- Most people let the hips rise as fatigue sets in; check your side profile occasionally and make sure you could draw a straight line from your head through your heels.
- Drive the knee with your lower abs instead of just bending the leg, otherwise the movement turns into a hip-hike exercise with little abdominal involvement.
- Keep the working foot from touching down hard between reps; a soft, controlled return keeps tension on your core the entire time.
- Avoid locking your elbows back at the top; a soft bend with shoulders stacked over wrists reduces strain on the joint during longer sets.
- If your lower back starts to arch as the planted leg tires, shorten the set rather than widening your stance, which often just masks the problem.
- Start with slow alternations for the first few sessions; speed is easy to add later, but a fast bounce on an unstable chair is hard to fix.
- Place the chair on a non-slip surface or mat, since smooth floors are where lightweight chairs are most likely to slide out from under you.
- Match the pace of your breathing to your knee drives rather than holding your breath, which causes early fatigue and a loss of bracing.
Frequently Asked Questions
Which muscles does the Elevated Mountain Climber With Hands On A Chair work the most?
The abs and hip flexors do the primary work driving each knee forward, while the deep core resists rotation. Your shoulders, triceps, and chest stabilize you against the chair, and the glutes and quads of the planted leg hold your hips in place.
Why use a chair instead of doing mountain climbers on the floor?
The elevated hands put your torso on an incline, which reduces the load on your wrists, shoulders, and upper body while still training the core. It is an easier progression that also makes it simpler to keep your lower back from sagging.
Is the Elevated Mountain Climber With Hands On A Chair suitable for beginners?
Yes, it is one of the best entry points to mountain climbers because the incline lightens the demand on the upper body. Beginners should start with slow, deliberate knee drives and prioritize keeping the hips level before increasing speed.
How high should the chair seat be?
A standard chair height of around 45 cm works well, and the higher the surface, the easier the movement. If the incline still feels too demanding, progress from a table or counter height down to a chair over time.
How can I stop the chair from sliding during the exercise?
Press the chair firmly against a wall and place it on a non-slip surface or exercise mat. Test it by leaning your weight into the seat before you start your set.
Should my hands be flat on the seat or gripping the edge?
Place your palms flat on the seat about shoulder-width apart, with your fingers curled slightly over the front edge. This gives you a secure hold without jamming your fingers or loading the wrists awkwardly.
What is the most common mistake with this exercise?
Letting the hips pike upward as the knee drives forward, which turns the movement into a hip hike and removes tension from the abs. Another frequent error is bouncing the foot back down instead of returning it under control.
What can I substitute if I do not have a sturdy chair?
Any stable elevated surface works, such as a bench, step platform, or sturdy coffee table pushed against a wall. In a pinch, drop to your forearms on the floor and perform slow alternating knee drives with the same hip-level control.
How fast should I alternate knees?
Start at a moderate, controlled pace where each knee drive and return takes about two seconds total. Once you can keep your hips level and your back flat for the whole set, gradually increase the tempo.
Is this exercise safe for people with wrist pain?
The incline reduces wrist extension compared with a floor plank, so many people with mild wrist discomfort find it more comfortable. Keep a soft bend in the elbows, spread your fingers for support, and stop if you feel sharp pain in the joint.