Seated Curl To Shoulders Press On Chair
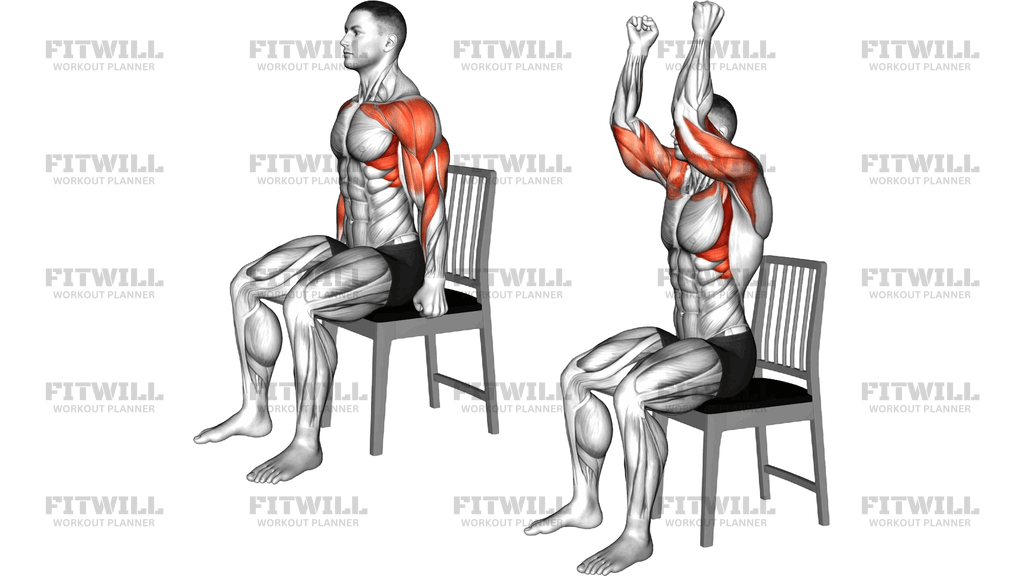
The Seated Curl To Shoulders Press On Chair is a bodyweight arm-and-shoulder drill performed while sitting upright on a sturdy chair. You start with your arms down at your sides beside your hips, curl your fists up toward your shoulders, and then drive your arms up overhead into a press position before lowering back down the same way. Because there is no external load, the movement relies on deliberate muscle tension and clean mechanics rather than heavy resistance, which makes it easy to fit into warm-ups, desk-break routines, or beginner upper-body sessions.
This exercise combines two familiar arm actions into one continuous path. The first half resembles a biceps curl, working the front of the upper arm, while the second half resembles an overhead press, placing the demand on the deltoids around the shoulder. Your forearms and grip stay active throughout, and the trunk works quietly to keep you tall on the chair. The seated position removes momentum from the legs and hips, so the arms have to do the work honestly.
The chair setup matters more than it might seem. Sitting with your feet flat, your sit bones planted, and your back upright gives your shoulders a stable base to press from and stops the common habit of leaning back and arching the low back as the arms rise. A firm, non-rolling chair is essential; a soft couch or a chair with wheels will shift under you and change the movement.
To execute it well, think about the path of the hands. They travel from beside your hips, up in front of the body as the elbows bend, and then straight up as the arms extend overhead or reach the top position. Reverse that exact line on the way down. Moving slowly is the point here: two to three seconds up and two to three seconds down turns a simple bodyweight drill into something the biceps and shoulders can genuinely feel.
This movement suits people training at home without equipment, office workers looking for a discreet upper-body reset, older adults rebuilding arm strength in a safe seated position, and lifters who want a low-fatigue way to prime the shoulders and biceps before pressing or pulling work. It is also a useful teaching tool for learning the overhead path before adding dumbbells or a bar.
Safety-wise, keep the movement in a range where your shoulders stay comfortable and pain-free. If pressing fully overhead bothers your shoulders, stop at eyebrow height and work within that shorter arc. Keep your ribs stacked over your pelvis rather than flaring them forward, and avoid shrugging your shoulders up toward your ears as your arms rise.
[ Workout Log & Planner ]
Put your next workout in Fitwill
Keep your plan and training log ready when you are.


Instructions
- Sit sideways-free on a sturdy, armless chair with your feet flat on the floor about hip-width apart and your sit bones planted evenly on the seat.
- Sit tall with your chest open and ribs stacked over your pelvis; let your arms hang straight down at your sides beside your hips with your hands in loose fists.
- Brace your core lightly and draw your shoulder blades down your back so you are not starting with shrugged shoulders.
- Exhale as you bend your elbows and curl your fists up toward the fronts of your shoulders, keeping your upper arms close to your torso.
- Continue the motion by driving your fists upward until your arms are raised overhead with elbows bent or fully extended, depending on your shoulder comfort.
- Pause briefly at the top with your shoulders down away from your ears and your wrists straight.
- Inhale as you reverse the exact path, lowering your arms back to shoulder height, then extending your elbows until your arms hang at your sides again.
- Reset your posture between repetitions: sit tall, relax your shoulders down, and confirm your feet are still flat before starting the next rep.
- Breathe steadily throughout, exhaling on the upward curl and press, inhaling on the controlled return.
- Perform 10 to 15 slow repetitions, keeping the tempo even rather than rushing the lowering phase.
Tips & Tricks
- The most common mistake is leaning back or arching the low back as the arms rise overhead. Fix it by squeezing your glutes gently into the seat and keeping your ribs stacked over your pelvis.
- Watch for the elbows drifting out wide during the curl phase. Keep them tracking close to your ribs so the biceps, not the shoulder joints, lead the first half of the lift.
- If your shoulders shrug toward your ears at the top, you are compensating with your upper traps. Lower your arms slightly and consciously press your shoulder blades down before continuing.
- Speed kills this exercise. Because there is no weight, momentum is the only resistance you can remove; a slow two-second curl and two-second press makes the muscles actually work.
- A chair with a cushioned but firm seat works best. A rolling office chair or a folding chair that wobbles will steal your stability and can shift mid-rep.
- Keep your wrists neutral and fists relaxed. Clenching hard or bending the wrists back as the arms rise adds unnecessary forearm strain.
- If full overhead reach is uncomfortable, stop the press at eyebrow height and build up gradually. The curl-to-press path should never force the shoulders into a pinched position.
- Your feet are part of the setup, not an afterthought. Flat feet and uncrossed ankles keep your hips level, which keeps your torso from rotating as one arm travels.
- Treat this as a great warm-up before dumbbell curls or presses. Two light sets of 12 to 15 reps raise the shoulder and elbow joints without fatiguing them.
Frequently Asked Questions
What muscles does the Seated Curl To Shoulders Press On Chair work?
The main work falls on the deltoids in the shoulders during the press portion, with the biceps driving the curl portion. The forearms, triceps, and postural muscles of the trunk assist as you control the arm path.
Do I need any equipment besides a chair?
No, the exercise uses only your body weight and a sturdy, armless chair. If you want more challenge later, light dumbbells can be added, but the movement is designed to work without them.
Is this exercise good for beginners?
Yes. The seated position, lack of external load, and slow tempo make it a low-risk way to learn the curl and overhead press patterns before progressing to weighted versions.
Why perform the curl and press seated instead of standing?
Sitting removes help from the legs and hips, so you cannot swing or use body english to move your arms. It also makes it easier to keep an upright torso, which protects the lower back during the overhead portion.
How can I tell if my chair is stable enough for this exercise?
Use a chair with four legs, a firm seat, and no wheels, placed on a non-slip floor. It should not rock or slide when you press your hands down into the seat or shift your weight while seated.
My shoulders pinch when my arms go fully overhead. What should I do?
Stop the press at roughly eyebrow height and work within that shorter range. As shoulder mobility improves, you can gradually extend the top position as long as it stays comfortable and pain-free.
How many repetitions should I do of the Seated Curl To Shoulders Press On Chair?
Because the resistance is your own limb weight, higher reps with slow tempo work best. Aim for 10 to 15 controlled repetitions per set, and use multiple sets if you want a greater training effect.
What can I substitute if I do not have a suitable chair?
Any firm, stable seat such as a bench, sturdy stool, or even the edge of a bed with your feet planted works. The key is an upright torso and a surface that will not move under you.
Should my back stay in contact with the chair backrest?
You can rest lightly against it for reference, but avoid slumping into it. Keeping a small gap encourages you to hold yourself tall with your own trunk muscles, which is part of the training benefit.
Can this exercise replace weighted curls and presses in my routine?
It is a useful teaching and warm-up tool, but for ongoing strength gains you will eventually want added load, such as dumbbells. Use the chair version to build technique, mobility, and endurance first.