Assisted Weighted Push Up
The Assisted Weighted Push Up is a standard push up with an added twist: a weight plate is set on your upper back while a partner places, steadies, or removes it for you. The partner's role here is mostly about handling the load safely — getting the plate positioned correctly on your back between the shoulder blades is genuinely awkward to do alone, and trying to manage it yourself usually costs you your setup. With a partner controlling the plate, you get the full benefit of extra resistance without fumbling your position.
This movement suits lifters who have outgrown bodyweight push ups but are not yet ready for harder variations like deficit or one-arm push ups. Adding external load lets you keep progressing in small, measurable jumps — a plate change of a few pounds is a far smoother progression than leaping to a new leverage variation. It is also useful for anyone training push up strength against a measurable number, since loaded push ups respond to the same rep-and-weight progression you would use on a bench press.
The primary work is done by the chest, with the front of the shoulders and the triceps assisting through the pressing range. What changes most when you add weight is the demand on your trunk: the core, glutes, and legs now have to hold a rigid plank position under a heavier load, or the plate will slide and your hips will sag. In that sense, the Assisted Weighted Push Up trains the whole body to stay tight while pressing, which transfers well to benching and other floor-based pressing work.
Setup matters more here than in a regular push up. Your hands should be stacked under your shoulders, the plate centered on your upper back — between the shoulder blades, not on the neck or lower back — and your body in one straight line from head to heels before the plate arrives. If the load lands in the wrong spot, it either pulls you out of alignment or turns the set into an endurance test for your lower back instead of your chest.
To execute well, lower with control until your chest is close to the floor, keep your elbows at roughly a 45-degree angle to your torso, and press back up without letting the hips lead the movement. Breathe in on the way down, exhale as you press. Communicate with your partner throughout: they should place the plate before your first rep, keep hands near it for safety on heavier sets, and lift it off as soon as you finish or lose form. If your hips drop or the plate starts shifting, end the set rather than pushing through a compromised position.
[ Workout Log & Planner ]
Put your next workout in Fitwill
Keep your plan and training log ready when you are.


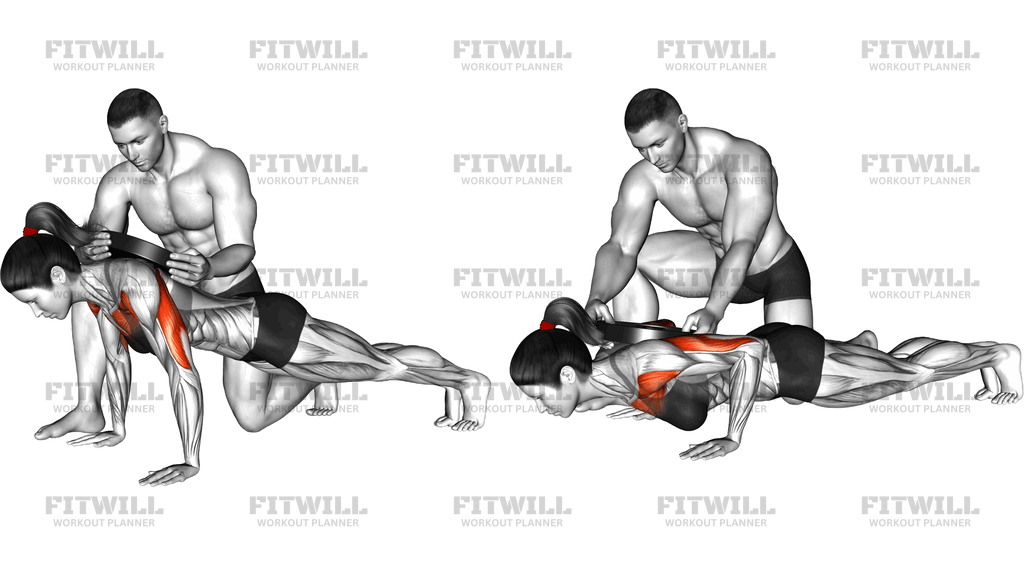
Instructions
- Kneel into a push up position with your hands placed slightly wider than shoulder-width, fingers spread, and wrists stacked directly under your shoulders.
- Set your feet about hip-width apart and extend your legs so your body forms one straight line from head to heels before any weight is added.
- Have your partner center a weight plate flat on your upper back, between the shoulder blades — not on your neck or lower back — and hold it steady until you are ready.
- Brace your core, squeeze your glutes, and pull your shoulder blades down and back so the plate has a stable shelf to rest on.
- Inhale and bend your elbows to lower your chest toward the floor, keeping the elbows at about a 45-degree angle to your torso and your head in line with your spine.
- Descend until your chest is just above the floor and your upper arms are roughly parallel to the ground, maintaining a rigid plank under the load.
- Exhale and press through your palms to push the floor away, extending your elbows fully while keeping your hips from rising or sagging.
- Complete each rep at the top with elbows locked out and the plate still flat on your back, then reset your brace before the next descent.
- When you finish the set or feel your form break down, tell your partner and stay in the plank position while they lift the plate off your back.
- After the plate is removed, lower your knees to the floor to rest, then reposition the plate for the next set if needed.
Tips & Tricks
- The most common mistake is letting the plate sit too high near the neck or too low on the lower back. Ask your partner to center it between the shoulder blades so the load compresses your spine neutrally instead of shearing it.
- If your hips sag as soon as the weight goes on, the load is too heavy for your trunk, not necessarily your chest. Drop the plate size and rebuild with a plank you can hold rigid for every rep.
- Do not rush the placement. Stay in a stable plank while your partner sets the plate, because many sets are lost during the wobbly few seconds before the first rep.
- Keep your elbows from flaring out to a full 90 degrees. Under load this position stresses the shoulders, so cue your elbows slightly toward your ribs on the way down.
- Drive your fingers into the floor and grip it actively. Loaded push ups magnify wrist discomfort, and a firm grip helps keep your wrists stacked over your elbows.
- If the plate slides during the set, it usually means your shoulders are shrugging or your upper back is rounding. Depress your shoulder blades and keep your chest open to give the plate a flat surface.
- Communicate clearly with your partner before starting: agree on how many reps you plan, and have them keep hands near the plate on heavy sets so they can catch it if you fail.
- Progress in small plate increments rather than large jumps. Loaded push ups punish ego loading with form breakdown at the hips and lower back before the chest ever reaches failure.
- If full push ups under load are too difficult, elevate your hands on a low bench while keeping the plate placement identical — the setup and partner role stay the same, only the leverage changes.
Frequently Asked Questions
What muscles does the Assisted Weighted Push Up work?
The chest is the primary mover, with the triceps and front shoulders assisting through the press. Your core, glutes, and legs also work hard to hold a rigid plank position under the added plate.
Where should the weight plate be placed on my back?
Flat on your upper back, centered between the shoulder blades. Placing it on the neck or lower back creates strain in those areas and throws off your line from head to heels.
Is the Assisted Weighted Push Up suitable for beginners?
Beginners should first build the ability to perform 15 or more clean bodyweight push ups with a stable plank. Once that base exists, starting with a small plate and a partner is a safe way to progress.
How heavy should the plate be?
Start with a light plate — around 10 to 25 pounds — and only increase when you can complete your target reps without your hips sagging or the plate shifting. Small jumps work better than big ones.
What does the partner actually do in the Assisted Weighted Push Up?
The partner places the plate on your upper back, steadies it on heavier sets, and removes it when you finish or lose form. They are handling the load for safety, not lifting you through the reps.
Why do my hips sag when the plate goes on?
The added load exceeds what your core can currently brace against. Reduce the weight and focus on squeezing your glutes and abs before each descent to keep a straight line.
What can I use instead of a weight plate?
A weighted vest removes the need for a partner entirely and keeps the load centered. A dumbbell held flat on your upper back works in a pinch, though it is harder to balance.
How is the Assisted Weighted Push Up different from a regular push up?
The mechanics are identical, but the external load increases the pressing demand and dramatically raises the bracing requirement for your trunk. It also allows progressive overload in small increments, which bodyweight push ups do not.
How deep should I lower with a plate on my back?
Lower until your chest is just above the floor and your upper arms are roughly parallel to the ground. If your hips or the plate drop first, the depth or the load is beyond your current control.
Is the Assisted Weighted Push Up safe for the lower back?
Yes, when the plate sits between the shoulder blades and your body stays in one straight line. Risk comes from excessive load, sagging hips, or a plate positioned too low on the spine, so end the set the moment your brace fails.