Back Lever Tuck
The Back Lever Tuck is the entry-level variation of the back lever, one of the classic static holds in calisthenics. You hang from a pull-up bar, rotate your body underneath your hands, and hold a compact ball shape with your knees tucked toward your chest and your hips facing up toward the ceiling. Because the tucked position shortens the lever, the load on your connective tissue and pulling muscles is far lower than in a full back lever, making this the safest place to learn the movement pattern.
This hold is valuable for anyone progressing toward the full back lever or German hang, and it is also a genuinely useful exercise on its own. It trains the lats and posterior shoulders in a lengthened, rotated position that ordinary pull-ups and rows never touch, while the lower back and core work hard to keep the tucked shape from collapsing. Grip and biceps strength get a steady isometric demand as well, since your elbows stay locked and your shoulders stay pulled down away from your ears the entire time.
Setup quality matters more here than in most pulling exercises. Because your body ends up inverted, a secure overhand grip on a stable bar is non-negotiable, and you should know how to bail safely before you start holding longer sets. Hands are typically set about shoulder width, and the rotation into the hold should come from the shoulders and upper back, not from letting your elbows bend.
To execute well, hang from the bar, raise your legs and pass them back between your arms or over the bar until your body flips under your grip, then pull your knees in toward your chest and lift your hips so your torso turns face-down beneath the bar. Keep your elbows straight, pull actively with your lats as if trying to drag the bar toward your hips, and breathe in short, steady breaths while you hold. To come out, tuck tighter, rotate back through the same path, and lower one leg at a time to the ground with control.
Expect the hold to feel most demanding across the shoulders, upper back, and elbows at first. Build time gradually, starting with short holds of a few seconds and resting fully between attempts. If you feel sharp discomfort in the shoulder or elbow rather than muscular effort, come out of the hold and revisit the tuck position another day with less time under tension.
Fitwill
Log Workouts, Track Progress & Build Strength.
Achieve more with Fitwill: explore over 9600 exercises with images and videos, access built-in and custom workouts, perfect for both gym and home sessions, and see real results.
Start your journey. Download today!




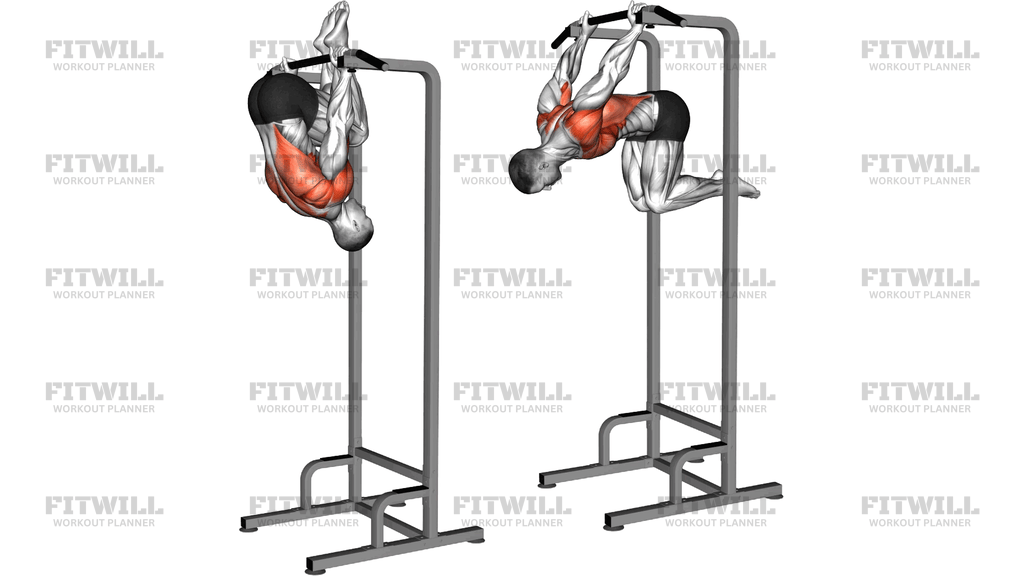
Instructions
- Grip a sturdy pull-up bar with an overhand grip about shoulder width apart, and hang with your arms fully straight.
- Engage your grip and pull your shoulders down away from your ears before any rotation begins.
- Lift your knees toward your chest and pass your legs back behind the bar, or reach one leg over at a time, so your body rotates under your grip.
- Once inverted, tuck your knees tightly toward your chest and let your hips rise so your torso turns face-down beneath the bar.
- Press the bar down actively by straightening your elbows and squeezing with your lats, keeping your upper arms near your sides.
- Hold the tucked shape with your hips open toward the ceiling and your head in a neutral position, eyes toward the floor.
- Breathe in short, controlled breaths through the hold rather than holding your breath.
- To finish, tuck tighter, rotate back through the same path you entered, and lower your legs under control until you are hanging again.
- Release one hand at a time only after your feet are back near the ground, and rest fully before the next attempt.
Tips & Tricks
- Most people let the elbows bend slightly to make the hold easier, which shifts stress onto the biceps tendon; lock the arms and reduce hold time instead.
- A loose tuck is the most common fault. The tighter you pull your knees to your chest, the shorter the lever and the easier the hold.
- If your shoulders creep up toward your ears mid-hold, reset your grip and consciously press the bar toward your hips before continuing.
- Neck strain often comes from lifting your head to look forward. Keep the head neutral and let your gaze fall toward the floor.
- Warm up your shoulders and elbows with hangs and gentle rotations first, since the back lever position loads these joints in a rotated range.
- Practice dismounts early. Knowing you can rotate back out of the tuck cleanly lets you hold with more confidence and less tension.
- Use short holds of five to ten seconds with full rest between them rather than one long exhausted set, especially in the first weeks.
- Grip failing before your back and shoulders fatigue is normal at first. Hang work on its own days will raise your total hold time.
Frequently Asked Questions
What muscles does the Back Lever Tuck work?
The main drivers are the lats and posterior shoulders, which hold your body under the bar, while the lower back and core lock in the tucked shape. Grip and biceps work isometrically to keep your arms straight and your hold secure.
Is the Back Lever Tuck safe for beginners?
It is the safest starting point for the back lever family because the tucked shape shortens the lever, but you should already be comfortable hanging from a bar for 30 seconds or more. Build hold time slowly and stop if you feel joint pain rather than muscle effort.
How do I get into the Back Lever Tuck position on a pull-up bar?
Hang with a shoulder-width overhand grip, then raise your legs and pass them back behind the bar so your body rotates under your hands. From there, tuck your knees to your chest and lift your hips until your torso faces the floor.
Why do my elbows hurt when I hold the Back Lever Tuck?
Sharp elbow discomfort usually means the arms are bending or the hold time is progressing too quickly for the tendons. Keep the elbows fully locked, shorten your holds, and allow several days between sessions while the tissue adapts.
How long should I hold the Back Lever Tuck before progressing?
Aim for a comfortable tuck hold of 15 to 20 seconds with straight arms and a stable shape. At that point you can start opening the hips slightly toward an advanced tuck before attempting a full back lever.
Can I train the Back Lever Tuck on rings instead of a bar?
Yes, rings work well and many people find them friendlier on the shoulders because the rings can rotate with your body. The bar version shown here is more stable, which makes it a good first choice while you learn the entry and exit.
What is the most common mistake in the Back Lever Tuck?
Letting the tuck loosen so the hips drop and the body starts to extend, which multiplies the load on the shoulders and lower back. Re-tuck the knees, press the bar down with the lats, and end the set if the shape cannot be held.
How should I breathe during the Back Lever Tuck?
Avoid holding your breath; take short, steady breaths through the hold. Breath-holding raises tension but tends to make longer holds fail early.
What exercises prepare me for the Back Lever Tuck?
Active bar hangs, skin the cats or German hangs, and straight-arm lat pulldowns or pull-ups build the shoulder mobility and pulling strength this hold requires. Comfortable inverted control is the key prerequisite.