Decline Push Up Against Wall
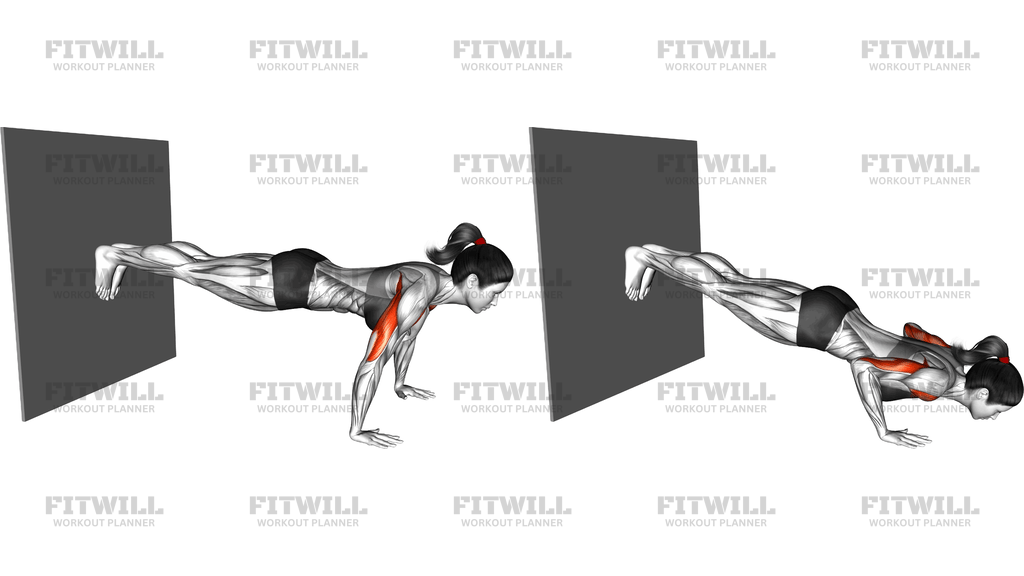
The Decline Push Up Against Wall is a bodyweight pressing exercise where your hands stay on the floor while your feet are elevated and braced against a wall behind you. Instead of resting your toes on a bench or box, you place the balls of your feet flat against the wall with your legs extended, so the wall acts as the support surface. This shifts more of your body weight forward over your hands, which makes the push-up noticeably harder than a standard floor version and places extra emphasis on the upper chest, front shoulders, and triceps.
This setup is especially useful when you train at home with minimal equipment. A bare wall is almost always available, so you can create a decline angle without a bench, box, or step platform. It also lets you fine-tune the difficulty: the closer your hands are to the wall, the steeper the angle and the heavier the load on your upper body; stepping your hands farther away reduces the decline and eases the demand.
Beyond the pressing muscles, the exercise demands a great deal from your core. Because your feet are higher than your head and your body forms a downward slope, your abs, glutes, and legs must work hard to keep your hips from sagging or your lower back from arching. Many people find that the Decline Push Up Against Wall doubles as a moving plank, which is part of what makes it so effective for building full-body tension.
To get the most from the movement, treat the wall contact as an active brace rather than a passive lean. Press the balls of your feet firmly into the wall, squeeze your thighs, and keep a straight line from your heels through your hips to your head. Lower your chest toward the floor with your elbows tracking at roughly a 45-degree angle to your torso, pause briefly near the bottom, then press back up without letting your hips drop.
This exercise fits well as a progression for anyone who has outgrown regular push-ups but is not yet ready for full hand-elevated decline variations on a high bench. It is also a practical option for higher-volume sessions, since stepping into and out of the wall position is quick and easy. If your wrists or shoulders complain at steep angles, reduce the elevation or shorten the range until you can press with control.
[ Workout Log & Planner ]
Put your next workout in Fitwill
Keep your plan and training log ready when you are.


Instructions
- Face away from a clear wall and get down on your hands and knees, then walk your feet back until you can place the balls of both feet flat against the wall behind you at roughly hip height or lower.
- Position your hands on the floor slightly wider than shoulder-width apart, fingers spread and pointing forward, so your shoulders sit directly over your wrists at the top.
- Straighten your legs by pressing your heels gently toward the wall, forming one straight line from your heels through your hips to your head.
- Brace your abdominal muscles, squeeze your glutes, and pull your shoulder blades down slightly so your upper back is not rounded toward the ceiling.
- Bend your elbows and lower your chest toward the floor, letting your elbows travel back at about a 45-degree angle to your sides rather than flaring straight out.
- Descend until your chest is a few inches from the floor or until your upper arms are roughly parallel to the ground, keeping your neck neutral and eyes slightly ahead of your hands.
- Press firmly through your palms to extend your elbows and return to the top, pushing the floor away while keeping your hips level with your shoulders.
- Exhale as you press up and inhale as you lower down, keeping the breath steady rather than holding it.
- Complete your repetitions, then step one foot off the wall at a time and kneel down to come out of the position safely.
- Reset your foot placement and brace before each set so your angle against the wall stays consistent from rep to rep.
Tips & Tricks
- If your lower back sags mid-set, your hands are probably too far from the wall or your core is fatigued; step your feet down to a lower point or move your hands closer to reduce the load.
- Pressing the balls of the feet into the wall is what keeps the decline position stable — if your feet slide, wipe the wall surface and make sure your shoesor socks are not slick.
- Avoid letting your head drop toward the floor before your chest; if your head touches first, you are leading with the neck instead of lowering as one unit.
- Keep your elbows at about 45 degrees to your torso. Elbows pinned tightly back shifts stress to the front of the shoulder, while full flaring strains the shoulder joint at this steep angle.
- Start with fewer reps than a floor push-up allows. The Decline Push Up Against Wall loads noticeably more weight onto your arms, so expect your triceps to fail before your chest does.
- If your wrists ache at the top, grip a pair of push-up handles or dumbbells placed on the floor to keep your wrists straighter throughout the press.
- Do not rush the lowering phase — a slow, controlled descent of two to three seconds builds more tension in the chest than bouncing off the floor.
- Check your hand distance to the wall before each set. Moving your hands even a foot changes how much body weight lands on your arms.
- Squeeze your thighs against each other slightly to lock in the hip position; loose legs are the most common reason the plank line breaks down in this variation.
Frequently Asked Questions
What muscles does the Decline Push Up Against Wall work?
The primary muscles are the chest, particularly the upper portion, with strong support from the triceps and front shoulders. Your core, glutes, and legs work continuously to hold the angled plank position against the wall.
Why place the feet on a wall instead of a bench for a decline push-up?
A wall is available almost anywhere and lets you adjust the angle easily by sliding your feet higher or lower. Pressing the balls of the feet into the wall also gives you an active brace, which many people find more secure than balancing on a narrow bench edge.
Is the Decline Push Up Against Wall suitable for beginners?
It is best treated as an intermediate progression. Beginners should build capacity with standard floor push-ups first, then start with the feet very low on the wall and the hands farther away to reduce the load.
How far should my hands be from the wall?
The closer your hands are to the wall, the steeper the decline and the harder the press. Start with your hands about two to three feet away so your feet are only modestly elevated, then move closer as your pressing strength improves.
My hips sag when I lower down — what should I fix?
Sagging hips usually mean the core is not braced hard enough or the angle is too steep for your current strength. Squeeze your glutes and abs before descending, and if the sag continues, lower your feet on the wall or return to standard push-ups temporarily.
Can I substitute the Decline Push Up Against Wall with another exercise?
Yes — a decline push-up with feet on a low bench or step trains the same pattern, and standard push-ups work if you are not yet ready for the elevated version. Wall slides toward a handstand position are a harder option for advanced trainees.
How does this exercise differ from a regular push-up?
Elevating the feet shifts more of your body weight onto your hands and changes the pressing angle so your upper chest and shoulders take on more work. Most people find this version meaningfully harder than a push-up on flat ground.
Is it safe for my shoulders and wrists?
For healthy shoulders and wrists, yes, as long as you keep your elbows at a moderate angle and avoid descending faster than you can control. If you have a current shoulder issue or wrist pain, use push-up handles to keep the wrists neutral and keep the decline angle shallow.
How many reps should I aim for?
Start with sets of 5 to 10 clean repetitions and build from there, since the elevated angle loads your arms more than floor push-ups. Once you can complete 15 solid reps, progress by raising your feet higher on the wall.