Medicine Ball Mountain Climber
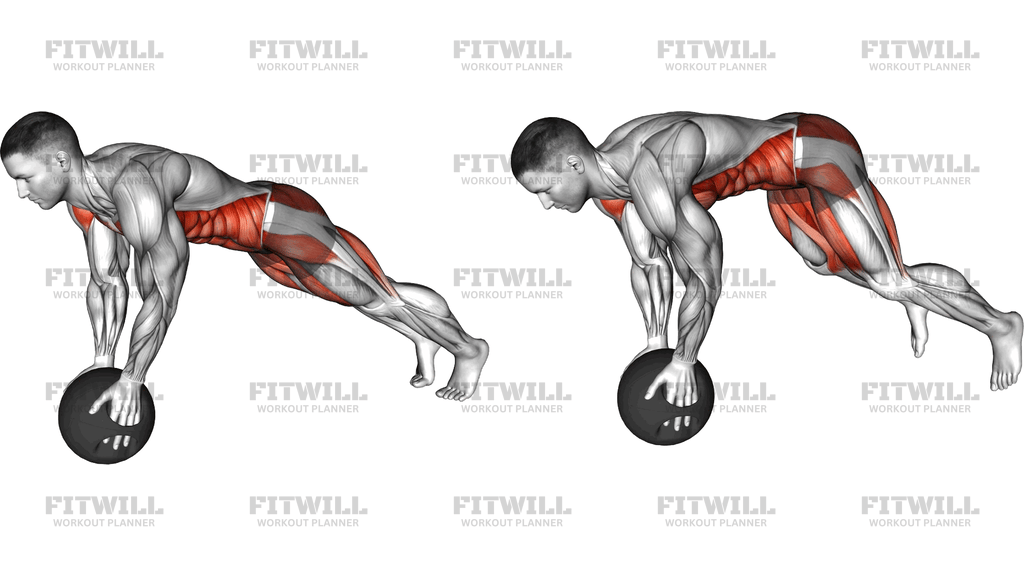
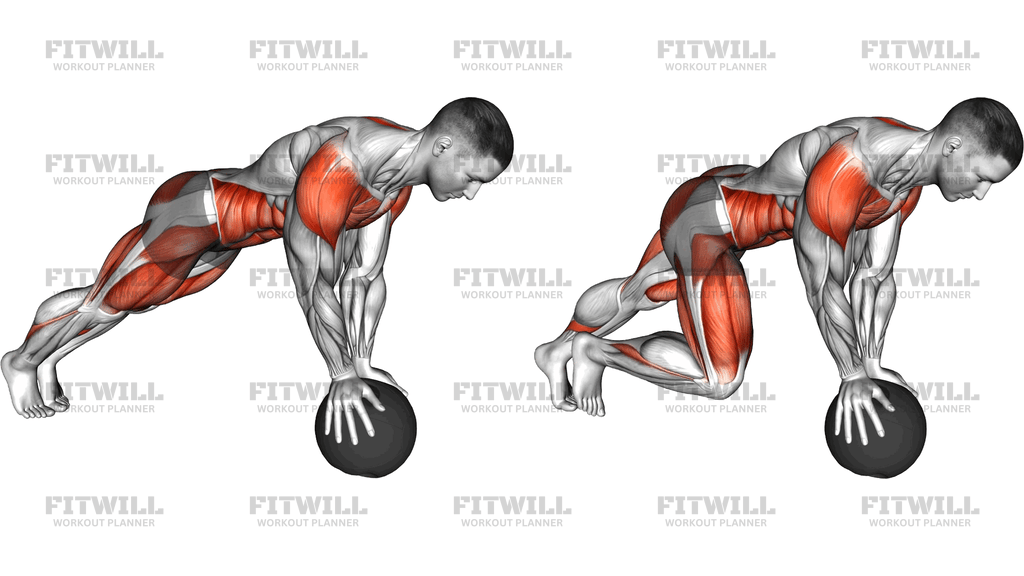
The Medicine Ball Mountain Climber is a dynamic core exercise performed in a high plank position with both hands placed on a medicine ball instead of the floor. From that unstable, elevated platform, you drive one knee at a time toward your chest in a running rhythm, alternating legs while keeping the rest of your body locked into a straight line. The ball adds two challenges at once: it narrows your base of support and forces your shoulders, chest, and trunk stabilizers to work overtime to keep it from rolling or wobbling.
This movement is useful for almost anyone who has mastered the standard floor mountain climber and wants more core demand without adding external load to the spine. Because the hands are elevated on the ball, the angle is slightly friendlier to the wrists and shoulders than a flat-floor version, yet the instability more than makes up for it in difficulty. It fits well into circuit training, core finishers, and conditioning blocks where you want to raise your heart rate while training anti-rotation control.
The primary work comes from the abs and hip flexors, which power each knee drive and control the return. Your obliques and deep core fight the rotational pull every time one leg lifts, and the shoulders, chest, and triceps hold a stable platform over the ball. Holding an isometric plank position on an unstable surface also builds serious shoulder girdle endurance.
Setup matters more here than in most core drills. A soft or underinflated ball will shift under your hands, and a ball that is too small cramps your hand placement, so choose a firm medicine ball with a flat enough contact point to stay put. Position it directly under your shoulders before you start, because re-adjusting mid-set usually means losing your brace.
To execute well, think of your torso as a rigid plank while only the legs move. Drive the knee toward the chest with intent, set the foot down under control, and switch legs without letting the hips bounce or sway. Slowing the tempo down is the fastest way to make this exercise harder, not easier, because every rep must be stabilized rather than rushed.
Common use cases include athletic conditioning, core circuits, and warm-ups for upper body pressing days, since the plank position on the ball pre-activates the shoulders and trunk. If you cannot keep the ball still or your lower back starts to sag, regress to floor mountain climbers or slow alternating knee drives with hands on a bench until your plank stability improves.
[ Workout Log & Planner ]
Put your next workout in Fitwill
Keep your plan and training log ready when you are.


Instructions
- Place a firm medicine ball on the floor and position yourself behind it on your hands and knees, setting both palms flat on top of the ball roughly shoulder-width apart.
- Step your feet back one at a time until your body forms a straight line from head to heels, with the ball directly under your shoulders and your arms nearly extended.
- Grip the sides of the ball firmly with your fingers spread, and squeeze your glutes and abs to lock your pelvis in a neutral position before moving.
- Keep your neck in line with your spine by looking at a spot on the floor slightly ahead of the ball.
- Drive your right knee toward your chest, stopping when the knee is under or slightly past your hips, while the left leg stays extended behind you.
- Return the right foot to the starting position with control, then immediately drive the left knee toward your chest, continuing to alternate in a steady rhythm.
- Exhale as each knee drives forward and inhale as it returns, keeping your breathing rhythmic rather than holding your breath.
- Keep your hips level and square to the floor throughout the set; resist the urge to let them rock side to side or lift toward the ceiling.
- When you finish the set, step your feet back in one at a time and kneel down before releasing your grip on the ball.
- Reset your plank position completely between sets, checking that the ball has not drifted out from under your shoulders.
Tips & Tricks
- The most common failure point is hip sway: as one knee drives, the opposite hip rotates up. Imagine a glass of water balanced on your lower back and keep it level through every rep.
- If the ball rolls forward as you fatigue, it usually means your weight has drifted past your wrists. Shift slightly back so your shoulders stack over the ball, not in front of it.
- Start with a slower tempo, roughly one knee drive per second, and only speed up once you can keep the ball motionless for a full set.
- Do not let your elbows bend and your chest drop toward the ball; that turns the drill into a shaky push-up position and shifts work away from the core.
- A ball with a textured or slightly flat contact point works better than a perfectly smooth, round one, which tends to roll under fast leg switches.
- If your wrists complain, grip the sides of the ball with your fingers wrapping around it rather than laying your palms flat, which keeps the wrists more neutral.
- Shorten your range instead of your form: a knee drive that stops under the hip with a braced trunk beats a full knee tuck that collapses your lower back.
- Breathe shallow and continuous rather than holding your breath on the knee drive; breath-holding on an unstable surface makes the wobble worse.
- Place the ball on a non-slip surface or exercise mat if you are training on slick flooring, since a ball that slides out is the main safety risk in this setup.
Frequently Asked Questions
What muscles does the Medicine Ball Mountain Climber work?
The abs and hip flexors drive each knee tuck, while the obliques and deep core stabilize against rotation. The shoulders, chest, and triceps work isometrically to hold a steady plank over the unstable ball.
How is the Medicine Ball Mountain Climber different from a regular mountain climber?
Your hands sit on an unstable, elevated ball instead of the floor, which narrows your base and forces your shoulders and trunk stabilizers to control the wobble. The knee drive mechanics are the same, but the stability demand is significantly higher.
Is the Medicine Ball Mountain Climber suitable for beginners?
It is best treated as a step up from the floor version, since the rolling ball punishes a weak plank. Beginners should first build a solid 30-second high plank and controlled floor mountain climbers before adding the ball.
What size medicine ball should I use for this exercise?
A firm ball in the roughly 45 to 60 cm diameter range works well, giving enough surface for a shoulder-width hand placement. Weight matters less than firmness, because a soft ball deforms under your palms and makes balancing harder than it needs to be.
Why does my medicine ball keep rolling forward during the set?
That usually means your weight has shifted past your wrists or you are pushing off the ball with each knee drive. Re-center your shoulders directly over the ball and focus on keeping your upper body completely still while only the legs move.
Should I move fast or slow on the Medicine Ball Mountain Climber?
Start slow enough that the ball stays still and your hips stay level, then gradually build speed. Fast, sloppy reps on an unstable ball mostly train hip bouncing rather than core control.
My lower back hurts when my knee comes up. What should I change?
Your pelvis is likely tipping forward as the knee drives, which arches the lower back. Squeeze your glutes, shorten the knee drive so it stops under the hip, and if the discomfort persists, regress to floor mountain climbers with hands on a bench.
Can I substitute another exercise if I do not have a medicine ball?
Yes. A sturdy low box, a flat weight bench, or a BOSU ball platform placed upside down can replace the ball, though the rolling instability is unique to the ball itself. Standard floor mountain climbers remain the simplest substitute.
How many reps or how long should I perform the Medicine Ball Mountain Climber?
Count knee drives in pairs, starting with 20 to 30 total or 20 to 30 seconds per set. Stop the set as soon as the ball starts moving or your hips sag, since those are the first signs the core has checked out.
Is the Medicine Ball Mountain Climber safe for the shoulders?
Generally yes, because the elevated hand position reduces the extension demand at the shoulder compared to a floor plank. If you have an active shoulder issue, test a static plank hold on the ball first and only add leg movement once that feels stable and pain-free.