Resistance Band Hip Thrust (Version 2)
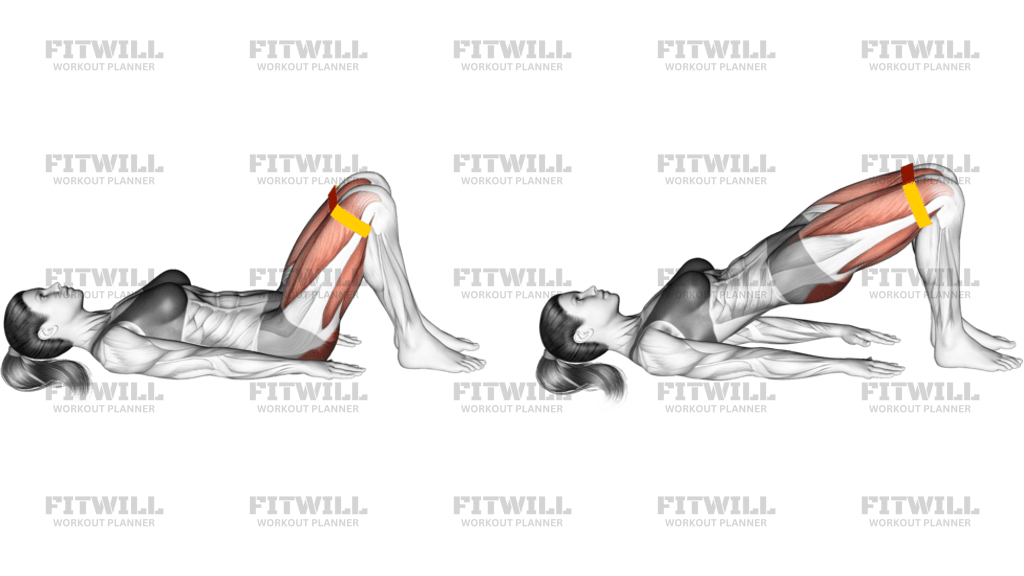
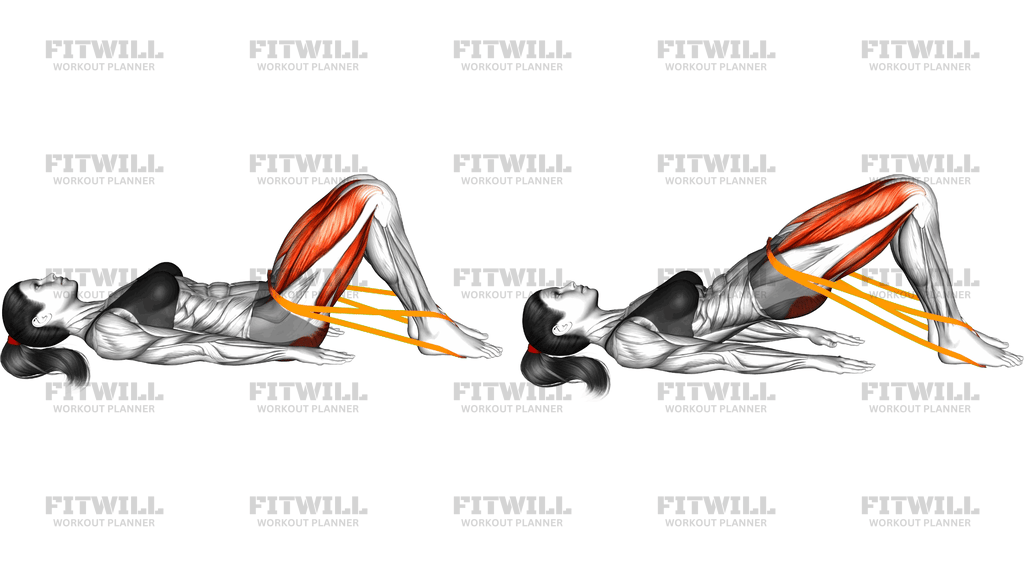
The Resistance Band Hip Thrust (Version 2) is a floor-based hip extension exercise where a resistance band is looped over the hip crease and anchored under both feet. Instead of bracing your shoulders against a bench, you lie flat on your back on the floor with knees bent, so the band's downward pull has to be overcome purely by driving your hips upward. It is essentially a loaded glute bridge, and the band replaces the barbell or dumbbell that would normally sit on your hips.
This setup is ideal for people who train at home, beginners who are not ready to load a barbell across their pelvis, or anyone who wants targeted glute work without the pressure of a weighted plate on the hip bones. Because the band's resistance increases as you lift higher and shorten it, the glutes are challenged most at the top of the movement, which is exactly where the hips reach full extension.
The primary muscle at work is the gluteus maximus, which extends the hip as you raise your pelvis toward the ceiling. The hamstrings assist with the lift, the lower back muscles stabilize the pelvis and spine, and the core works to keep your ribcage from flaring as tension builds. Your feet and calves also stay active because they pin the band in place against the floor throughout every rep.
Setup matters more here than in most floor exercises. The band must sit across the crease of your hips, not on your stomach or mid-thigh, and both ends must be secured under your feet with even tension on each side. If one side is tighter than the other, your hips will twist as you lift, shifting work away from the glutes and stressing the lower back unevenly.
To perform the movement well, drive through your heels, squeeze the glutes, and lift until your hips form a straight line from shoulders to knees, then pause briefly before lowering with control. Avoid pushing the hips so high that the lower back arches past neutral; the goal is a strong squeeze at the top, not maximum height. Keep your arms relaxed at your sides and let the glutes, not a lower back arch, finish every rep.
This version fits well as a warm-up activation before squats or deadlifts, as the main glute exercise in a home workout, or as a high-rep finisher when heavier equipment is not available. Because the load is self-limiting and sits comfortably on the hips, it is also one of the safest ways to learn what a full, glute-driven hip extension actually feels like before progressing to barbell hip thrusts.
[ Workout Log & Planner ]
Put your next workout in Fitwill
Keep your plan and training log ready when you are.


Instructions
- Lie on your back on an exercise mat with your knees bent and feet flat on the floor, hip-width apart, about a hand's width from your glutes.
- Loop a resistance band over both hips so it sits in the crease where your thighs meet your pelvis, then secure each end of the band under the corresponding foot so tension pulls straight down on your hips when you lift.
- Check that the tension is even on both sides of the band and adjust the length under each foot if one side pulls harder than the other.
- Rest your arms at your sides with palms down on the floor, and brace your core as if bracing for a light punch to the stomach.
- Exhale and drive through your heels to push your hips straight up toward the ceiling, keeping the band pressed against your hip crease.
- Lift until your body forms a straight line from your shoulders through your knees, and squeeze your glutes hard at the top for a one-second pause.
- Inhale and lower your hips back to the floor under control, letting the band guide the descent rather than dropping down.
- Lightly tap your glutes to the mat without fully relaxing, reset your brace, and begin the next repetition.
- Keep your neck relaxed and your gaze toward the ceiling throughout, and let your hands stay on the floor for balance rather than pressing them into the ground to help lift.
Tips & Tricks
- If the band slides up toward your stomach, it is positioned too high; move it down into the hip crease, where it can press against the top of the thigh bone as you lift.
- Feet that drift forward reduce glute involvement and shift work to the hamstrings, so keep your shins close to vertical at the top of each rep.
- If your heels lift as you push up, the band is likely too heavy for your current strength; drop to a lighter band until you can keep your whole foot planted.
- Overarching at the top is the most common fault in this exercise; stop when your hips line up with your shoulders and knees, and let the glute squeeze, not extra height, finish the rep.
- Point your knees slightly outward if they want to cave inward, and make sure the knees track over the toes throughout the lift.
- You can drape a towel or fold a mat over the band where it crosses your hips to soften the pressure if the band digs into your hip bones.
- Push the floor apart slightly with your feet as you lift; this subtle outward pressure engages the outer hips and keeps the band from rolling under your feet.
- Do not let your lower back and hips sag as you lower; a slow three-second descent keeps tension on the glutes and makes lighter bands feel substantially harder.
Frequently Asked Questions
Which muscles does the Resistance Band Hip Thrust (Version 2) work?
The gluteus maximus does most of the work as you extend your hips against the band's downward pull. The hamstrings assist the lift, while the lower back and core stabilize your pelvis and ribcage throughout.
Why is the band anchored under the feet instead of held with the hands?
Securing the band under both feet frees your arms to stay relaxed at your sides and directs the resistance straight down onto the hip crease, which matches the direction a barbell would load in a standard hip thrust. It also keeps tension consistent no matter how high you lift.
Is the Resistance Band Hip Thrust (Version 2) good for beginners?
Yes, it is one of the friendliest entry points into loaded hip extension because the band pressure sits comfortably on the hips and the resistance is easy to adjust. Beginners should start with a light band and focus on a full glute squeeze rather than lifting as high as possible.
How is this version different from a bench-supported band hip thrust?
In this version your shoulders and upper back stay on the floor instead of resting on a bench, which shortens the range of motion and lowers the load on the hips. It works more like a weighted glute bridge, making it easier to set up at home with no bench required.
Why do my hamstrings cramp during this exercise?
Cramping usually happens when the hips are pushed past a straight line into an overarched position, or when the feet are placed too far from the glutes. Stop the lift at shoulder-to-knee height and pull your heels slightly closer so the glutes, not the hamstrings, dominate the top of the rep.
What should I do if the band causes discomfort on my hip bones?
Pad the contact point by folding a small towel over the band or wearing thicker sweatpants, and make sure the band sits in the hip crease rather than higher on the waist. Choosing a wider, flatter band instead of a narrow tube also spreads the pressure more evenly.
Can the Resistance Band Hip Thrust (Version 2) replace barbell hip thrusts?
For most home and general strength purposes, yes, because the band provides meaningful resistance at the top where the glutes are strongest. It becomes less adequate once you need very heavy loads, at which point the movement works better as an activation warm-up before barbell work.
How many sets and reps should I perform?
Two to four sets of 12 to 20 reps works well, since band resistance suits moderate rep ranges. For a pre-workout activation, use a lighter band for one or two sets of 15 controlled reps.
Is it safe for the lower back?
When the lift stops at a straight line from shoulders to knees and the descent is controlled, the lower back only has to stabilize rather than move. The main risk comes from overarching at the top or letting the hips twist under uneven band tension, so keep the band length equal on both sides.
How do I make the Resistance Band Hip Thrust (Version 2) harder without buying heavier bands?
Slow the lowering phase to three or four seconds, add a two-second pause at the top, or perform single-leg reps with one foot pinning both band ends. Any of these increases time under tension without changing equipment.