Star Reach Side Leg Lift
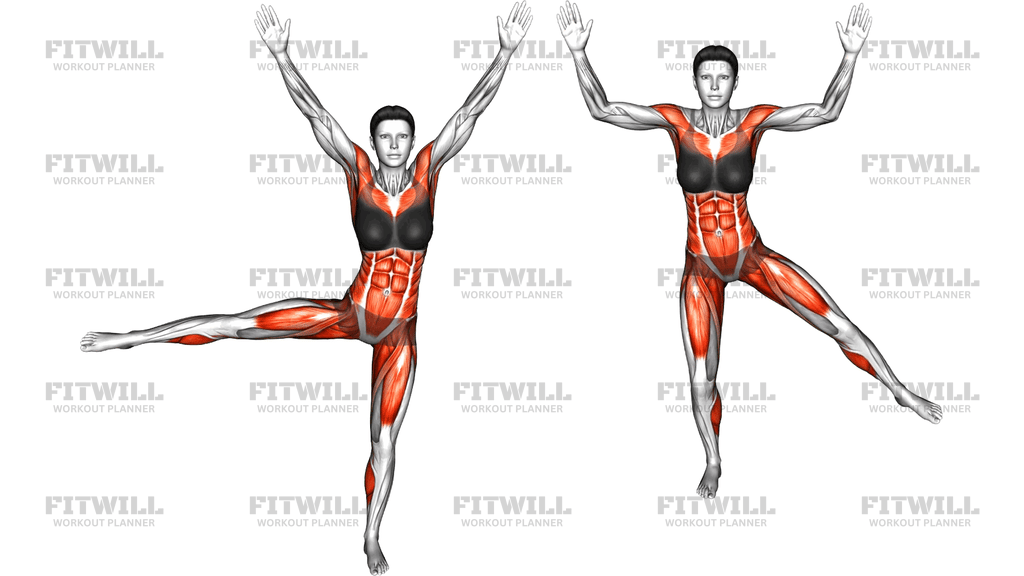
Star Reach Side Leg Lift is a standing balance exercise where you lift one leg out to the side while your arms reach up and out in a wide V overhead, creating a star shape at the top of the movement. It is done entirely with body weight, so you need nothing more than a bit of clear floor space and, ideally, something sturdy nearby to hover a hand over if your balance is still a work in progress.
The main work happens in the hip of the moving leg, particularly the gluteus medius and other outer-hip muscles that raise the leg sideways away from your midline. Just as important, the standing leg is doing constant quiet work: its glutes, hip, and ankle stabilizers fire continuously to keep your pelvis level and your foot from wobbling. Meanwhile your core, especially the obliques on the opposite side, braces to stop your torso from tipping away from the lifted leg.
The overhead arm reach is not just decoration. Raising your arms raises your center of mass and makes the balance demand noticeably harder, which is exactly why the star position is useful. It teaches your trunk to resist lateral sway and forces the standing hip to own its job. If you find regular standing side leg lifts easy, adding the star reach is the natural next step.
Setup matters more than people expect. You want a tall spine, soft knee on the standing leg, and your weight spread across the whole foot rather than dumped on the toes. If your torso starts leaning, your hips start rotating, or you rush the lift, the outer-hip work leaks away and the movement turns into a momentum contest.
To perform it well, shift onto one leg, brace your midsection, and sweep the other leg out to the side while your arms rise into a wide V. Lift only as high as you can keep both hips facing forward and your torso upright, then lower the leg slowly under control. Controlled tempo beats height every time with this one.
This exercise shows up frequently in warm-ups for lower-body strength days, in glute and hip-focused routines, in Pilates and barre-style training, and in rehab-adjacent programming for hip stability. It is a practical pick for runners and anyone whose daily life involves a lot of standing on one leg, since it directly trains the side-to-side hip control that keeps knees and lower backs happier under load.
[ Workout Log & Planner ]
Put your next workout in Fitwill
Keep your plan and training log ready when you are.


Instructions
- Stand tall with your feet together or hip-width apart, arms relaxed at your sides, and your weight evenly spread across one foot as you shift onto that leg.
- Soften the knee of your standing leg slightly and grip the floor with your whole foot, spreading your toes to build a stable base.
- Brace your abdominal wall as if preparing for a light nudge, and keep your ribcage stacked over your pelvis before you start moving.
- On an exhale, raise both arms up and outward into a wide V overhead while sweeping your free leg out to the side, toes pointing forward or slightly down.
- Lift the leg to a comfortable height, roughly 30 to 45 degrees for most people, stopping before your torso has to lean away or your hips rotate open.
- Hold the star position for a brief beat with both hips facing forward and your shoulders relaxed away from your ears.
- Inhale as you lower the leg slowly, resisting the drop rather than letting gravity take it, and bring your arms back down to your sides.
- Complete all reps on one side before switching, or alternate legs rep by rep if that helps you keep balance fresher.
- Reset your stance and re-brace between reps if you feel yourself wobbling or leaning; quality of each lift matters more than keeping a fast rhythm.
Tips & Tricks
- If you tip your torso sideways as the leg lifts, the leg has gone past what your hip control allows; reduce the height until your shoulders stay level.
- Check that both hip bones stay pointing forward. A common fault is opening the pelvis toward the lifted leg to gain extra height, which shifts work away from the outer hip.
- Keep a slight bend in the standing knee. Locking it straight makes balance harder and puts unnecessary pressure on the joint.
- Point the toes of the lifted leg forward or slightly down. Turning the foot up and out usually means the hip has rotated instead of the leg abducting.
- Move your arms and leg together as one coordinated sweep. Starting the arms late leaves you off-balance at the top of the lift.
- Hover a hand near a wall or the back of a chair for the first few sessions. Use it for light fingertip support only, not to lean on.
- If your standing foot cramps, you are likely gripping too hard with your toes. Redistribute your weight across the heel and the ball of the foot.
- Do this exercise barefoot or in flat, flexible shoes so your foot can feel the floor and make small balance corrections.
- Expect your first few reps on the second leg to feel shakier; that side-to-side difference is normal and worth noting so you can give the weaker side an extra set or two over time.
Frequently Asked Questions
What muscles does the Star Reach Side Leg Lift work?
The primary movers are the gluteus medius and other outer-hip muscles of the lifting leg. The standing leg's glutes and ankle stabilizers plus the obliques and deep core work hard to keep you upright and level.
Why do the arms go overhead in the Star Reach Side Leg Lift?
Raising your arms in a wide V lifts your center of mass and makes balancing considerably harder. It forces the core and standing hip to work together to stop lateral tipping, which is the point of the star shape.
How high should I lift my leg in the Star Reach Side Leg Lift?
Lift only as high as you can while keeping your torso upright and both hips facing forward, which for most people is around 30 to 45 degrees. Height gained by leaning or rotating takes the work away from the outer hip.
Is the Star Reach Side Leg Lift good for beginners?
Yes, as long as you start with a lower leg height and keep a wall or chair nearby for light support. Beginners can also begin with arms out to the sides at shoulder height before progressing to the full overhead V.
Why do I wobble so much when I raise my arms overhead during this exercise?
Raising your arms raises your center of gravity, so every small correction in your foot, hip, and trunk gets amplified. This settles with practice, and short, controlled reps with a brief hold at the top will speed that up.
What is the most common mistake in the Star Reach Side Leg Lift?
The most common mistake is leaning the torso away from the lifted leg to gain height. This usually means the standing hip is collapsing and the outer-hip muscles of the moving leg are no longer doing the lifting.
Can I substitute the Star Reach Side Leg Lift with something else?
A standing side leg lift without the arm reach, a side-lying leg lift, or a cable hip abduction all train the same outer-hip pattern. The star version is simply the hardest of these from a balance standpoint.
Should I hold the top position of the Star Reach Side Leg Lift?
A short hold of one to two seconds at the top is worthwhile because it challenges the standing hip's stability rather than just the lifting motion. Keep the hold brief enough that your form does not deteriorate.
How many reps and sets of the Star Reach Side Leg Lift should I do?
Two to three sets of 8 to 12 controlled reps per side works well, either as a warm-up activation drill or as part of a hip and glute circuit. Stop a set when your balance or hip control slips, not when the leg gets heavy.
Is it safe to do the Star Reach Side Leg Lift with knee or hip discomfort?
The movement is low impact and generally joint friendly, but any lift that provokes pinching or pain should be shortened or stopped. Keep the range pain-free, stay near a support, and check with a qualified professional if discomfort keeps returning.