Glute Bridge Single Leg With Chair
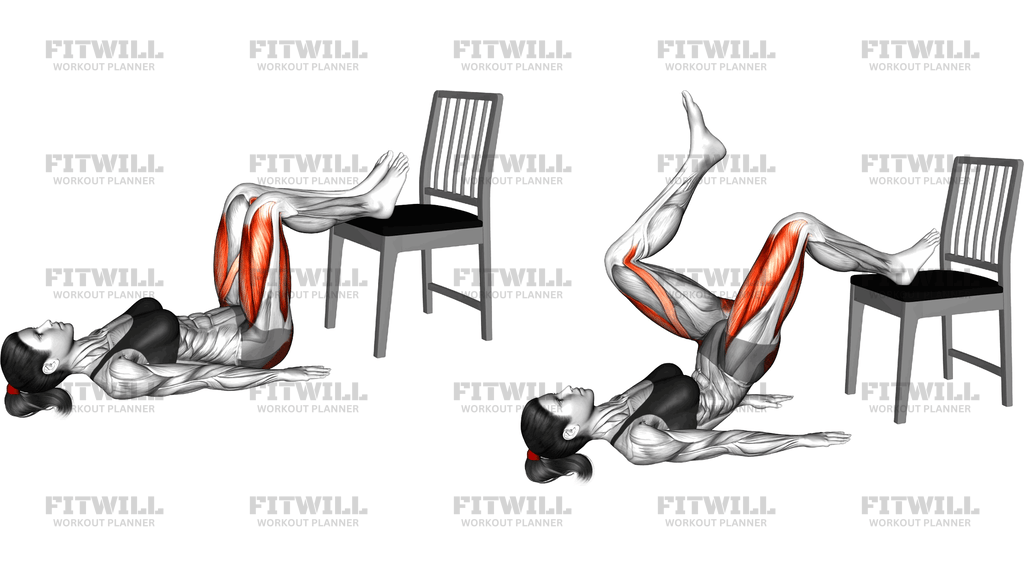
The Glute Bridge Single Leg With Chair is a unilateral hip extension exercise performed from the floor with one foot elevated on a chair seat. You lie on your back, place one heel on the chair with that knee bent, lift your other leg completely off the floor, and drive up through the working heel until your hips are fully extended. Elevating the foot increases the range of motion at the hip compared with a floor-based single-leg bridge, which makes the glutes and hamstrings work through a longer stretch.
This movement is especially useful for people who feel back extensions like bridges mostly in their lower back or quads. Raising the working foot on a chair shifts more of the demand onto the glutes and hamstrings and away from the front of the thigh, while lifting the opposite leg forces each side to produce force on its own. That single-leg demand exposes and helps correct side-to-side differences in hip strength, which matters for running, climbing stairs, and any sport that pushes off one leg at a time.
The primary muscles working are the glutes, particularly the gluteus maximus of the working leg. The hamstrings assist in driving the hip into extension, and the muscles around the top of the hip help keep your pelvis level so it does not tip toward the unsupported side. Your core and lower back muscles work isometrically the whole time to hold your ribcage and pelvis steady as the hips rise and lower.
Setup details matter here more than in a standard bridge. The chair height controls how much the hip has to work through a stretched position, so a standard chair with the shin roughly vertical at the start is a good benchmark. Your arms stay relaxed at your sides on the floor for balance only, not for pushing. If you push hard through your hands, you steal work from the hips and make the exercise easier than it should be.
To execute it well, think about driving the floor away through your heel and squeezing the glute of the working leg rather than arching your back to get higher. Lift until your body forms a straight line from your shoulders through the hip to the knee on the chair, hold that top position briefly, then lower with control until your hips are just above the floor before the next rep. Avoid letting the knee on the chair collapse inward or drift forward past the toes.
Because it requires no equipment beyond a sturdy chair and floor space, this exercise fits well into home workouts, warm-ups before lower-body training, and rehabilitation-style programs where loading one hip at a time is preferred. Start with a modest number of reps per side and only progress the difficulty by slowing the lowering phase or adding a pause at the top once your hips stay level throughout.
[ Workout Log & Planner ]
Put your next workout in Fitwill
Keep your plan and training log ready when you are.


Instructions
- Sit on the floor and place a sturdy chair behind you, then lie back and rest one heel flat on the chair seat with that knee bent to roughly 90 degrees.
- Keep your other leg completely off the floor, either with the knee bent toward your chest or extended straight, and let both arms rest at your sides with palms down.
- Position yourself far enough from the chair that your shin is close to vertical when your heel is on the seat, with the chair stable against slipping.
- Brace your abs lightly and tuck your pelvis slightly so your lower back is not already arched before you move.
- Exhale and press your heel down into the chair, straightening that hip until your body forms a straight line from your shoulders through the hip to the knee on the chair.
- Squeeze the glute of the working leg hard at the top and hold for one to two seconds, keeping the lifted leg from dropping toward the floor.
- Inhale and lower your hips slowly under control until they are just above the floor, keeping tension in the working glute rather than resting between reps.
- Complete all reps on one side, then reset your position, switch legs, and perform the same number of reps with the other foot on the chair.
Tips & Tricks
- If your lower back arches to reach the top, you have gone past your true hip extension range. Stop where the lift comes from the glute, even if that is slightly lower than a full straight line.
- Watch for the lifted leg sinking toward the floor. When it drops, your pelvis rotates and the working glute loses leverage, so imagine that leg being held up by someone the entire set.
- If the chair slides across the floor when you press down, brace it against a wall or use a chair on a non-slip surface before continuing.
- A common mistake is pushing through the toes instead of the heel, which shifts effort toward the quads and can cause cramping at the front of the thigh. Keep the heel planted and drive through it.
- If your hamstrings cramp, your hips may be too close to the chair or you may be pulling the heel toward you. Slide slightly further away and focus on pushing the seat down rather than dragging it.
- Keep your neck relaxed and your head resting on the floor. Lifting the head to watch yourself tends to break the braced ribcage position you need.
- Do not let the knee on the chair cave inward. Track it over the middle of the foot so the glute, not the inner thigh, controls the movement.
- Make the lowering phase last at least two seconds. Most people rush the eccentric part, which is where much of the strength benefit of the elevated position comes from.
- If one side is clearly weaker, start your sets with that side and match the reps with the stronger side rather than doing extra reps on the strong leg.
Frequently Asked Questions
What muscles does the Glute Bridge Single Leg With Chair work?
The glutes of the working leg do most of the lifting, with the hamstrings assisting hip extension. Your core and lower back muscles hold the pelvis and ribcage steady, and the hip muscles on the lifted side work to keep that leg up and level.
Why put one foot on a chair instead of doing the bridge flat on the floor?
Elevating the foot lets the hip extend through a larger range and increases the stretch on the glutes and hamstrings at the bottom. It also shifts some work away from the quads, which tend to dominate when both feet are flat on the floor.
Is the Glute Bridge Single Leg With Chair suitable for beginners?
Yes, as long as you can perform a controlled two-legged glute bridge first. Beginners can lower the foot height, for example using a low step or ottoman, to make the range of motion more manageable before using a full-height chair.
What should my non-working leg do during the exercise?
Keep it completely off the floor for the whole set, either bent toward your chest or held straight. If you plant it down for help, the exercise becomes a two-leg bridge and the single-leg benefit disappears.
How far should the chair be from my hips?
Sit far enough away that your shin is roughly vertical with your heel on the seat. Too close favors the hamstrings and can cause cramping; too far makes it hard to keep the heel planted as you lift.
Why do I feel this more in my lower back than my glutes?
That usually means you are arching your spine to get higher instead of extending at the hip. Brace your abs, tuck your pelvis slightly before lifting, and only rise as high as you can while squeezing the glute of the working leg.
Can I substitute the chair with other equipment?
Yes. A stable bench, low step, or ottoman at a similar height works the same way. Avoid anything wobbly or on wheels, since the chair needs to stay firmly in place while you press through the heel.
How many reps and sets should I do?
Two to three sets of 8 to 12 controlled reps per leg is a solid starting point. Slow the lowering phase or add a pause at the top before increasing the total volume.
Is it safe for my knees to press through one heel on a chair?
For most people yes, as long as the knee stays aligned over the foot and does not cave inward or drift far past the toes. If you feel pinching or pain in the knee rather than muscular effort, reduce the range of motion or lower the foot height.