Standing Pelvic Tilt Against Wall
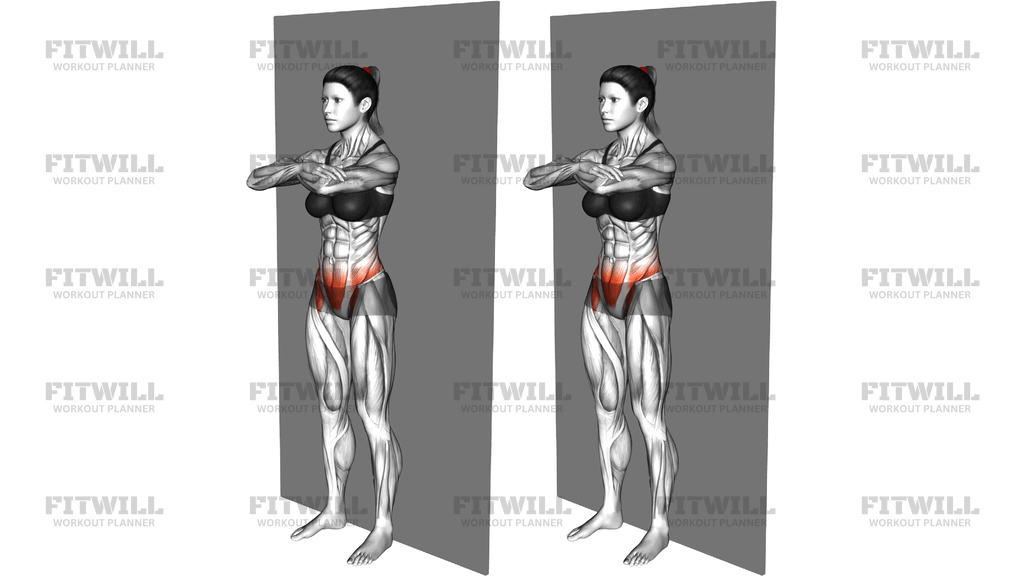
Standing Pelvic Tilt Against Wall is a simple but precise core control drill performed with your back flat against a wall, feet stepped slightly forward, and arms crossed over your chest. From this position you repeatedly flatten your lower back into the wall by tilting your pelvis backward, then release partway to the small natural arch, moving only at the pelvis while your upper back and shoulders stay in contact with the wall. The wall acts as a feedback tool: it instantly tells you whether your pelvis is actually moving or whether you are just arching and rounding your upper body instead.
This exercise primarily trains the lower abdominals and deep core muscles, with the glutes assisting on the posterior tilt. Because the movement isolates the pelvis, it also teaches you to separate pelvic motion from lumbar and hip motion, which is a skill many people lose from long sitting or from training with a stiff, locked rib cage. The highlighted work area sits in the lower belly and front of the hips, which is exactly where control tends to be weakest.
It is especially useful for people learning to brace properly before squatting or deadlifting, postpartum clients rebuilding connection with their deep core, and anyone with a pronounced anterior pelvic tilt who wants to practice the opposite position in a supported, low-load setting. Physical therapists and coaches frequently use wall-based pelvic tilts as a first step before progressing to dead bugs, bird dogs, or loaded carries.
The setup matters more than the range. Feet a few inches from the wall, knees soft but not bent deeply, upper back and shoulders resting against the surface, arms folded so they cannot sneak in and push. If your feet are too close to the wall your lower back will already be flattened and the tilt has nowhere to go; too far away and you lose the contact that makes the drill honest.
Execution should feel small and deliberate. Exhale as you draw the front of your pelvis up and press the gap behind your lower back toward the wall, hold briefly, then let the pelvis return only to a neutral spine, not into a big arch. There is no speed benefit here, and no need to force the wall contact with a hard squeeze; the goal is smooth, repeatable control. If you feel cramping in the front of the hips, shorten the range and keep the return shallow.
Because it is bodyweight only and done standing, this drill fits easily into warm-ups, desk-break routines, or rehab-style sessions. Expect to feel a working sensation in the lower abdomen rather than a burn, and treat quality of contact with the wall as the measure of a good set.
[ Workout Log & Planner ]
Put your next workout in Fitwill
Keep your plan and training log ready when you are.


Instructions
- Stand with your upper back, shoulders, and hips against a flat wall and step both feet forward 4 to 6 inches so your heels are not touching the wall.
- Cross your arms over your chest, resting each hand on the opposite forearm or shoulder, and keep your head level with your gaze forward.
- Soften your knees slightly and find a neutral pelvis, allowing a small natural gap between your lower back and the wall.
- Inhale gently, then exhale slowly as you tilt the top of your pelvis backward, pressing your lower back flat toward the wall.
- Hold the flattened position for two to three seconds, feeling the lower abdominals work while your shoulders and head stay in contact with the wall.
- Inhale as you release the tilt only until your lower back returns to its small neutral arch, stopping before you push your belly forward.
- Keep your rib cage from flaring and avoid rounding your upper back; all of the motion should come from the pelvis.
- Complete 8 to 12 slow repetitions, then step away from the wall and reset your stance if you lose contact or feel hip cramping.
Tips & Tricks
- The most common mistake is substituting upper-body motion: if your shoulders round off the wall as you tilt, reduce the range until only the pelvis moves.
- Do not bend your knees deeply to force lumbar contact; that turns the drill into a partial squat and removes the abdominal challenge.
- If the front of your hips cramps on the release, you are letting the pelvis tip too far forward; stop at neutral rather than arching into a big anterior tilt.
- Think of the cue 'zip up and flatten' rather than 'suck in'; forceful breath-holding bracing defeats the smooth control this drill builds.
- Keep your feet parallel and hip-width; a wide or staggered stance lets your pelvis rotate sideways instead of tilting cleanly.
- Press the back of your head lightly toward the wall without lifting your chin so your neck stays relaxed and neutral.
- Breathe continuously through each rep; if you have to hold your breath to flatten your lower back, the movement is being powered by bracing instead of the lower abs.
- Once 12 controlled reps feel easy, progress by slowing the return phase or moving to floor-based pelvic tilts and dead bugs.
Frequently Asked Questions
Which muscles does Standing Pelvic Tilt Against Wall work?
It mainly targets the lower abdominals and deep core stabilizers, with the glutes assisting on the backward tilt and the hip flexors active as you return to neutral. The wall contact also lightly engages the postural muscles of the upper back.
Why do my feet need to be stepped forward from the wall?
With your heels at the wall, your lower back is already flattened and the pelvis has little room to tilt. Stepping the feet forward gives the pelvis a working range in both directions.
Is Standing Pelvic Tilt Against Wall suitable for beginners?
Yes, it is one of the best starting points for learning pelvic control because the wall gives instant feedback on whether you are moving correctly. Beginners should use a small range and focus on keeping the shoulders glued to the wall.
How far should I tilt my pelvis during each rep?
Only far enough to press the small gap behind your lower back toward the wall, then release back to neutral. A range of a few centimeters is normal; bigger motion usually means your upper back or knees are compensating.
Can Standing Pelvic Tilt Against Wall help with an anterior pelvic tilt?
It is commonly used to practice the posterior tilt position in a supported stance, which helps you recognize and control an exaggerated forward-tilted pelvis. Consistent practice pairs well with hip flexor stretching and glute strengthening.
Should I feel this in my lower back?
You should feel working effort in the lower abdomen, not strain in the back. If your lower back aches or pinches, you are likely pushing too far into the arch on the release, so stop the return at neutral.
What can I use if I do not have a clear wall space?
A sturdy closed door or any flat vertical surface works the same way. Without a wall, you can do pelvic tilts lying on your back on an exercise mat, though you lose the standing posture the wall version trains.
How many reps and sets should I do?
One to three sets of 8 to 12 slow repetitions is plenty, since the value comes from control rather than volume. Use it as a warm-up before lower body training or as a standalone core activation drill.
Is it safe to do this exercise every day?
For most people yes, because the load is low and the range is small. If you are recovering from a back injury or recently postpartum, check with a qualified professional to confirm the movement fits your situation.