Bridge Yoga Pose Setu Bandha Sarvangasana
Bridge Yoga Pose, known in Sanskrit as Setu Bandha Sarvangasana, is a supine backbend in which you lift your hips toward the ceiling while your shoulders, head, and feet stay grounded. The name translates roughly to bridge-building for the whole body, and that is exactly what the shape looks like: a span of lifted hips and open chest connecting the upper back and shoulders on one side to the feet on the other. It sits at the intersection of yoga and restorative exercise, so it works both as an active strength hold and as a gentle stretch.
This pose is useful for nearly everyone. Desk workers with tight hip flexors and rounded upper backs get a controlled opening through the front of the hips and chest. People building posterior chain strength use it to wake up the glutes and hamstrings, which often sit dormant after long hours of sitting. Because the head and neck stay supported on the floor and the range is self-selected, it is one of the safest backbends to learn early on, making it a staple in beginner yoga sequences and warm-ups alike.
The main work comes from the glutes and hamstrings driving the hips upward, with the erector spinae and deep core stabilizing the spine as it arches. The adductors on the inner thighs help hold the knees from drifting outward, and the chest and shoulders receive a stretch as the torso lifts. Held statically, the pose builds isometric endurance; moved in and out of rhythmically, it becomes a controlled hip extension drill.
Setup matters more than most people expect. The feet should be planted about hip-width apart and close enough to the hips that your fingertips can graze your heels. If the feet wander too far forward, the hamstrings take over and the lift flattens; too close, and the knees cram and the lower back compresses. Keeping the knees stacked over the ankles throughout protects the joints and keeps the workload on the glutes.
To perform it well, press the feet firmly, engage the glutes before the hips leave the floor, and think of lifting the chest toward the chin rather than shoving the hips as high as possible. The thighs should stay roughly parallel, and the arms press lightly into the floor alongside the body. A common fault is flaring the knees or tucking the chin aggressively; both create unnecessary strain and signal that the hips are doing less work than they should.
In practice, this pose appears at the end of yoga flows, in warm-ups before squats and deadlifts, and in recovery sessions after heavy lower body training. Most people hold it for 20 to 60 seconds for two to four rounds. Come down slowly, vertebra by vertebra, rather than dropping the hips, and rest between holds with the knees knocked together or the feet wide to let the lower back settle.
[ Workout Log & Planner ]
Put your next workout in Fitwill
Keep your plan and training log ready when you are.


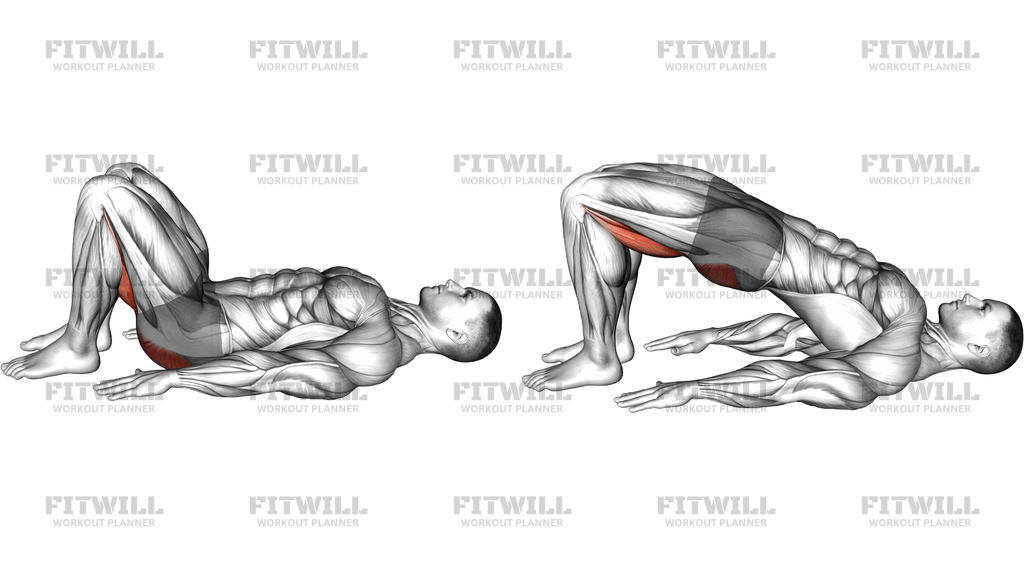
Instructions
- Lie on your back on an exercise mat with your knees bent and feet flat on the floor, about hip-width apart, toes pointing straight forward.
- Walk your heels back toward your hips until your fingertips can just touch the backs of your heels; keep your arms alongside your body, palms facing down.
- Let your head and shoulders rest heavy on the floor and relax your neck before you move.
- Exhale, press your feet into the floor, and squeeze your glutes to peel your hips and lower back off the mat.
- Continue lifting until your thighs are roughly parallel to the floor and your knees stay stacked directly over your ankles.
- Roll your shoulders slightly under you, press your arms lightly into the mat, and lift your chest gently toward your chin without forcing the neck to turn.
- Breathe steadily through the hold, keeping the glutes engaged and the knees from drifting outward or inward.
- To come down, exhale and lower your spine back to the mat one segment at a time, finishing with the hips.
- Rest briefly with your knees together or your feet wide, then repeat for your planned number of holds.
Tips & Tricks
- If your knees splay outward as you lift, place a block or a squeezed towel between your thighs to remind the inner thighs and glutes to share the work.
- Feet too far from the hips turn this into a hamstring-only lift and flatten the backbend; too close and the knees jam. Adjust until the shins are close to vertical at the top.
- Do not yank the shoulders back forcefully to lift higher — a gentle roll under the shoulder blades is enough, and the neck should never bear weight or twist.
- Overarching at the top usually means the glutes have let go and the lower back is compensating. Re-squeeze the glutes and lower slightly until you feel them working again.
- If your heels slide during the lift, press through the heels deliberately rather than the toes, or practice barefoot on a mat for better grip.
- Warm up stiff hips with a few slow pelvic tilts before attempting the full lift, especially first thing in the morning.
- Keep the chin slightly away from the chest and the jaw relaxed; compressing the throat changes breathing and adds neck tension.
- Come down slowly instead of collapsing — the eccentric lowering itself trains control through the hips and spine.
- If a hold fatigues your hamstrings quickly, shorten the hold time and increase the number of rounds rather than forcing longer isometric work.
Frequently Asked Questions
Which muscles does the Bridge Yoga Pose work the most?
The glutes and hamstrings do the primary lifting work, while the lower back stabilizers and deep core hold the spine in the arched position. The inner thighs also contribute by keeping the knees from flaring.
Is the Bridge Yoga Pose good for beginners?
Yes, it is one of the most approachable backbends because the head and neck stay supported on the floor and you control the height of the lift. Beginners should start with 15 to 20 second holds and focus on driving through the heels.
How far should my feet be from my hips in Setu Bandha Sarvangasana?
Close enough that your fingertips can just graze your heels, with the shins close to vertical at the top of the lift. This distance keeps the knees over the ankles and puts the work on the glutes instead of straining the knees or lower back.
Why do my knees drift apart during the pose?
Weak or sleepy glute medius muscles and tight outer hips usually cause knee flare. Squeeze a block or towel between your thighs for a few sessions to retrain the legs to track straight ahead.
Can I hold the Bridge Yoga Pose for a long time?
Most people do well with 20 to 60 second holds for two to four rounds, resting between sets. If your hamstrings cramp, the hold is too long or the feet are planted too far away from the hips.
What can I substitute if the pose bothers my neck or lower back?
A smaller lift — raising the hips only a few inches while keeping the ribs down — keeps most of the glute work with less spinal extension. A standard glute bridge, which does not include the chest lift and shoulder roll, is another option.
How is the Bridge Yoga Pose different from a weighted glute bridge?
The yoga version is a bodyweight hold with a longer backbend and chest opening component, while a weighted glute bridge is a strength repetition drill focused almost entirely on hip extension. They train overlapping muscles but with different intent.
Should I breathe a specific way during this pose?
Inhale as you prepare or lift, then breathe slowly and evenly through the hold, deep into the belly and ribs. If you find yourself holding your breath at the top, lower slightly until breathing is comfortable again.
Is it safe to turn my head while holding the bridge?
No, keep the head neutral and facing the ceiling for the entire hold. Turning or lifting the neck while the shoulders are rolled under shifts load onto the cervical spine for no added benefit.