Single Leg Bridge Pose
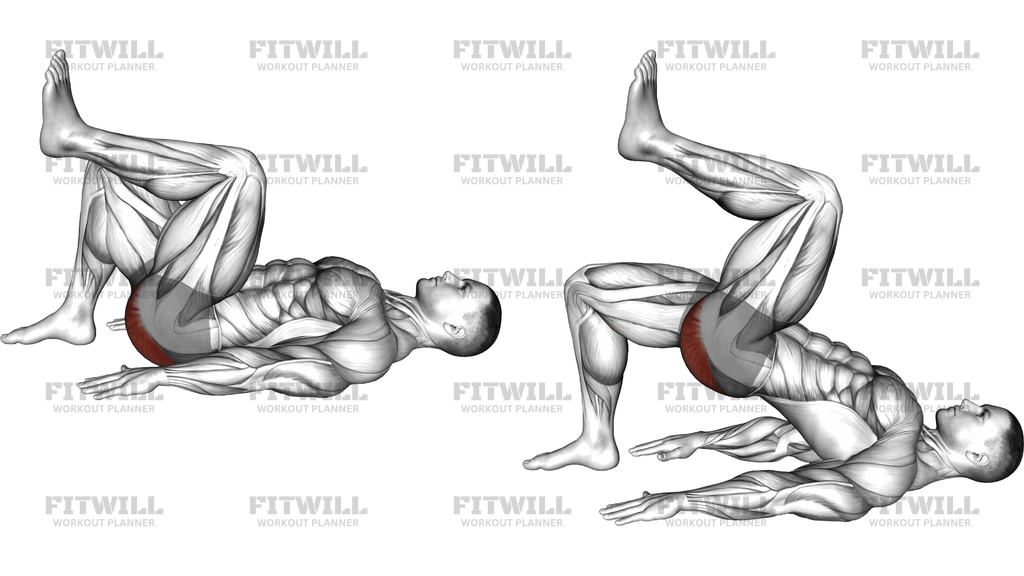
The Single Leg Bridge Pose is a bodyweight hip extension exercise performed lying on your back with one foot planted on the floor and the opposite leg held with the knee bent, lifted away from the ground. From that position, you drive through the planted heel to lift your hips until your body forms a straight line from shoulders to knee, then lower back down with control. Because one limb is removed from the equation, the working side has to handle your full bodyweight on its own, which makes this a noticeably harder progression than the standard two-legged glute bridge.
This movement earns its place in almost any program. It trains the gluteus maximus as the main driver, with the hamstrings assisting on the hip drive and the gluteus medius working hard to keep your pelvis level while balancing on one leg. Your core and lower back stabilize the trunk the entire time, which is exactly why coaches use single leg bridges for runners, cyclists, and anyone rehabbing or bulletproofing hips and knees. When one side of your body is noticeably weaker or less coordinated than the other, this exercise exposes it quickly and gives you a low-load way to fix it.
Setup matters more here than in most floor exercises. The distance of your planted heel from your hips determines how the work is shared: too far away and the hamstrings and lower back take over, too close and the knees flare forward while the glutes get shortchanged. The lifted leg should stay bent with the knee roughly over the hip, held still throughout the set rather than swinging, because any momentum from that leg leaks tension away from the working glute.
Execution is straightforward but easy to rush. Brace your abs lightly, exhale, and push the floor away through your heel until your hips reach full extension, squeezing the glute hard at the top for a beat. Your ribs should stay down and your lower back should not arch past neutral at the top. A common tell is a pelvis that dips toward the floor on the unsupported side, which means the glute on the planted leg is not holding the hips square.
Because it requires nothing but floor space, the Single Leg Bridge Pose slots into warm-ups, glute-focused lower body days, home workouts, and desk-worker mobility routines alike. Start with two to three sets of eight to twelve controlled reps per side. If your hips cramp or you feel the work in your lower back instead of your backside, drop back to two-legged bridges until the pattern is solid.
[ Workout Log & Planner ]
Put your next workout in Fitwill
Keep your plan and training log ready when you are.


Instructions
- Lie on your back on an exercise mat with your arms relaxed at your sides and palms facing down.
- Bend both knees, then plant one foot flat on the floor with the heel about a foot from your glutes and the knee pointing straight up.
- Lift the other leg off the floor and bend the knee so it sits over your hip, holding this leg steady for the whole set.
- Brace your abs lightly and tuck your pelvis slightly so your lower back rests flat against the floor before you move.
- Exhale and drive through the planted heel, pushing the floor away to lift your hips toward the ceiling.
- Stop when your body forms a straight line from the shoulder of your down side through the hip to the planted knee, and squeeze the working glute hard at the top.
- Pause for one to two seconds at the top without arching your lower back or letting the unsupported hip sag.
- Inhale and lower your hips back to the floor under control, touching down lightly rather than dropping.
- Complete all reps on one side, then reset both feet on the floor briefly before switching to the other leg.
- Keep your arms pressing gently into the floor for balance, but avoid pushing off them to hoist your hips upward.
Tips & Tricks
- If your hamstrings cramp, slide the planted heel slightly closer to your glutes; the hamstrings take over when the foot sits too far away.
- Watch the unsupported hip in a mirror or place a hand on it: if it sinks toward the floor at the top, the gluteus medius on your planted side needs more squeeze, so lift a little less high and hold square instead.
- Do not let the lifted leg swing or straighten mid-set. Pin the knee over the hip so it acts as dead weight, not a counterbalance.
- Ribs down, always. If your lower back arches at the top of the bridge, you are hyperextending the spine instead of finishing with the glute, which is a common culprit behind lower back soreness after this drill.
- Keep the pressure on the planted heel, not the toes. Pushing through the ball of the foot shifts work toward the quads and reduces hip extension drive.
- Slow the lowering phase to two or three seconds. The eccentric is where most people gain strength in this pattern, and rushing it turns the set into bouncing.
- If you cannot keep the pelvis level at all, regress to a two-legged bridge or shorten the range until your hips stop tilting, then rebuild the range gradually.
- Warm the hips up first with a few standard bridges. Going straight into the single leg version cold often produces that surprise hamstring or glute cramp on the first rep.
- Point the toes of the planted foot straight ahead or very slightly out. A sharply turned-out foot rolls the knee inward and tilts the pelvis off-axis.
Frequently Asked Questions
What muscles does the Single Leg Bridge Pose work?
The gluteus maximus on the planted-leg side is the primary mover, supported by the hamstrings during the hip drive. The gluteus medius, core, and lower back stabilize the pelvis and trunk throughout the hold.
Why do my hamstrings cramp during the Single Leg Bridge Pose?
This usually means your planted heel is too far from your hips, so the hamstrings dominate the lift. Slide the heel closer to your glutes and focus on squeezing the glute to finish each rep.
Is the Single Leg Bridge Pose good for beginners?
Yes, as long as you can hold your pelvis level. Beginners should master the two-legged glute bridge first, then use a shorter range of motion on the single leg version before building to full-height reps.
How is the Single Leg Bridge Pose different from a regular glute bridge?
Removing one leg doubles the load on the working side and adds a balance and anti-tilt demand for the gluteus medius and core. It is a strength and stability progression, not just a harder version of the same shape.
Should my lifted leg stay bent or straight during the Single Leg Bridge Pose?
Keep the knee bent with the thigh roughly over your hip, as this position keeps the leg still and prevents it from swinging. A straight lifted leg lengthens the lever and makes the pelvis much harder to hold level.
How many reps and sets should I do of the Single Leg Bridge Pose?
Two to three sets of eight to twelve controlled reps per side works well for strength and stability. Prioritize level hips and a solid glute squeeze over squeezing out extra repetitions.
Why does one side feel weaker than the other when I do the Single Leg Bridge Pose?
Most people have a natural side-to-side difference in glute strength, and this exercise makes it obvious because each leg works alone. Train both sides with equal volume, and let the weaker side set the rep count for the stronger one.
Can I do the Single Leg Bridge Pose if I feel it in my lower back?
Stop at a lower hip height and re-brace your abs so your ribs stay down, since arching past neutral at the top shifts work to the lumbar spine. If the feeling persists, return to two-legged bridges and rebuild the pattern.
What can I use instead of the Single Leg Bridge Pose?
A two-legged glute bridge is the easiest regression, while a hip thrust with a barbell or a banded lateral walk pairing are common progressions or alternatives. Runner or stability-focused lifters can also substitute a single leg hip thrust off a bench.
Do I need any equipment for the Single Leg Bridge Pose?
No equipment is required beyond a floor, though an exercise mat makes lying on your back more comfortable. Your bodyweight and one planted heel provide all the resistance.